The molecular reality of your bathroom floor
Most guys skip the leveling compound. They think the underlayment will hide the dip. It won’t. I spent three days grinding concrete on a job last month just so the floor wouldn’t click like a castanet. When I finally got the tile down, the homeowner asked if they needed to seal the grout. I told them the same thing I tell everyone. Grout is essentially a rigid sponge made of sand and cement. If you do not seal it, you are just waiting for a disaster. People spend thousands on showers and tile only to let the smallest component fail. I have seen baseboards rot from the inside out because water wicked through the grout lines and sat behind the wood. It is a slow, invisible rot that smells like damp earth and regret. To prevent this, you need to understand the physics of your installation. You need to know if your grout is protecting your subfloor or funneling water directly into it.
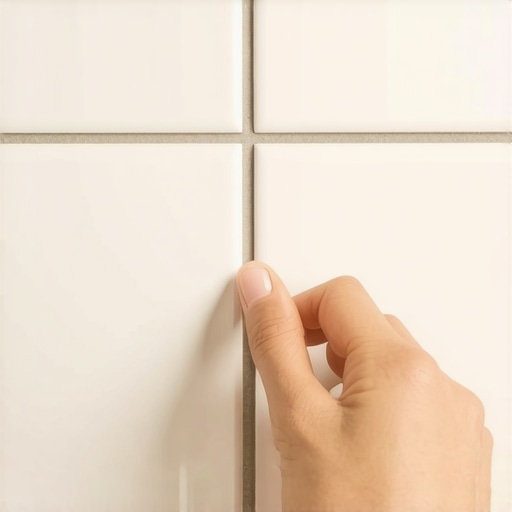
The finger test reveals the truth
The finger test for grout porosity involves applying a single drop of water to a grout joint and observing the absorption rate. If the water beads on the surface, the sealer is intact. If the grout darkens or the water vanishes, the grout is porous and requires immediate resealing. This simple diagnostic tool prevents long-term moisture damage in high-moisture areas like showers and kitchens. It is the most reliable way to check the integrity of your moisture barrier without expensive equipment. You are looking for the hydrophobic response of a healthy sealer. When that sealer wears thin, the microscopic tunnels in the cement open up. It will buckle if you ignore it. It will mold if you forget it. The finger test is your first line of defense against a total floor failure.
“A floor is only as good as the subfloor beneath it; deflection is the enemy of every joint.” – Master Flooring Axiom
The chemistry of grout absorption
When we talk about grout, we are talking about a cementitious matrix. This is a fancy way of saying it is a collection of sand and Portland cement held together by a chemical reaction called hydration. During the curing process, the water in the mix evaporates. This evaporation leaves behind a network of microscopic pores and capillaries. These tiny tunnels are exactly why grout is naturally thirsty. If you have ever seen a tile floor that looks patchy and dark in certain spots, you are looking at capillary action in real time. The grout is literally sucking up liquid. In showers, this liquid is a cocktail of soap scum, body oils, and hard water minerals. Once those contaminants get inside the grout, they are nearly impossible to remove without a professional tile cleaning strategy. The finger test works because it simulates this capillary suction. If the water drop stays as a bead, the sealer has successfully plugged those tunnels. If it disappears, the tunnels are open for business.
Why your subfloor is lying to you
A subfloor might look flat to the naked eye, but a 10 foot straightedge usually reveals a different story. When grout becomes porous, it allows water to seep through the joints and reach the thin-set mortar below. If the mortar was applied over a subfloor that has even a minor dip, that water will pool. It won’t evaporate. It will sit there, slowly weakening the bond between the tile and the substrate. Eventually, you will hear a hollow sound when you walk across the floor. That is the sound of a failure. I have walked into jobs where the baseboards were perfectly painted, but when I pried them back, the drywall behind them was black with mold because the grout in the shower pan had failed months ago. You can find more about chic baseboard designs, but remember that no design can hide the smell of a rotting subfloor. The finger test is how you ensure your subfloor stays dry and your showers stay structural.
The ghost in the expansion gap
Every floor needs room to breathe. The National Wood Flooring Association and the Tile Council of North America both hammer on this point. In a tile installation, we leave an expansion gap at the perimeter, usually hidden under the baseboards. However, if the grout is porous, water can travel horizontally through the grout bed and reach these perimeter gaps. Once water hits the raw edge of a plywood subfloor or the bottom of a wooden baseboard, the damage accelerates. The wood swells. The baseboards warp. You might think your 1/8 inch gap is a small detail, but it is often the place where a floor starts to die. If you are planning a baseboards makeover, you must check your grout first. If the grout is absorbing water, your new boards will be ruined within a year. It is a chain reaction of moisture migration that starts with a single unsealed joint.
Comparing grout types and porosity
| Grout Type | Natural Porosity | Sealing Requirement | Ideal Location |
|---|---|---|---|
| Sanded Cement | High | Every 6-12 Months | Large Floor Joints |
| Unsanded Cement | High | Every 6-12 Months | Wall Tile, Thin Joints |
| High-Performance Cement | Medium | Optional but Recommended | General Flooring |
| Epoxy Grout | Zero | Never | Showers, Commercial Kitchens |
As the table shows, the type of grout you choose determines your maintenance schedule. Epoxy grout is the king of the job site because it is non-porous by nature. It is a chemical bond that does not have the microscopic tunnels of Portland cement. But most homeowners have standard cement grout. That is why the finger test is a mandatory part of your home maintenance routine. If you find your grout is failing the test, you might need to look into grout restoration secrets to bring it back to life. Do not just slap more sealer on top of dirt. You have to clean it first, or you are just sealing in the stains.
The 1/8 inch that ruins everything
Precision is not a suggestion in flooring. It is the law. When a grout joint is too wide for the type of grout used, it cracks. When it is too narrow, it cannot properly fill the void. These structural flaws make the grout even more porous. A crack is basically a highway for water. In showers, a hairline crack in the corner can lead to a thousand dollar repair bill. I always tell people to look at their showers with a critical eye. If you see a crack, the finger test is irrelevant; the floor has already failed. You need to fix the crack before you worry about the sealer. Modern showers that wow are not just about the aesthetics of the stone. They are about the integrity of the waterproofing system beneath the surface. If you see signs of moisture, you might need to learn how to refresh grout without replacing it to save the installation.
Step by step guide to the finger test
- Clean a small area of the grout with a pH-neutral cleaner and let it dry for 24 hours.
- Dip your finger into a glass of distilled water.
- Press your wet finger firmly against the grout line for five seconds.
- Lift your finger and observe the color of the grout immediately.
- Wait sixty seconds and check if the water has vanished into the surface.
- If the spot remains dark after a minute, your sealer has failed.
The reason we use distilled water is to avoid leaving mineral deposits behind during the test. If the grout fails, you are seeing a lack of surface tension. A good sealer creates a high contact angle for water droplets. When the sealer is gone, the contact angle collapses and the water spreads out, seeking a way into the pores. This is the same reason why cheap tile jobs fail in a few years while professional ones last a lifetime. One person cared about the chemistry, and the other just wanted to get paid. I have spent my life fixing the mistakes of the latter.
“Cementitious grout is a hydraulic material; it lives and dies by its relationship with water.” – Tile Professional Handbook
The regional climate factor
If you live in a high-humidity environment like Houston or Miami, your grout is under constant attack from ambient moisture. In these regions, a porous grout line will never fully dry out. This leads to the growth of pink mold and black mildew within the grout matrix itself. It is not just on the surface; it is inside. Conversely, in a dry climate like Phoenix, the grout can become brittle if it is not sealed. The sealer helps retain a tiny amount of internal moisture that keeps the cement from becoming chalky. Whether you are installing eco-friendly tile solutions or traditional marble, the climate dictates your sealer choice. Never buy a generic sealer from a big-box store. Go to a dedicated flooring supply house and buy the professional grade penetrating solvent-based sealers. They smell like a chemical factory, but they actually work. They dive deep into the pores and stay there.
The bottom line on floor health
Flooring is a structural engineering challenge disguised as a finish trade. Your grout is the seal on the envelope of your room. If that seal is broken, the structural components are at risk. The finger test is a simple, no-cost way to audit your home. It takes five minutes. If you find a problem, fix it. Do not wait for the tile to start clicking. Do not wait for the baseboards to swell. A little maintenance now prevents a full tear-out later. I have seen too many beautiful showers with a style fall apart because the homeowner didn’t spend ten dollars on a bottle of sealer. Treat your floor with the respect a performance surface deserves, and it will last as long as the house stands.