The structural truth about repairing cracked porcelain bathtubs at home
Most homeowners treat a bathtub crack as a cosmetic nuisance. They are wrong. I spent three days grinding concrete on a job last month just so the floor would not click like a castanet because moisture from a leaking tub had migrated through the subfloor and rotted out the joist seats. A crack in a porcelain tub is a breach in your bathroom’s structural armor. When you see a hairline fracture in a cast iron or steel tub coated in porcelain, you are looking at a potential flood event. Porcelain is a glass-like substance fused to a metal substrate at temperatures exceeding 1500 degrees Fahrenheit. It does not just ‘bend’ under pressure. It shatters. If your tub is flexing because the mortar bed beneath it has crumbled, no amount of retail-grade filler will save it. You have to address the physics of the load before you touch the chemistry of the repair. I have seen fifteen thousand dollar wide-plank walnut floors cupping because a second-floor tub had a pinhole leak that went ignored for six months. We are going to fix this the right way, with industrial-grade epoxies and the same precision I use when leveling a five-hundred-square-foot slab for large-format tile installations.
“A surface is only as good as the subfloor beneath it; deflection is the enemy of every joint.” – Master Flooring Axiom
The physics of porcelain failure and moisture migration
Porcelain bathtub cracks occur when the structural substrate fails to support the tensile load of water and human weight. These fractures allow capillary action to pull moisture into the cast iron or steel shell, causing oxidation and delamination of the protective enamel layer over time. Understanding this process is vital because a simple surface patch will fail if the underlying metal is actively rusting or if the fiberglass reinforcement has lost its rigidity. When I walk onto a job site, I do not just look at the crack. I look at the baseboards around the tub to see if they are swelling. I check the grout lines in the surrounding floor. If that tub moves even a fraction of an inch when you step in it, the repair will pop out like a bad tooth. You are dealing with a rigid material on a potentially non-rigid base. That is a recipe for disaster. We must ensure the tub is stable before we begin the chemical bonding process. If the tub is fiberglass or acrylic with a porcelain finish, the flex is even more pronounced. You might need to inject high-density structural foam beneath the basin to stop the movement before you apply your resins. This is the difference between a fix that lasts ten years and one that lasts ten days.
The chemistry of two part epoxy resins
Two-part epoxy resins create a covalent bond with the porcelain surface by utilizing a polymerization process that turns liquid monomers into a solid thermosetting plastic. This chemical reaction is sensitive to ambient temperature and relative humidity, requiring a clean, decontaminated surface for maximum interfacial adhesion. I do not use the stuff you find in a squeeze tube at the grocery store. I use high-viscosity, marine-grade resins. These are designed to withstand the thermal expansion that happens when you flip the faucet from cold to hot. Metals expand. Glass-coatings like porcelain do not expand at the same rate. This is called the coefficient of thermal expansion. If your patch is too brittle, the first hot shower you take will shear the bond. If it is too soft, it will stain and wear down. You need a filler that mimics the hardness of the original material while maintaining enough elasticity to survive the movement of the house. We are talking about molecular-level engineering here. You have to clean the area with acetone, not just soap and water. You need to strip away every molecule of body oil, soap scum, and hard water deposits. If you skip the prep, you are just painting over a problem.
| Material Type | Repair Compound | Cure Time | Durability Rating |
|---|---|---|---|
| Cast Iron Porcelain | High-Density Epoxy | 24 Hours | Maximum |
| Steel Enamel | Polymer Resin filler | 12 Hours | High |
| Acrylic / Fiberglass | Reinforced Fibers | 8 Hours | Moderate |
The ghost in the expansion gap
Expansion gaps around the perimeter of the bathtub must remain flexible to prevent stress fractures in the porcelain finish. Using a high-modulus silicone rather than rigid grout at the tub-to-floor transition ensures that the structural shifting of the home does not transmit mechanical force directly into the tub walls. I see this all the time. People run their floor tile right up against the tub and jam it full of grout. Then the house settles, the floor pushes against the tub, and the porcelain chips. You need a soft joint. This is especially true in modern showers where the tub is integrated into a larger wet room design. The movement of the joists under the weight of a full tub (which can be over 500 pounds) is significant. If you do not account for that movement, your repair will fail. I always check the baseboard designs nearby. If there is no gap for the floor to breathe, that pressure has to go somewhere. Usually, it goes into the weakest point of your bathtub. Before repairing the crack, ensure the perimeter is sealed with a high-quality 100 percent silicone sealant that allows for at least 25 percent movement. This relieves the stress on the basin and gives your epoxy patch a fighting chance to stay seated.
Why your subfloor is lying to you
Subfloor integrity is the hidden variable that determines the longevity of porcelain repairs because subsurface deflection causes the tub basin to flex and distort. A moisture meter should be used to verify that the plywood or concrete beneath the tub is dry and stable before any topical repair is attempted. If you have a crack, water has been getting through. It is a mathematical certainty. That water sits on the subfloor. If it is wood, it rots. If it is concrete, it can cause the mortar bed to break down. I have walked into small bathrooms where the floor felt solid, but the moment I pulled the tub, the subfloor was like wet cardboard. You cannot fix a bathtub if the floor it sits on is failing. This is the ‘Zooming’ logic we professionals live by. We do not just see a crack. We see the journey of every drop of water that went through it. If you suspect the subfloor is soft, you are better off pulling the tub now than waiting for it to fall through the ceiling. For a proper repair at home, you must ensure the tub is perfectly level. Use a four-foot level across the rim. If it is out of plumb, the water will pool in areas it was not designed for, putting uneven pressure on the repair site. Leveling is not just for floors. It is for everything that holds water.
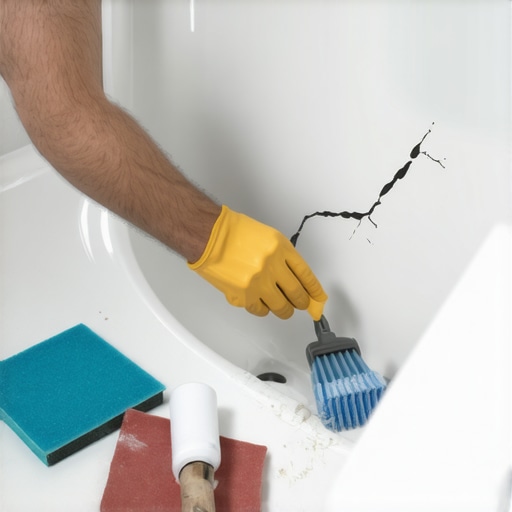
The meticulous process of mechanical abrasion
Mechanical abrasion using graded sandpaper creates a surface profile that allows the repair resin to mechanically interlock with the porcelain substrate. Starting with 80-grit to remove damaged enamel and finishing with 2000-grit wet-sanding ensures a seamless transition that is imperceptible to the touch and resistant to peeling. You cannot just smear epoxy on a smooth surface. It is like trying to glue two pieces of glass together with school glue. It will pop right off. You have to ‘rough up’ the area. I use a small rotary tool with a diamond bit to V-out the crack. I make the crack wider at the surface than it is at the bottom. This creates a ‘key’ for the epoxy to lock into. It feels wrong to make a crack bigger, but it is the only way to make the repair permanent. Once the V-groove is cut, I sand the surrounding two inches with 400-grit paper. This removes the factory glaze and gives the resin something to grab. You are looking for a matte finish. No shine. If it is still shiny, the resin will not stick. After the repair is cured, we go back the other way. We sand it with 600, then 1000, then 2000. Finally, we use a polishing compound. This is where the magic happens. If you do it right, you will not be able to find the crack again. It takes patience. Most people spend five minutes sanding. I spend an hour.
- Inspect the crack for rust or structural movement
- Stabilize the tub basin using structural foam if necessary
- Clean the site with 100 percent pure acetone
- Grind a V-shaped groove into the crack with a diamond bit
- Apply a high-viscosity two-part epoxy filler
- Level the filler with a plastic spreader to minimize sanding
- Cure for the full manufacturer-recommended duration
- Wet-sand starting at 600 grit and moving to 2000 grit
- Buff with a porcelain polishing compound
- Seal the surrounding area with fresh grout restoration or silicone
The 1/8 inch that ruins everything
Precision measurement of the crack depth and filler thickness is the deciding factor in repair success because excessive material leads to brittleness and premature cracking. Maintaining a uniform thickness of no more than one-eighth of an inch per layer of epoxy prevents internal stress during the exothermic curing process. When epoxy cures, it gets hot. It is a chemical reaction. If you gloop it on too thick, the heat can actually cause the resin to pull away from the edges or create bubbles. I build it up in thin layers. It is a slow process, but it ensures the bond is solid all the way through. I also pay close attention to the color match. Porcelain is never just ‘white.’ It is bone, it is biscuit, it is linen. I mix my tints on a scrap piece of white tile first. I wait for it to dry to see the final color. If the color is off by even a fraction, the repair will stand out like a sore thumb. This level of detail is what separates a pro from a handyman. While you are at it, check your eco-friendly tile solutions nearby to make sure your cleaning chemicals are not eating away at your new repair. Harsh bleaches will ruin an epoxy patch in weeks. Use pH-neutral cleaners once the repair is complete.
“A floor is only as good as the subfloor beneath it; deflection is the enemy of every joint.” – Master Flooring Axiom
Long term maintenance and surface protection
Proper maintenance of a repaired porcelain surface requires the avoidance of abrasive cleaners and impact stress to preserve the integrity of the resin bond. Utilizing non-reactive cleaning agents and ensuring the structural stability of the bathroom floor will prevent the re-emergence of stress fractures over the life of the fixture. Once that tub is fixed, you treat it like a classic car. No scouring pads. No pumice stones. You use soft cloths and mild soap. If you dropped a heavy showerhead and caused the crack, consider a plastic or rubberized showerhead to prevent a repeat performance. Keep an eye on the grout and the silicone around the tub. If those seals fail, water gets back under the tub, the subfloor moves, and your repair will crack again. It is all connected. A house is a living, moving thing. You have to respect the physics of it. If you keep the moisture out and the structure stable, your porcelain repair will outlast the house itself. Stop looking at your tub as a bowl. Look at it as a engineered system that requires precision and care. If you do that, you will never have to replace a tub again.