
The physics of a perfect drain cut and why subfloors fail
Most guys skip the leveling compound. They think the underlayment will hide the dip. It won’t. I spent three days grinding concrete on a job last month just so the floor wouldn’t click like a castanet. That is the reality of the trade. If you do not respect the subfloor, the tile will punish you later. When you deal with a circular drain, you are fighting the laws of physics and the inherent rigidity of porcelain. You are trying to make a square, brittle product fit a round, sloping hole. It requires more than a wet saw. It requires an understanding of the drainage plane and the bond coat. A floor is a performance surface. If the slope is off by even a fraction of an inch, you get standing water, mold growth, and a grout failure that will haunt the homeowner for years. We do not do decoration here. We do engineering.
The geometry of the envelope cut
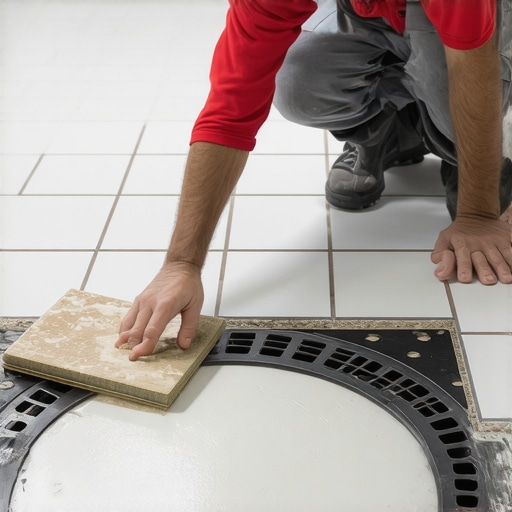
The envelope cut or four way slope requires bisecting the tiles that intersect the primary drainage planes to maintain a consistent pitch toward the circular drain. This geometric technique prevents lippage and ensures that water follows the gravitational path to the waste pipe without pooling in the corners of the shower. When you are working with larger tiles, you cannot simply bend the material to meet the drain. You have to create a series of triangular facets. Each facet must maintain a minimum slope of one quarter inch per foot as mandated by the TCNA. I have seen installers try to force a 12×24 tile to the edge of a circular drain without cuts. It never works. The tile sticks up like a jagged cliff, just waiting to slice a toe. Instead, you locate the center of the drain, mark your four diagonal lines from the corners of the shower to the center of the drain, and cut your tiles along those lines. This creates a funnel effect that is both structurally sound and hydraulically efficient.
“A floor is only as good as the subfloor beneath it; deflection is the enemy of every joint.” – Master Flooring Axiom
The chemical bond of modified thin set mortar
Modified thin set mortar uses polymer additives to increase shear strength and flexibility which is necessary for tiled surfaces subject to thermal expansion and moisture. Using the right ANSI A118.15 mortar ensures that your tiles remain bonded to the substrate even as the house shifts or the temperature fluctuates during hot showers. You have to understand the molecular level of this stuff. Portland cement alone is too brittle. The polymers act like tiny rubber bands within the cement matrix. They allow for a micro amount of movement without the bond snapping. When you are tiling around a drain, the water pressure and the constant wet-dry cycles put immense stress on that bond. If you use a cheap, unmodified mortar, you are asking for a callback. I always mix my mortar to a peanut butter consistency. If it is too runny, the tile will slump into the drain. If it is too thick, you will not get the 95 percent coverage required for wet areas. You need to back-butt every tile around the drain to ensure there are no voids where water can sit and stagnate.
[IMAGE_PLACEHOLDER_1]
Precision cutting techniques for the circular radius
Cutting a circular radius in porcelain requires a diamond hole saw or a series of tangential nipper cuts followed by a diamond sanding pad to smooth the edge. A perfectly circular cut should leave a uniform one eighth inch gap around the drain flange for a bead of high quality 100 percent silicone sealant. Most amateurs try to hide a bad cut with a thick glob of grout. Grout is not a gap filler. It is a porous material that will crack if it is too wide. I use a diamond blade on a small angle grinder to score the circle first. Then I use nibblers to remove the waste material in tiny bites. It is slow work. It smells like wet stone and burnt diamonds. But when that drain flange drops in and there is a perfect, even gap all the way around, that is when you know you are a professional. For those looking for inspiration, modern showers often utilize these exact geometric principles to create high end looks that function flawlessly.
Managing the drainage plane and moisture barriers
The drainage plane consists of the waterproof membrane and the slope of the subfloor which must direct water toward the weep holes in the drain assembly. If the weep holes are blocked by mortar or if the membrane is punctured the entire shower system will eventually fail due to hydrostatic pressure. I have seen guys dump mortar right over the weep holes. That is a crime. Those holes are there so that any water that gets under the tile can still find its way into the pipe. If you block them, the mud bed stays saturated. Eventually, it starts to smell like a swamp. You need to use crushed stone or a plastic weep hole protector to keep the path clear. The moisture barrier, whether it is a topical liquid like RedGard or a sheet membrane like Schluter-Kerdi, must be integrated perfectly with the drain flange. It is about creating a continuous, hydrophobic skin that protects the framing of the house. In the swampy humidity of the South, this is even more vital because the air itself is trying to rot your house from the inside out.
| Tile Size | Minimum Slope | Maximum Slope | Grout Width |
|---|---|---|---|
| 1×1 Mosaic | 1/4 inch per foot | 1/2 inch per foot | 1/16 inch |
| 2×2 Mosaic | 1/4 inch per foot | 3/8 inch per foot | 1/8 inch |
| 4×4 Porcelain | 1/4 inch per foot | 1/4 inch per foot | 3/16 inch |
The chemistry of grout and the prevention of efflorescence
Grout is a cementitious product that requires precise water ratios to achieve maximum density and prevent efflorescence which is the migration of salts to the surface of the joint. High performance grouts with antimicrobial properties are standard for shower floors to ensure longevity and ease of maintenance in wet environments. If you add too much water to the mix, you weaken the polymer chain. The grout will be soft and powdery. It will wash away within a year. I use a distilled water if the local tap water is too hard. It sounds crazy, but the minerals in city water can mess with the color of the grout. When you are cleaning up after grouting around a drain, you have to be careful not to wash out the joint. Use a damp sponge, not a wet one. For older installations that have lost their luster, grout restoration can sometimes save a floor, but it is better to get the chemistry right the first time. Regular maintenance is also key, and following proper tile cleaning protocols will prevent the buildup of soap scum and hard water deposits that can degrade the grout over time.
“Water is the most patient architect; it will find every mistake you made and exploit it.” – Master Flooring Axiom
The checklist for a waterproof shower floor
- Verify subfloor deflection is within L/360 limits for ceramic or L/720 for stone.
- Check the pre-slope of the shower pan before installing the liner.
- Perform a 24 hour flood test to ensure the membrane is airtight.
- Clean the drain flange of all debris and mortar before final tile set.
- Ensure the envelope cuts align with the corners of the drain assembly.
- Use 100 percent silicone at all change of plane joints and around the drain.
Transitioning from floor to wall
The transition from the shower floor to the wall requires a movement joint filled with flexible sealant rather than rigid grout to accommodate the different rates of expansion between the two surfaces. This prevents the bottom row of wall tiles from cracking or the floor tiles from tenting due to structural pressure. You cannot just jam grout into that corner. It will crack in six months. The physics of the house dictate that the walls and the floor will move independently. I always leave a small gap and fill it with a color matched silicone. This also applies where the tile meets modern baseboards outside the shower area. Every transition is a potential failure point. If you treat the floor as a single, rigid slab, you are ignoring the reality of building materials. Everything expands. Everything contracts. If you do not build for that movement, your hard work will literally tear itself apart. Precision is not just about the cuts you see; it is about the gaps you leave for the house to breathe.