I smell like thin-set and spent the morning wrestling with a laser level. Most guys skip the leveling compound. They think the underlayment will hide the dip. It won’t. I spent three days grinding concrete on a job last month just so the floor wouldn’t click like a castanet. I bring that same intensity to every shower I seal. When I see silicone peeling off a wall, I don’t see a bad product. I see a failure of process and a lack of respect for the chemistry of the bathroom. Silicone is an inorganic polymer with a backbone of alternating silicon and oxygen atoms. It is designed to be the ultimate flexible barrier, but it is not magic. It is a structural engineering component that requires a pristine environment to function. If you ignore the physics of the bond, the water will find a way in. This is about more than just a little strip of rubber pulling away. It is about the integrity of your substrate and the longevity of your home.
The microscopic failure of surface prep
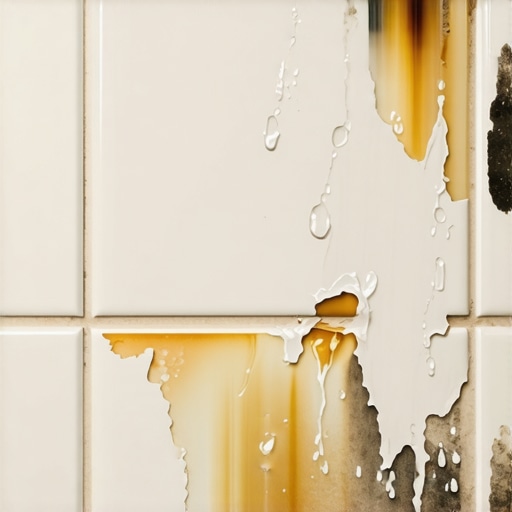
Silicone sealant peels because the bonding surface contains residual moisture, soap scum, or old silicone oils that prevent the polymer from achieving mechanical adhesion. Most failures occur because the installer did not use a solvent like denatured alcohol to strip the surface down to the raw tile glaze or stone pore. When you look at a tile surface, it looks flat. Under a microscope, it is a series of peaks and valleys. If those valleys are filled with calcium stearates from your soap, the silicone just floats on top like oil on water. This is an adhesive failure. The silicone never actually touched the tile. It touched the grime. To get a real bond, you must decontaminate the area with surgical precision. I have seen million dollar showers that wow guests but fail within six months because the installer was too lazy to wipe the joints with a clean rag and alcohol. It is the invisible film that kills the job. You can’t just spray some bathroom cleaner and call it a day. Most cleaners leave behind surfactants that are just as bad as the soap scum they supposedly removed.
“Movement joints are not optional; they are a structural necessity to manage the expansion and contraction of tile assemblies.” – TCNA Handbook Principles
The physics of polymer bonding
Silicone bonding relies on the cross-linking of polymers that occur as the sealant cures through exposure to atmospheric moisture. There are two main types of silicone, acetoxy and neutral cure. Acetoxy silicone releases acetic acid as it cures, which is that sharp vinegar smell. It is great for glass and ceramic but it can be a disaster for natural stone or metal chic baseboard designs because the acid reacts with the substrate. Neutral cure silicone is more expensive and takes longer to tack up, but it is much more forgiving and offers better adhesion to a wider variety of materials. When the silicone cures, it forms a three dimensional matrix. If the joint is too deep, the silicone can’t cure properly in the middle. This leads to a soft core that will eventually pull away. You need to use a backer rod in deep joints to ensure you only have two point adhesion. If the silicone sticks to the back of the joint and the two sides, it is called three point adhesion. This is a death sentence for the bead. As the walls move, the silicone is pulled in three directions at once and it will inevitably tear or peel. You want the silicone to act like a rubber band stretching between two points, not a rigid plug glued into a hole.
| Sealant Type | Adhesion Strength | Flexibility | Moisture Resistance |
|---|---|---|---|
| 100% Silicone | High | 25-50% | Maximum |
| Siliconized Acrylic | Medium | 10-15% | Moderate |
| Polyurethane | Very High | 20% | High |
Why your subfloor is lying to you
Structural movement in the subfloor or wall studs creates stress that exceeds the elastic limit of the sealant if the joint is not sized correctly. Many installers believe that a thin bead looks better. It does, until the house breathes. In the winter, your wooden studs shrink as the humidity drops. In the summer, they swell. This movement is transmitted directly to the tile. If your silicone bead is only 1/16 of an inch wide, it only has a tiny amount of material to stretch. If the wall moves 1/32 of an inch, that bead has to stretch 50 percent of its width. Most silicones can’t handle that repeated stress. If you use a 1/4 inch bead, that same 1/32 of an inch movement is only a 12.5 percent stretch. The wider bead survives while the thin bead peels. This is why I tell people that the baseboards makeover ideas they see on social media often fail in reality. They prioritize the look over the engineering. You have to account for the deflection of the floor and the expansion of the walls. If you are in a high humidity region like Houston or Miami, this movement is even more pronounced. The moisture in the air keeps the wood in a constant state of flux. You need a joint that can breathe.
The 1/8 inch that ruins everything
A gap smaller than 1/8 inch between the shower floor and the wall tile prevents the silicone from forming a sufficient mechanical plug to resist water pressure. When you are tiling, it is tempting to run the wall tile tight to the floor. This is a mistake. You need that 1/8 inch to 1/4 inch gap. This gap allows the silicone to penetrate deep into the joint. It creates a wedge of material that is much harder to dislodge than a surface smear. If you just smear a thin layer of silicone over a tight joint, the water will eventually get behind it through capillary action. Water is a persistent enemy. It will find a microscopic hole and then use hydrostatic pressure to push the rest of the bead off the wall. This is especially true if you are using eco-friendly tile solutions that might have different absorption rates. Every material expands at a different rate. The coefficient of thermal expansion for ceramic tile is different than that of a fiberglass shower pan. The silicone is the only thing standing between those two materials as they fight each other. If you don’t give it enough space to work, it will lose that fight every time.
- Strip every trace of the old sealant using a plastic scraper and specialized silicone remover.
- Scrub the joint with a stiff nylon brush and denatured alcohol to remove soap films.
- Use a vacuum to pull dust and debris out of the deep crevices of the grout.
- Ensure the area is bone dry for at least 24 hours before applying new sealant.
- Apply a high quality neutral cure 100% silicone for the best longevity.
- Tool the bead with a dry tool or a gloved finger to avoid introducing spit or soapy water.
- Keep the shower dry for a full 48 hours to allow the polymer cross-linking to complete.
- Check the integrity of the surrounding tile cleaning tips to ensure no harsh chemicals are used during curing.
- Verify that the grout is not crumbling or sandy before sealing.
- Maintain a consistent bead width to distribute mechanical stress evenly.
“A floor is only as good as the subfloor beneath it; deflection is the enemy of every joint.” – Master Flooring Axiom
The chemical ghost in the shower corner
Residual silicone oil from a previous installation is the most common reason new sealant fails to stick even after the old bead is removed. Silicone is a migratory substance. Over time, the oils in the sealant soak into the pores of the grout and even the edges of the tile. If you just pull the old bead off and put a new one on, the new silicone will fail within weeks. You have to chemically neutralize those oils. I use a dedicated silicone digester for this. It breaks down the molecular bonds of the residue so it can be wiped away. This is the difference between a handyman and a specialist. Most people don’t even know those oils exist. They just see a clean looking surface and assume it is ready for caulk. Then they wonder why the silicone peels off in one long strip like a snake skin. It is because they were trying to glue silicone to silicone oil. It doesn’t work. You also need to look at how to refresh grout without replacing it if the grout itself is saturated with body oils or shampoo. If the substrate is compromised, the sealant will never hold. You are only as strong as the weakest layer in the stack.
How to refresh grout without replacing it
Refreshing grout involves removing the top layer of contaminated material and applying a high quality colorant or sealer to restore the surface energy. If your grout is failing near the silicone line, you have a bigger problem. Water is likely getting behind the tile and saturating the cement board. This creates a constant source of moisture that pushes the silicone off from the inside out. This is called back pressure. You can use grout restoration secrets to stabilize the area, but you must address the moisture first. If you have a crawlspace, go under the house and look for leaks. If you have a second story shower, look for water spots on the ceiling below. Peeling silicone is often the first warning sign of a major structural failure. Don’t ignore it. It is the canary in the coal mine for your bathroom. If you catch it early, you can save the shower. If you wait, you will be looking at a full tear out and a five figure bill for new tile and framing. Clean the joints, use the right chemistry, and respect the expansion gaps. That is how you build a floor and a shower that lasts a lifetime.