The myth of the waterproof grout joint
Grout repair in high-pressure shower corners requires understanding that cementitious grout is not waterproof. It is a porous material that functions as a structural filler between tiles. When grout crumbles in a corner, it usually indicates a failure to accommodate the natural movement of the building walls, known as a plane change. I spent three days grinding concrete on a job last month just so the floor wouldn’t click like a castanet, and showers are no different. If you ignore the subfloor or the wall framing stability, your grout will fail. Most guys skip the leveling compound or the proper backing. They think a bit of paste will hide the structural movement. It won’t. Last year, I opened a wall where the grout had crumbled, and the entire corner stud was rotted because the homeowner kept ‘patching’ it with more cement. You need to treat the shower corner as a movement joint, not a rigid one.
The physics of shower corner failure
Crumbled grout in shower corners happens because of differential movement between two perpendicular walls. While the tile is rigid, the house is dynamic. Wood studs swell and shrink with humidity, and the foundation shifts. When you lock two walls together with rigid cement grout, the weakest point will fracture. This is physics. High-pressure shower heads exacerbate the problem by forcing water molecules into these micro-fissures through capillary action. Once water gets behind the tile, it begins to degrade the thin-set bond and the wall substrate. This is why the TCNA (Tile Council of North America) mandates that all changes in plane must be filled with a flexible sealant, not rigid grout. Using cement in a corner is a fundamental error that leads to the ‘crunchy’ sound you hear when the tile moves against the grout. To understand more about the longevity of these surfaces, you can look at grout restoration secrets for long lasting results. The chemistry of the bond is everything.
“A floor is only as good as the subfloor beneath it; deflection is the enemy of every joint.” – Master Flooring Axiom
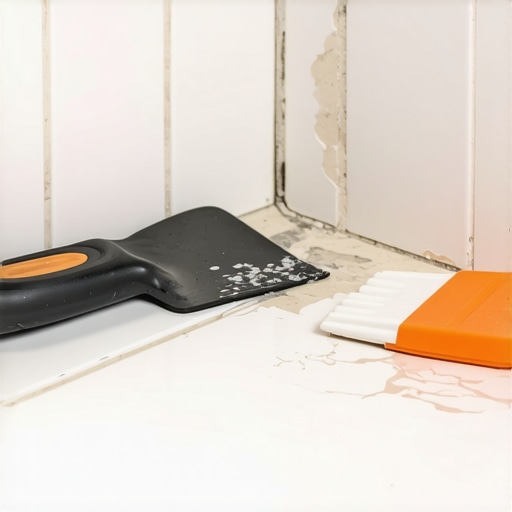
The 1/8 inch that ruins everything
Expansion gaps in shower corners must be maintained at a minimum of one eighth of an inch. If the tiles are butt-jointed against each other in the corner, there is no room for the material to expand. In the humid environment of a place like Florida or the coastal Carolinas, the moisture levels in the wall cavities can fluctuate significantly. This causes the wood framing to expand. If there is no gap, the tiles will press against each other until the grout is pulverized. I always use spacers even in the corners. You want a clean, deep channel that can hold enough sealant to remain flexible. Most amateur installers shove grout in there because it is faster. Then, six months later, the homeowner is looking at a pile of gray dust on the shower floor. You have to scrape every bit of that old, brittle material out. It is a tedious job, but if you leave even a small piece of old grout, the new sealant won’t bond properly to the tile edges.
The chemistry of modern sealants
100 percent silicone sealant is the only professional choice for shower corners. Do not use ‘caulk’ that contains latex or acrylic if you want a permanent fix. True silicone is inorganic and does not support mold growth. It also has a much higher elongation percentage, meaning it can stretch and compress as the walls move without tearing away from the tile. In high-pressure showers, the constant cycle of heating and cooling creates thermal expansion. The tile gets hot and expands, then cools and contracts. Cement grout has zero elasticity. Silicone can handle this cycle for years. For those interested in keeping these surfaces pristine, checking out tile cleaning tips for a sparkling bathroom in 2025 will help maintain the aesthetic after the repair is done. The sealant must be applied to a bone-dry surface. If there is any moisture trapped in the joint, the silicone will fail to cure and will eventually peel off like a cheap sticker.
The ghost in the expansion gap
Substrate preparation for grout repair involves removing the failed material to a depth of at least twice the width of the joint. This is the ‘two to one’ rule of sealant joints. If the joint is one eighth of an inch wide, you need a quarter inch of depth for the silicone to perform correctly. This provides enough surface area for the adhesive bond to hold. Use a carbide-tipped grout saw or an oscillating tool with a diamond blade. You have to be careful not to nick the tile edges or pierce the waterproofing membrane behind the tile. In older homes, you might find a lead pan or a thick mortar bed. In modern ones, it is likely a foam board or a liquid-applied membrane. If you puncture that membrane, you have a much bigger problem than just crumbled grout. You have a leak. This is why you must go slow. The smell of the diamond blade cutting through the cement is distinctive, a sharp, earthy scent that stays in your nose for hours. It is the smell of doing the job right.
| Material Property | Cementitious Grout | Epoxy Grout | 100% Silicone |
|---|---|---|---|
| Flexibility | Zero | Low | High |
| Water Resistance | Porous | Waterproof | Waterproof |
| Ease of Repair | Moderate | Difficult | Easy |
| Stain Resistance | Low | High | High |
The regional climate factor
Local humidity and water hardness change how grout behaves over time. In dry climates like Phoenix, grout can become brittle faster because the moisture leaves the cement too quickly during the initial cure. In high-humidity areas, the grout stays damp, which can lead to soft spots if the mix was too watery. Furthermore, if you have hard water with high mineral content, those minerals can calcify inside the grout pores, making it even more brittle and prone to cracking. When you are looking at showers that wow modern designs for 2025, remember that the best designs account for local environmental stressors. You might even consider eco friendly tile solutions for sustainable homes in 2025 to find materials that handle these stresses better. If you are in a region with high seismic activity, the movement joints are even more vital. A rigid corner in California is a recipe for a disaster within the first year. Use the right materials for your zip code, not just what is on the shelf at the big box store.
- Inspect the corner for structural movement or loose tiles.
- Remove all old grout using a specialized removal tool.
- Vacuum the joints to remove every speck of dust and debris.
- Wipe the tile edges with denatured alcohol to remove soap scum.
- Apply a high-quality 100 percent silicone sealant.
- Tool the joint with a finger or a profiling tool for a smooth finish.
Why your subfloor is lying to you
Shower pan stability is the foundation of your corner grout health. If the shower pan flexes when you step on it, the walls will move. Most people think the walls are the problem, but it is often the floor. A shower pan that wasn’t set in a proper mortar bed will bounce. That bounce translates into vertical shear at the corner joints. No amount of grout or silicone will fix a moving floor. You have to address the deflection first. This is a common issue with cheap acrylic pans or poorly installed mud beds. If you see cracks starting at the very bottom of the corner and working their way up, the floor is likely the culprit. You can learn how to refresh grout without replacing it for minor cosmetic issues, but structural cracks need a deeper dive. If the pan moves, the tile will eventually pop off the wall. I have seen it happen a hundred times. You can check my contact us page if you have questions about specific structural failures.
“Movement joints are not an option; they are a requirement for a lasting installation.” – TCNA Handbook for Ceramic Tile Installation
The art of the clean bead
Silicone application techniques determine whether your repair looks professional or like a DIY mess. After the joint is clean and dry, cut the nozzle of the silicone tube at a 45-degree angle. The opening should be just slightly larger than the gap you are filling. Push the bead into the joint rather than pulling it. This ensures the silicone fills the entire depth of the void. If you just lay a bead on top, it will eventually peel. Once the bead is down, spray it lightly with a mixture of water and a few drops of dish soap. This prevents the silicone from sticking to the tile surface while you tool it. Run your finger or a caulk tool along the line in one smooth motion. Do not stop and start. The goal is a concave shape that sheds water away from the corner. This is the difference between a functional repair and a temporary patch. Once you finish the shower, you might realize your baseboards makeover ideas to elevate your space are next on the list. For a more modern look, consider chic baseboard designs that transform rooms in 2025. A clean shower corner deserves a clean transition to the rest of the room. Professionalism is in the details. It is in the grit under your nails and the patience to let the silicone cure for 24 hours before turning on the water. If you rush it, you will be doing it again in six months. Don’t be that guy. [{“@context”:”https://schema.org/”,”@type”:”HowTo”,”name”:”Repair Crumbled Shower Grout”,”step”:[{“@type”:”HowToStep”,”text”:”Remove old grout with a carbide saw.”},{“@type”:”HowToStep”,”text”:”Clean the joint with alcohol.”},{“@type”:”HowToStep”,”text”:”Apply 100 percent silicone.”},{“@type”:”HowToStep”,”text”:”Tool the joint for a smooth finish.”}]}]