The physics of the isolated tile fracture
A single cracked tile is rarely just an aesthetic blemish. It is often a warning from the subfloor that the structural assembly has failed under mechanical stress. Most guys skip the leveling compound. They think the underlayment will hide the dip. It won’t. I spent three days grinding concrete on a job last month just so the floor wouldn’t click like a castanet. That experience taught me that replacing a tile is not about the ceramic surface but about the chemistry of the bond and the stability of the substrate. If you do not address why the tile broke, you are just installing a future failure. You need to understand the Young’s modulus of the material and how point loads interact with the thin-set bed.
The surgical strike against grout lines
Grout removal requires a vibrating oscillating tool or a manual carbide grit saw to isolate the damaged unit from the surrounding grid. If you attempt to pry a tile before the grout is entirely cleared, the lateral pressure will chip the adjacent pieces. This is particularly vital in showers where the waterproof membrane sits just millimeters below the adhesive. You must maintain a steady hand to avoid piercing the liner. Once the grout is gone, the tile exists as an island, and the risk of collateral damage drops significantly. You can find more about maintaining these surfaces at tile cleaning tips for a sparkling bathroom in 2025 to keep the rest of the floor looking as fresh as the new replacement.
“A floor is only as good as the subfloor beneath it; deflection is the enemy of every joint.” – Master Flooring Axiom
Why your thin-set bond failed in the first place
Substrate contamination or improper trowel notch size usually accounts for the hollow sound you hear when walking across a floor. If the original installer didn’t achieve 80 percent coverage in dry areas or 95 percent in wet areas like showers, the tile is effectively floating. When you pull up a broken tile, look at the back. If the ridges are still standing and haven’t collapsed, the installer didn’t back-butter or twist the tile into place. This lack of mechanical bond creates a void where air is trapped, leading to a fracture when a heavy object or a high-heeled shoe applies concentrated pressure. This is a common issue in high-traffic zones or near the wall where baseboards might be hiding poor perimeter expansion gaps. If you are looking to refresh the look of your walls, consider checking out baseboards makeover ideas to elevate your space for a professional finish.
The molecular reality of adhesive removal
Old mortar removal involves mechanical abrasion and careful chiseling to return the substrate to a flat, clean state for the new bond. You cannot simply slap new thin-set over old, dried ridges. The chemistry of Portland cement requires a clean surface to form a crystalline bond. If there is dust, oil, or old adhesive residue, the new mortar will only provide a suction fit, not a structural one. I use a small hammer and a cold chisel, working from the center of the cavity outward. It is a slow, methodical process. You are fighting the shear strength of the original install. If the tile was in a bathroom, you might notice the grout looks dingy around it. You can learn how to refresh grout without replacing it to ensure the new repair blends perfectly with the existing floor.
| Adhesive Type | Shear Strength (PSI) | Cure Time | Best Use Case |
|---|---|---|---|
| Unmodified Thin-set | 200-300 | 24 Hours | Saltillo and thick stone |
| Polymer-Modified Mortar | 400-600 | 12-24 Hours | Porcelain and large format |
| Epoxy Adhesive | 1000+ | 4-8 Hours | Industrial and submerged |
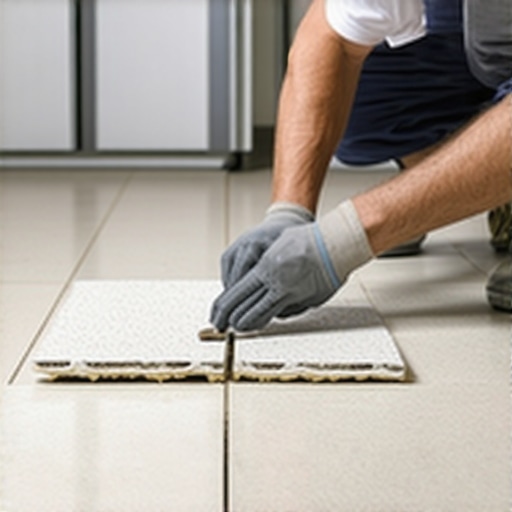
Mechanical extraction of the ceramic shards
Tile extraction involves drilling a series of holes into the center of the damaged piece to break the surface tension and create a weak point for the chisel. Start with a 1/4 inch masonry bit. Drill five or six holes in a star pattern. This allows the ceramic to shatter inward rather than pushing outward against the healthy tiles. Wear your safety glasses. Ceramic shards are essentially glass and will fly several feet when the tension snaps. Once the center is removed, you can gently tap the chisel under the remaining edges. If the tile is stubborn, a heat gun can sometimes soften the polymers in the thin-set, though this is rarely effective with traditional cementitious mortars.
The checklist for a clean extraction
- Oscillating tool with diamond grit blade
- Carbide tipped masonry drill bits
- Spring-loaded center punch for starting holes
- Narrow cold chisel and 16-ounce hammer
- High-filtration vacuum to manage silica dust
- Replacement tile from the original dye lot
The chemistry of the new bond
Polymer modified thin-set provides the flexibility needed to prevent future cracking by allowing for microscopic movement within the floor assembly. When you mix your mortar, it should have the consistency of peanut butter. Too wet and it will shrink as it cures, pulling the tile down below the level of the surrounding floor. Too dry and it won’t wet out the back of the tile, leading to another failure. Back-butter the new tile using the flat side of the trowel to ensure 100 percent coverage. This creates a monolithic bond between the ceramic and the mortar bed. For those interested in long-term maintenance after the repair, see grout restoration secrets for long-lasting results.
“Substrate preparation is 90 percent of the job; the remaining 10 percent is just laying the jewelry on top.” – TCNA Handbook Principle
The ghost in the expansion gap
Expansion gaps at the room perimeter are mandatory for every hard surface installation to accommodate the natural movement of the structure. If your tile is tight against the wall, the entire floor is under compression. When the house settles or the temperature shifts, that energy has to go somewhere. It usually goes into the weakest tile in the center of the room, causing it to tent or crack. When you replace that one tile, check the edges of the room under the baseboards. If you don’t see a gap, take a grinder and create one. This relieves the pressure and saves the rest of your installation. You can see how these gaps are integrated into modern aesthetics in chic baseboard designs that transform rooms in 2025.
The final grout integration
Matching old grout requires considering both the pigment and the age-related staining of the existing lines. Even if you have the original bag of grout, the color will likely be darker or lighter than what is on the floor. I often mix a few shades to get the right match or use a grout colorant after the repair has cured. Push the grout into the joints at a 45-degree angle to ensure there are no air pockets. Use a damp, not dripping, sponge to strike the joints. Excessive water during the cleanup phase will wash out the pigment and weaken the cement structure. For high-moisture areas like showers, using a high-quality sealer is non-negotiable once the grout has fully cured. Discover more design inspiration at showers with a style trendy ideas for small bathrooms and showers that wow modern designs for 2025.