The structural reality of the floor to wall transition
Filling the gap between tile and baseboards requires a flexible sealant like 100% silicone or siliconized acrylic caulk rather than rigid grout. This accommodates the natural expansion and contraction of different materials. This prevents cracking at the joint where the horizontal floor meets the vertical wall surface. I spent three days grinding concrete on a job last month just so the floor wouldn’t click like a castanet. Most guys skip the leveling compound. They think the underlayment will hide the dip. It won’t. I saw the same issue with gaps. If you do not prep the transition between the tile and the baseboard, you are just waiting for a failure. This transition is a change of plane. In the flooring world, a change of plane is where movement is concentrated. If you use grout here, it will crack. It is not a matter of if, but when. Wood baseboards and ceramic tiles have different coefficients of thermal expansion. The wood grows and shrinks with humidity. The tile stays relatively stable but the subfloor underneath it might shift. When these two forces meet at a ninety degree angle, the joint needs to breathe. I have seen beautiful chic baseboard designs that transform rooms in 2025 ruined because the installer used hard grout at the floor line. It looks great for a week. Then the heating kicks on, the wood shrinks, and you have a jagged line of crumbled dust. You need to understand the physics of the bond before you grab a caulk gun. We are talking about the Shore A hardness of the material and the ability of the polymer chains to stretch without tearing from the substrate.
“A floor is only as good as the subfloor beneath it; deflection is the enemy of every joint.” – Master Flooring Axiom
Why rigid grout is a mistake for baseboard joints
Rigid grout lacks the elasticity needed to survive the differential movement between a masonry floor and a timber wall frame. Grout is designed for compression within a stable plane. When applied to a perimeter joint, it becomes the weak point that fractures under structural tension or seasonal humidity shifts. Most homeowners think grout is the universal filler for anything touching a tile. That is a lie. If you look at the TCNA handbooks, they are very clear about movement joints. A perimeter gap is a movement joint. In my twenty five years, I have pulled up miles of cracked grout from under baseboards. People want it to match the floor. I get it. But you can buy color matched caulk that looks exactly like your grout restoration secrets for long lasting results. If you use a rigid portland cement product, the bond will break. Wood moves. It is an organic material. Even in a climate controlled house, the moisture content of your baseboards will fluctuate. In a place like Houston, that wood is a sponge. In Phoenix, it is a bone. That movement must go somewhere. If the joint is locked with grout, the grout breaks or the baseboard pulls away from the wall. Neither is a good look. We also have to talk about the subfloor. If you have a crawlspace, your floor is constantly flexing. That deflection, even if it is within the L over 360 limit, is enough to pulverize grout at the edges. You need a material that can elongate. Standard grout has zero percent elongation. High grade silicone can reach five hundred percent. You do the math.
The chemical superiority of high performance silicone
100% silicone sealants provide the best adhesion and moisture resistance for tile to baseboard gaps because they do not shrink during the curing process. Unlike acrylic, silicone remains flexible for decades and resists mold growth in wet environments like bathrooms or laundry rooms. When you are working in showers with a style trendy ideas for small bathrooms, you cannot mess around with cheap latex caulk. Latex is water based. When the water evaporates, the bead shrinks. This creates a concave profile that catches dust and hair. Silicone is a different animal. It cures through a chemical reaction with atmospheric moisture. It maintains its volume. This is vital for filling deep gaps. If you have a quarter inch gap, silicone will fill that quarter inch and stay there. It also forms a covalent bond with the silica in the tile. This is not just sticky. It is a molecular link. However, you have to be careful with the finish. Silicone is a mess if you are messy. You need a steady hand and a logic for the application. I always tell my guys to clean the area with denatured alcohol first. Any dust from the tile saw will kill the bond. If you have grease or floor wax on the edge of the tile, the silicone will just peel off like a scab. Professionalism is in the prep, not the squeeze. We use specific tools to profile the bead. A finger works in a pinch, but a profiling tool gives you a consistent geometry that sheds water and looks like a factory edge.
How moisture levels dictate your sealant choice
Environmental humidity and potential liquid exposure determine whether you should use siliconized acrylic or pure silicone for filling floor gaps. Wet areas require pure silicone to prevent mold, while dry living areas can utilize siliconized acrylic for easier paintability and cleanup. If you are working on baseboards makeover ideas to elevate your space in a bedroom, you might want something you can paint. Pure silicone does not take paint. If you get it on the baseboard, your paint will bead up like water on a waxed car. That is why I often use a high quality siliconized acrylic for dry areas. It gives you some flexibility but allows the painters to follow behind me and finish the job. But in a bathroom? No way. You need the big guns. In a bathroom, the gap between the tile and the baseboard is a gateway for water. If you splash water out of the tub and it gets behind that baseboard, you are looking at rot and mold. Pure silicone creates a waterproof dam. I have seen houses where the subfloor rotted out because someone used cheap caulk in the bathroom. The water wicked under the baseboard and sat on the plywood for years. By the time they noticed the smell, the joists were soft. It is a nightmare that costs thousands to fix. All because of a five dollar tube of the wrong stuff. This is why I am a stickler for the specs. You check the moisture content of the subfloor with a pin meter. You ensure the tile is dry. You apply the sealant when the house is at its average humidity. This is the only way to ensure the joint stays closed through the winter and the summer.
| Material Type | Flexibility Rating | Paintable | Best Use Case | Lifespan |
|---|---|---|---|---|
| Standard Grout | Zero | No | Tile joints only | 2-5 years (perimeters) |
| Acrylic Caulk | Low | Yes | Dry walls, ceilings | 3-7 years |
| Siliconized Acrylic | Medium | Yes | Living areas, baseboards | 10-15 years |
| 100% Silicone | Maximum | No | Bathrooms, wet areas | 20+ years |
Tools and techniques for a professional finish
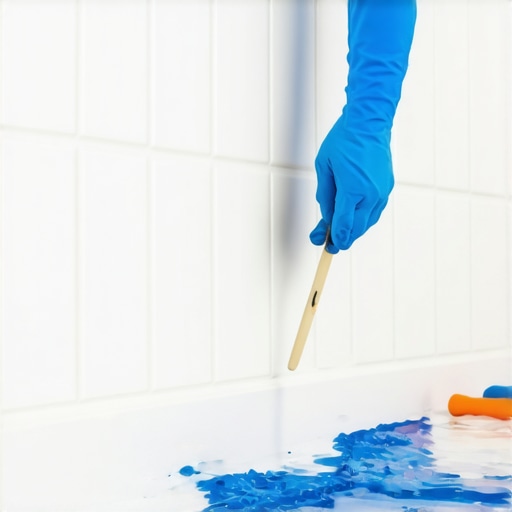
Achieving a professional bead requires a high thrust ratio caulk gun, a set of smoothing tools, and denatured alcohol for surface preparation. Proper application involves cutting the nozzle at a forty five degree angle to match the gap width and maintaining consistent pressure. Do not just go to the big box store and buy the cheapest gun they have. Those things are trash. They have too much flex and you cannot control the flow. Get a gun with an 18 to 1 thrust ratio. This allows you to push thick silicone with precision. When you start the bead, you pull the gun toward you. Do not push it. Pushing creates a mess. You want to lay a consistent rope of material into the void. If the gap is deep, you need a backer rod. This is a foam rope that you stuff into the gap. It prevents the sealant from sticking to the bottom of the joint. You only want the sealant to stick to the tile and the baseboard. This is called two point adhesion. If it sticks to the bottom too, it cannot stretch properly. It will tear in the middle. This is a technical detail that most DIY guys miss. They think more is better. It is not. You want a bridge, not a plug. Once the bead is down, spray it with a little soapy water or alcohol and use a tool to smooth it. This forces the material into the pores of the tile and the wood. It ensures the bond is physical as well as chemical. If you are worried about the mess, use painter’s tape on both sides of the joint. Pull the tape while the sealant is still wet. It gives you a line so sharp you could cut your finger on it. This is how we do showers that wow modern designs for 2025. It is all about the details that no one sees until they fail.
“Movement joints are not optional; they are the pressure valves of a ceramic installation.” – TCNA Handbook for Ceramic Tile Installation
- Clean the gap of all debris and old grout using a vacuum and a thin pick.
- Wipe the edges of the tile and baseboard with denatured alcohol to remove oils.
- Install a foam backer rod if the gap exceeds one quarter inch in depth.
- Cut the caulk tube tip to the exact width of the gap to avoid over-application.
- Apply a continuous bead without stopping to prevent visible overlap marks.
- Tool the joint immediately before the sealant begins to skin over.
The final step is patience. Most people want to walk on the floor or clean it an hour after they finish. That is a mistake. Silicone needs twenty four hours to cure through. If you hit it with a mop or tile cleaning tips for a sparkling bathroom in 2025 before it is ready, you will dull the finish or move the bead. If you are using an eco friendly tile solutions for sustainable homes in 2025, make sure your sealant is also low VOC to maintain the air quality of the home. I have spent my life on my knees looking at these joints. I know what works. Use the right chemistry, respect the physics of movement, and do not cut corners on the prep. Your floor will thank you by staying together for the next thirty years. If you need to fix old work, look into how to refresh grout without replacing it for the rest of the floor, but always swap the perimeter for a flexible joint. It is the only way to build a floor that lasts. Stop thinking about how it looks for the photo and start thinking about how it performs when the house settles in the middle of a cold January night. That is the mark of a master.