5 Warning Signs of Bathroom Waterproofing Failure and Structural Rot
Most guys skip the leveling compound. They think the underlayment will hide the dip. It won’t. I spent three days grinding concrete on a job last month just so the floor wouldn’t click like a castanet. It is the same story with waterproofing. Most installers slap some green board on the wall, smear a little thin-set in the corners, and call it a day. Then five years later, I am the one ripping out a rotted subfloor that looks like wet cardboard. After 25 years on my knees with a moisture meter, I can tell you that a bathroom is not a room. It is a wet-environment structural engine. If the seals fail, the engine explodes. You might not see the explosion today, but the chemistry of mold and the physics of water migration are working against you every second. When we talk about grout and showers, we are talking about a managed system of water containment. If that system breaches, the damage moves through the tile and into the baseboards, eventually eating the very joists holding you up.
The chemical breakdown of grout and surface seals
Grout discolouration, persistent dampness, and soft joints indicate that the internal waterproofing membrane has likely breached or was never installed correctly. When water penetrates the surface and hits a saturated substrate, it forces minerals to the surface through a process called efflorescence, which manifests as white crust or dark, unexplainable stains. This is not a cleaning issue. It is a hydrostatic pressure issue. When I see grout that stays dark long after the shower is used, I know the mud bed or the foam board underneath is waterlogged. Most people think grout is waterproof. It is not. It is a porous cementitious product. Even a grout that has been sealed will eventually allow vapor to pass through. If there is no functional membrane like a liquid-applied ANSI A118.10 layer or a bonded sheet membrane, that water has nowhere to go but into your 2×4 studs. I have seen tile installations that looked beautiful on the surface but were held up by nothing but hope and black mold. You can find more about maintaining these surfaces in our guide on tile cleaning tips for a sparkling bathroom in 2025. If the grout is crumbling when you touch it with a screwdriver, the chemical bond has been destroyed by constant saturation. This is a red alert. You are no longer looking at a cosmetic fix. You are looking at a structural failure.
“A floor is only as good as the subfloor beneath it; deflection is the enemy of every joint.” – Master Flooring Axiom
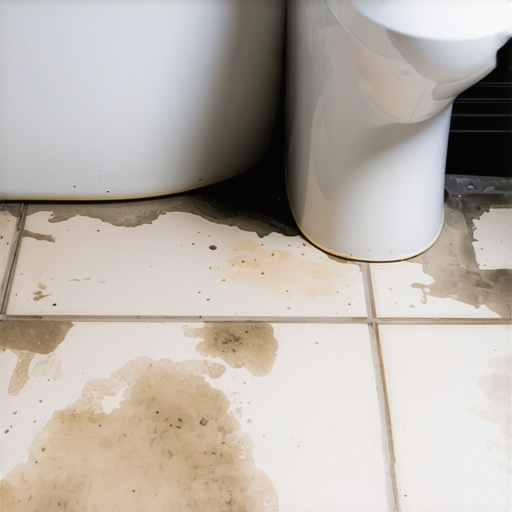
Swelling baseboards and the capillary climb
Swelling baseboards and peeling paint at the floor line are definitive evidence that water is escaping the shower pan or the floor assembly and wicking into the wall cavity. This often happens because the installer did not use a proper transition or failed to integrate the floor membrane with the wall waterproofing. Water is lazy. It follows the path of least resistance. Usually, that path leads straight to your baseboards. If you notice the bottom of your trim looks bloated or the paint is flaking off in chips, the wood or MDF is drinking water from the subfloor. This is the capillary climb. It can pull water inches above the actual leak site. This is why choosing the right trim and ensuring it is sealed is vital. You can see some examples of properly integrated designs at chic baseboard designs that transform rooms in 2025. In my experience, by the time the baseboards show visible rot, the subfloor underneath is already compromised. I have pulled up trim only to find the drywall behind it has turned into a grey mush. This is why I advocate for a zero-threshold approach where the waterproofing extends out of the bathroom and into the hallway. It is the only way to be sure. If you are seeing this sign, stop using the shower immediately. The water is already in the wood.
The physics of hollow tile and tenting failures
Hollow sounds when tapping on tile or visible lifting indicate that the bond between the tile and the substrate has been severed by moisture expansion or subfloor movement. This creates an air pocket where water collects and stagnates, leading to a foul odor that no amount of scrubbing can fix. I use a sounding tool or even just a heavy screwdriver handle to tap the tile. A solid bond sounds like a thud. A failed bond sounds like a drum. When water gets under the tile, it causes the thin-set to undergo a process called re-emulsification if the wrong products were used. Or, if the subfloor is plywood, the wood expands as it gets wet, but the tile does not. Something has to give. Usually, the tile pops off. This is especially common in showers where the pre-slope was not done correctly. If the water cannot reach the weep holes in the drain, it sits in the mortar bed forever. It becomes a stagnant pond under your feet. For those looking to upgrade their systems before this happens, check out showers that wow modern designs for 2025.
“The integrity of a ceramic tile installation is dependent upon the rigidity and water-resistance of the substrate; deflection must be limited to L/360 for ceramic and L/720 for stone.” – Master Flooring Axiom
The ghost in the expansion gap
Cracked caulking in the corners and vertical changes of plane signify that the house is moving and your waterproofing is not flexible enough to bridge the gap. Every bathroom needs expansion joints, but if those joints are failing, water enters the wall cavity every time you spray the shower head. I see it all the time. An installer uses grout in the corners instead of 100 percent silicone. Grout is rigid. Houses move. When the house moves, the grout cracks. Now you have a direct line for water to pour behind the tile. This is how you end up with a mold colony growing on the backside of your drywall. If you see cracks in your showers, it is not just an eyesore. It is a leak. You might try how to refresh grout without replacing it to fix small surface issues, but if the crack is deep, you have a structural problem. The gap is the ghost that haunts the installation. It is small, but it is deadly for your home health. I always tell my clients that a 1/8 inch gap is enough to ruin a $20,000 bathroom. You must use high-quality, mold-resistant sealants that can handle the expansion and contraction of the building envelope.
Technical comparison of waterproofing methods
Comparing perm ratings and installation reliability reveals why traditional methods often fail in modern high-use bathrooms where steam and constant water pressure are present. Not all waterproofing is created equal. A perm rating measures how much water vapor can pass through a material. The lower the number, the better the protection. Traditional felt paper has a high perm rating. Modern liquid membranes and foam boards have very low ratings. If you want a bathroom that lasts 50 years, you need a system with a perm rating below 0.5. Below is a breakdown of the materials I trust versus the ones that keep me busy with repair work.
| Material Type | Perm Rating | Typical Failure Point | Longevity Expectancy |
|---|---|---|---|
| Liquid Membrane | 0.07 to 0.5 | Inconsistent thickness | 25+ Years |
| Sheet Membrane | 0.01 to 0.1 | Seam bonding issues | 30+ Years |
| Cement Board (Unsealed) | 10.0+ | Total saturation | 5 to 10 Years |
| Foam Board Systems | 0.01 to 0.05 | Incorrect screw sealing | Lifetime |
As you can see, using unsealed cement board is a recipe for disaster. It is essentially a sponge. If your installer is not putting a membrane over that board, they are doing it wrong. I do not care how many years they say they have been doing it. Science does not care about your feelings. It only cares about moisture molecules. For more advanced solutions, look into eco-friendly tile solutions for sustainable homes in 2025. They often integrate the best modern chemistry to ensure a permanent seal.
The ultimate bathroom health checklist
Regular inspections and maintenance routines are the only way to catch a waterproofing failure before it becomes a full-scale renovation project involving mold remediation and structural repair. You need to be proactive. Do not wait for the ceiling in the kitchen below to start dripping. By then, it is too late. You are already looking at thousands of dollars in damage. Follow this checklist to keep your showers and floors in top shape.
- Inspect all grout lines for hairline fractures every six months.
- Press on the tile at the base of the shower to check for movement or deflection.
- Check the baseboards outside the shower for any softening or paint bubbling.
- Ensure that the weep holes in your drain assembly are not clogged with hair or soap scum.
- Verify that the silicone sealant at the floor-to-wall transition is intact and not peeling.
- Look for dark spots on the ceiling of the room directly below the bathroom.
- Smell the air in the bathroom after it has been closed for a few hours. A musty scent is a sign of hidden mold.
If you find issues, you might need grout restoration secrets for long-lasting results to bridge the gap. But if the tile is loose, you are past the point of restoration. You are in the realm of replacement. Never ignore the signs. Water is the most destructive force in the world when it gets into a home. It will buckle your floors. It will rot your studs. It will win every time if you do not respect the physics of the installation. For any questions on how to handle a failing floor, you can always contact us for expert advice. Do not let a small leak turn into a structural nightmare. Keep your subfloor dry and your membranes tight.