The 1/8 inch that ruins everything
A spongy bathroom floor near the tub indicates structural subfloor failure caused by chronic moisture intrusion or excessive joist deflection. When the subfloor absorbs water from failing grout lines or leaking showers, the plywood layers delaminate. This loss of structural integrity manifests as a soft or bouncy sensation underfoot.
I have spent twenty five years on my knees with a moisture meter and a level. I smell like WD 40 and oak dust most days. I have seen every way a floor can fail. Most guys skip the leveling compound. They think the underlayment will hide the dip. It won’t. I spent three days grinding concrete on a job last month just so the floor wouldn’t click like a castanet. That job taught me that a floor is only as good as the substrate. If you feel a bounce near your tub, the wood underneath is likely turning into oatmeal. It is not just a cosmetic issue. It is a structural engineering disaster waiting to happen. You are feeling the physical breakdown of the lignin in the wood fibers. Water acts as a solvent. It dissolves the glue holding your plywood together. Once those layers separate, the floor loses its shear strength. It will buckle. You cannot fix this with a new layer of tile. You have to go deep into the joists.
The physics of structural deflection
Structural deflection refers to the vertical movement of the floor system under a load. The Tile Council of North America (TCNA) requires a maximum deflection of L/360 for ceramic tile and L/720 for natural stone. Spongy floors near tubs often exceed these limits due to water damaged joists or improper spacing.
“A floor is only as good as the subfloor beneath it; deflection is the enemy of every joint.” – Master Flooring Axiom
When you step near the tub, you are applying a concentrated load. If the subfloor is compromised, that load is not distributed across the joist network. Instead, the material compresses. This compression is often localized. In many builder grade homes, the subfloor is only 5/8 inch OSB. This is a crime. OSB is basically a sponge made of wood chips and resin. When it gets wet, it swells and never returns to its original thickness. I always recommend 3/4 inch CDX plywood. It has better moisture resistance. You also need to look at the joist spacing. If your joists are 24 inches on center, you have a recipe for a trampoline, not a floor. You need a solid foundation to prevent the grout from cracking. Cracks in the grout allow more water to reach the subfloor. It is a vicious cycle of decay.
The chemical failure of substandard grout
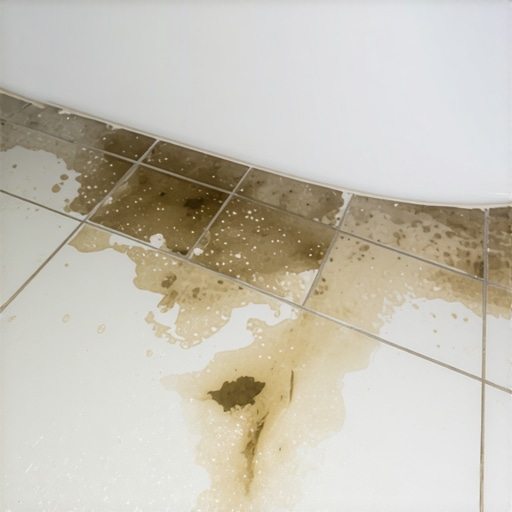
Grout failure occurs when the cementitious bond breaks down due to acidic cleaners or constant water saturation. Traditional grout is porous and absorbs water through capillary action. This moisture migrates through the tile assembly and settles on the subfloor, leading to the rot that causes a spongy feel.
If you see dark spots in your grout, you have a problem. Those spots are not just dirt. They are moisture pockets. You should look into grout restoration secrets for long lasting results to understand how to seal those pores. Standard cement grout is hydrophilic. It loves water. It pulls water down like a straw. Once that water hits the thin set, it stays there. It cannot evaporate. The chemical bond of the thin set begins to hydrate and soften. This is where the movement starts. You might notice the tile feels loose before it feels spongy. That is the bond failing. I prefer epoxy grouts for bathrooms. They are non porous. They act as a secondary waterproof barrier. They are harder to install, but they last a lifetime. You need to be a chemist and an architect to get a bathroom floor right. Most people just want it to look pretty. I want it to be bulletproof.
The silent warning signs of water damage
Early signs of bathroom floor failure include cracked grout, loose baseboards, and persistent musty odors. A spongy floor is a late stage symptom. By the time the floor feels soft, the subfloor moisture content has likely exceeded 20 percent for an extended period, allowing fungal growth to occur.
| Material | Moisture Threshold | Failure Mode |
|---|---|---|
| CDX Plywood | 19% | Delamination |
| OSB | 15% | Thickness Swelling |
| Cement Backer | 90% | Structural Integrity Remains |
| Standard Thin-set | Variable | Re-emulsification |
You need to pay attention to your chic baseboard designs that transform rooms in 2025 because they are your first line of defense. If the bottom of the baseboard is swollen or the paint is peeling, water is wicking up from the floor. This usually happens because the installer didn’t leave a proper expansion gap or didn’t seal the perimeter. The gap between the tile and the tub should never be filled with grout. It must be a high quality 100 percent silicone caulk. Silicone is flexible. Grout is rigid. When the tub fills with water, it gets heavy. It moves. If you have grout there, it will crack. Water will find that crack every single time. It is gravity. It is inevitable. I have seen $20,000 bathrooms ruined by a $5 tube of caulk.
The structural reality of baseboards
Baseboards serve as both an aesthetic transition and a protective barrier for the wall to floor junction. In bathrooms, baseboards must be installed with a small gap above the floor to prevent moisture wicking. If baseboards are resting directly on a wet floor, they will act as a wick.
I hate seeing MDF baseboards in a bathroom. MDF is just compressed paper. It is a death wish. If you want to elevate your space, you should check out baseboards makeover ideas to elevate your space but keep them made of wood or PVC. PVC is the only real choice for a high moisture area. It will not rot. It will not grow mold. When I install trim near a tub, I back caulk the edges. This creates a secondary seal. It stops the water from getting behind the wall. Most guys just nail it and bail. That is how you end up with a spongy floor five years later. You need to think about where the water goes when it spills. It doesn’t just disappear. It moves toward the lowest point. Usually, that is the gap between the tile and the subfloor.
Showers and the anatomy of a leak
Shower leaks often originate from failed waterproofing membranes or improperly sloped pans. These leaks are often slow and go unnoticed until the subfloor outside the shower becomes spongy. Modern showers require a continuous waterproof envelope to prevent water migration into the surrounding floor framing.
When planning showers that wow modern designs for 2025 you must prioritize the pan. The pan is the heart of the system. I use topical waterproofing membranes like Kerdi or RedGard. I don’t trust the old school plastic liners. They rely on a clamping ring that always fails. A topical membrane starts at the drain and goes up the walls. It creates a bathtub inside your shower. This is the only way to be sure. If your floor is spongy near the shower door, the curb is likely leaking. Curbs are a major failure point. They are often built with wood blocks that rot out. I use solid foam curbs. They cannot rot. They cannot grow mold. You have to be meticulous. One pinhole in the membrane will ruin the whole floor. For more ideas on small spaces, look at showers with a style trendy ideas for small bathrooms to see how to manage water in tight quarters.
“Water is the universal solvent; it will find the path of least resistance through any floor system.” – Master Flooring Axiom
The permanent fix for a spongy subfloor
To fix a spongy bathroom floor, you must remove the existing tile, assess the subfloor damage, and replace any rotted wood. If the joists are compromised, they must be sistered with new lumber to restore structural integrity. Simply covering the rot with new material will lead to further failure.
You have to be brave. You have to tear it out. If you try to save the tile, you are wasting your time. Once the subfloor is exposed, use a screwdriver to poke the wood. If it goes in like butter, it is trash. Cut it out. Check the joists for fungus or rot. If the joist is soft, I sister a new 2×8 or 2×10 next to it. I use construction adhesive and carriage bolts. I want that floor to be stiff. I want it to be silent. Then, I install new 3/4 inch plywood. I glue it and screw it every 6 inches. No nails. Nails squeak. Screws hold. After that, use a high quality underlayment. Don’t forget tile cleaning tips for a sparkling bathroom in 2025 once you have the new floor in place. Keeping the grout clean and sealed is the only way to protect your investment. If you are overwhelmed, you can always contact us for professional advice. Here is your diagnostic checklist.
- Inspect the grout for hairline cracks or missing chunks.
- Check the caulk line between the tub and the floor for gaps.
- Press your heel into the floor near the tub to check for vertical movement.
- Look at the basement or crawlspace directly below the bathroom for water stains.
- Use a non invasive moisture meter to check for high readings in the tile.
- Remove a piece of baseboard to see if the drywall behind it is damp.
A floor is more than a surface. It is a system. When one part of the system fails, the whole thing goes. The sponginess you feel is the floor screaming for help. Don’t ignore it. If you act fast, you might just be replacing a few square feet of plywood. If you wait, you will be replacing the floor joists and the ceiling below. In my experience, waiting always costs triple. Fix it right. Fix it once.