
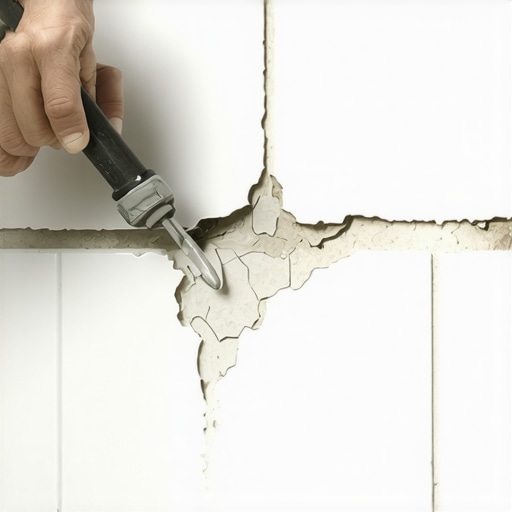
I spent three days grinding concrete on a job last month just so the floor would not click like a castanet. Most guys skip the leveling compound. They think the underlayment will hide the dip. It will not. That same brand of laziness is why most shower corners look like a spiderweb of cracks within six months of a renovation. I have seen million dollar homes where the master shower looks like a disaster because someone thought grout was a structural adhesive. It is not. Grout is a rigid mineral compound. It has zero flexibility. When your house shifts, or the moisture levels in your bathroom fluctuate, that grout joint is going to snap like a dry twig. I have spent twenty five years fixing these mistakes. If you want a shower that actually holds up, you have to stop thinking like a decorator and start thinking like a structural engineer. Most homeowners think a crack is just an eyesore. It is a gateway. Water gets into that crack, travels behind the tile, and starts rotting the wall studs or the subfloor. By the time you see the mold, the damage is done. You are not just fixing a joint. You are protecting the skeleton of your home. If you want more tips on maintaining your surfaces, you can find grout restoration secrets for long lasting results on our site.
The myth of the waterproof corner
Fixing a cracked grout joint in the shower corner requires removing the rigid cementitious material and replacing it with a flexible 100% silicone sealant. This transition is a change of plane where two walls meet. Because houses expand and contract, a flexible joint is the only way to maintain a water tight seal. You cannot simply smear new grout over old cracks. That is a temporary bandage that will fail within weeks. The physics of the shower environment demand a material that can stretch. When the wood framing behind your tile absorbs moisture from the air, it swells. When the heat from your shower hits the tile, it expands. If the joint is rigid, the pressure has nowhere to go but out. This results in the crumbling mess you see in your corner right now.
“A floor is only as good as the subfloor beneath it; deflection is the enemy of every joint.” – Master Flooring Axiom
The 1/8 inch that ruins everything
Movement is the silent killer of tile installations. Every structure is in a constant state of flux. In a bathroom, this movement is magnified. The temperature swing from a cold morning to a steaming hot shower causes thermal expansion. If your tile is installed tight against the corner without a movement joint, the stress will blow the grout right out of the gap. The Tile Council of North America (TCNA) is very clear about this. Every change of plane requires an expansion joint. This is not a suggestion. It is a requirement for a professional grade installation. If you are dealing with older tile, you might also want to look into tile cleaning tips for a sparkling bathroom in 2025 to get the surface ready for repair. Most people think they can just shove more grout in there and be done with it. They are wrong. You have to understand the chemistry of the bond. Cement based grout does not bond well to old, dried grout. It needs a clean, porous surface. Even then, the movement will break it again. You need a material with high elongation. That means silicone. While most people want the thickest underlayment, too much cushion actually causes the locking mechanisms on flooring to snap, and similarly, too much rigid grout in a corner causes the tile edges to chip under pressure. You need that 1/8 inch gap to be filled with something that acts like a gasket, not a rock.
Why your subfloor is lying to you
The subfloor and the wall framing are the foundation of your shower. If the subfloor has too much deflection, meaning it bounces when you walk on it, the entire shower assembly is under stress. This stress usually shows up first in the corners. I have walked into jobs where the homeowner complained about grout cracking, only to find out the floor joists were spaced too far apart. No amount of grout or caulk can fix a structural bounce. You have to address the movement. In a shower, the walls are often tied to different sets of studs. One wall might be an exterior wall that moves more with the weather, while the other is an interior wall. They move at different rates. This differential movement is what tears grout apart. You need to verify that your tiles are not “bridge bonded” across the corner. There must be a clear break. If you are planning a full remodel to fix these issues, check out showers that wow modern designs for 2025 for inspiration on better structural layouts.
Materials for a permanent corner seal
Selecting the right material is the difference between a ten year fix and a ten day fix. You need 100% silicone. Do not use “siliconized” acrylic caulk. It is a hybrid that performs poorly in wet environments. It shrinks. It mildews. It fails. 100% silicone is inorganic. Mold does not like to eat it. It remains flexible for decades. It is harder to work with, but it is the only correct choice. You also need to match the color. Most major grout manufacturers like Mapei or Laticrete sell color matched silicone that matches their grout line perfectly. This ensures your repair is invisible.
| Material Type | Flexibility Rating | Lifespan in Showers | Mold Resistance |
|---|---|---|---|
| Cementitious Grout | None | 1-2 Years (in corners) | Low |
| Acrylic Caulk | Medium | 2-3 Years | Moderate |
| 100% Silicone | High | 10-15 Years | High |
| Epoxy Grout | Low | 5-10 Years | High |
A surgical approach to grout removal
Removing the old grout is the most dangerous part of the job. One slip and you have a chipped tile. I prefer using a manual grout saw or a carbide tipped scraper for corners. Power tools like oscillating saws are fast, but they are aggressive. In a corner, the vibration can easily crack the edge of the adjacent tile. You need to clear out at least 1/8 inch of depth. If you do not remove enough of the old grout, the new silicone bead will be too thin. A thin bead has no strength. It will peel off like a sunburned layer of skin. Once the grout is out, you have to clean the joint. I use denatured alcohol or high grade acetone. You have to remove every trace of soap scum and hard water deposits. If the surface is not chemically clean, the silicone will not bond. It is that simple. If you are tired of the constant maintenance, you might consider how to refresh grout without replacing it for the flat areas of your wall. For more help, you can contact us directly.
- Carbide tipped grout scraper
- Denatured alcohol
- 100% color matched silicone
- Painter’s tape (for clean lines)
- Caulk finishing tool or a gloved finger
- Small vacuum to remove dust
The chemical bond and surface tension
Applying the silicone is an art form. You want a bead that is large enough to cover the gap but small enough to look clean. I use the tape method for DIYers. Put a line of painter’s tape on either side of the corner, leaving about 1/8 inch of tile exposed on each side. Lay your bead. Smooth it with a wet finger or a profiling tool. Pull the tape immediately while the silicone is still wet. This creates a perfect, crisp line. The silicone must bond to the edges of the tile, not just sit on top. This is why the cleaning step is so vital. If there is a film of body wash on that tile, the silicone will just float there. Within a month, water will get behind it, and you will have a slimy mess. We see this often when people try to rush the job. For those looking to upgrade their entire bathroom aesthetic, including the trim, look at chic baseboard designs that transform rooms in 2025 or even baseboards makeover ideas to elevate your space. Even in a bathroom, the transition from floor to wall matters.
“Water follows the path of least resistance; a crack is a welcome mat for rot.” – Master Flooring Axiom
Preventing the return of the crack
Once you have finished the repair, you have to let it cure. Do not use the shower for at least 24 hours. 48 hours is better. Silicone needs time to cross link and develop its full strength. If you hit it with water too soon, the surface will remain tacky and attract dirt. Long term prevention involves managing the humidity in your bathroom. Use your vent fan. If your bathroom stays damp, the wood framing stays swollen, keeping constant pressure on your joints. A dry bathroom is a stable bathroom. If you are interested in more sustainable options for your next project, consider eco friendly tile solutions for sustainable homes in 2025. Also, for those with tight spaces, showers with a style trendy ideas for small bathrooms can offer layout tips that minimize stress on joints. Remember, a shower is a system. The tile, the grout, the sealant, and the subfloor all have to work together. If one part fails, the whole thing is at risk. Stop treating your shower like a painting and start treating it like the waterproof vessel it is supposed to be. If you respect the physics of movement and the chemistry of the bond, your shower corners will stay sealed for a decade or more. If you cut corners, you will be back on your knees with a scraper before the year is out. That is the reality of the trade. For more information on how we handle your data, see our privacy policy.