
Most guys skip the leveling compound. They think the underlayment will hide the dip. It won’t. I spent three days grinding concrete on a job last month just so the floor wouldn’t click like a castanet. The same laziness happens when homeowners or rookie installers try to repair grout. They think they can just skim a new layer over the top. That new grout will flake off in weeks because it has no mechanical bond. To do it right, you have to get deep into the joints. You have to scrape out the old, failing material until you reach a clean substrate. I have seen countless $20,000 bathroom renovations ruined because someone didn’t want to sweat the details of the removal process. If you are staring at a floor that looks like a disaster, you need the right tools to fix the foundation before you even think about aesthetics.
The reality of deep grout removal
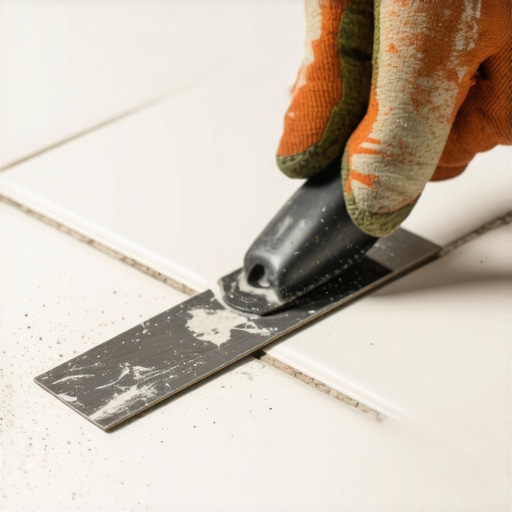
The best tool for scraping grout from deep joints is the oscillating multi-tool equipped with a triangular carbide grit blade. This power tool provides the necessary vibrational frequency to pulverize old cement without shattering tile edges. Manual carbide-tipped scrapers serve as essential secondary tools for precision corners and delicate shower transitions. This combination ensures that the joint is cleared to at least two-thirds of the tile depth. This depth is required for the new grout to achieve a structural grip. Without this clearance, the new material lacks the mass to resist the thermal expansion and contraction that occurs in every home. Most people underestimate the physics of a tile assembly. They see a static surface, but I see a moving system that breathes with the humidity and temperature of the room.
The physics of the mechanical bond
When we talk about deep joints, we are talking about the chemistry of Portland cement and the physics of adhesion. Grout is not glue. It is a hydraulic cement product that relies on a mechanical lock within the rough edges of the tile. If the joint is shallow, the grout has no place to anchor. It sits like a thin cracker on a sidewalk, waiting for someone to step on it and snap it into pieces. By using a carbide tool to excavate the old material, you create a fresh, porous surface on the edge of the tile. This is where the new grout crystals will grow and entwine themselves. It is a molecular process that determines if your floor will last thirty years or thirty days.
“Portland cement grout requires a mechanical bond that can only be achieved through deep clearing of the original joint profile.” – TCNA Maintenance Manual
You also have to consider the aggregate size. Sanded grout uses specific quartz grains that need space to settle. If you don’t scrape deep enough, those grains will clump at the surface, creating a weak and sandy finish that will wash away the first time you mop.
Oscillating tools and the carbide grit factor
If you want to save your shoulders and your sanity, the oscillating multi-tool is your primary weapon. Unlike a rotary tool or a grinder, the multi-tool moves in a tiny arc at about 20,000 oscillations per minute. This high-speed vibration breaks the bond of the old grout without creating the massive dust clouds or the high risk of over-travel that comes with a circular blade. You need a blade coated in carbide grit. Carbide is one of the hardest materials available, ranking just below diamond on the Mohs scale. This hardness allows it to grind through the silica sand in the grout without dulling instantly. When you are working in showers, this tool is indispensable for reaching the deep corners where moisture tends to pool and soften the original installation. If you are unsure how to handle this level of restoration, you might want to look at grout restoration secrets to understand the scope of the project. The vibration also helps to loosen the grip of the old grout from the substrate, making the final cleanup much easier.
Manual scrapers for precision work
Power tools are great for the long runs, but they lack the finesse needed around delicate areas. This is where the manual carbide-tipped scraper comes into play. These tools usually feature a triangular or hook-shaped head with a replaceable carbide blade. They allow you to feel the resistance of the grout. If you hit a spot where the tile is loose, you will feel it through the handle. You won’t get that feedback from a power tool. Manual scraping is a slow, methodical process that ensures you don’t chip the glazing on your expensive porcelain or ceramic tile. I always keep three different sizes of scrapers in my bag. A 1/16-inch blade for those tight, modern joints and a 3/16-inch blade for the wider, older style floors. If you are dealing with refreshing grout without replacement, the manual scraper is your best friend for removing just enough surface material to allow for a color match or a sealant application. It is about control and patience.
Protecting the baseboards and surrounding tile
One of the biggest mistakes I see is the collateral damage. People get so focused on the grout that they forget about the baseboards and the tile glazing. A slip with a carbide blade will leave a permanent scar on a wood baseboard or a deep scratch in a polished marble tile. I always tape off the edges of the floor with two layers of heavy-duty painter’s tape. If you are working near tile that is sensitive to scratching, like natural stone, you have to be even more careful. The dust generated by scraping is also abrasive. If you leave it on the floor and walk over it, you are basically sanding your floor with 80-grit sandpaper. You must vacuum constantly. A shop-vac with a HEPA filter should be running right next to your scraping tool. This keeps the workspace clean and prevents the fine cement dust from settling into the wood grain of your baseboards or the fabric of nearby furniture. For more on keeping your project areas looking sharp, check out chic baseboard designs to see how the finishing touches matter.
Moisture and the impact of regional climate
Your location matters more than you think. If you are in a high-humidity environment like Miami or Houston, the grout in your showers will behave differently than it would in the dry air of Phoenix. Moisture penetrates deep into the grout and the thin-set beneath it. If you try to scrape wet grout, it will turn into a muddy slurry that clogs your tools and smears across the tile. You need the area to be bone dry. I often tell my clients to stop using their shower for at least 48 hours before I show up. In dry climates, the grout becomes brittle and can shatter into sharp shards when hit with a tool. This requires eye protection and a slower pace to prevent the shards from flying everywhere. Understanding the local climate is part of being a professional. You have to work with the environment, not against it.
“A floor is only as good as the subfloor beneath it; deflection is the enemy of every joint.” – Master Flooring Axiom
This axiom applies to grout as well. If the subfloor is shifting because of moisture changes, your grout will crack no matter how well you scrape it. You have to address the root cause.
| Tool Type | Action Mechanism | Best Use Case | Risk Factor |
|---|---|---|---|
| Oscillating Multi-tool | High-speed vibration | Long straight joints, hard cement | High risk of tile edge chipping |
| Manual Carbide Scraper | Hand pressure/pulling | Corners, delicate stone, precision | Low risk, high physical effort |
| Rotary Tool (Dremel) | High-speed rotation | Intricate patterns, very narrow joints | Extreme risk of jumping out of joint |
| Chemical Grout Softener | Acidic dissolution | Removing stubborn epoxy or old sealer | Chemical burns, damage to natural stone |
The risk of structural vibration
When you are using power tools to scrape deep joints, you are introducing significant vibration into the tile assembly. This can be a double-edged sword. While it helps break the grout loose, it can also loosen tiles that were already poorly bonded. I have seen situations where a simple grout repair turned into a full floor replacement because the vibration caused the tiles to pop off the thin-set. This usually happens when the original installer didn’t achieve proper coverage. Before you start scraping, walk the floor and tap on the tiles with the handle of a screwdriver. If you hear a hollow sound, that tile is unbonded. You have to be extremely careful in those areas. Sometimes, the only solution is to remove the tile entirely, clean the back, and reset it. This is why deep scraping is a diagnostic process as much as a repair process. You are testing the integrity of the entire system as you work. If you find yourself in over your head, it is always better to reach out for professional help before the damage becomes irreversible.
Preparing the substrate for new bonding
Once the scraping is done, the job is only half finished. The most important step is the cleaning. You can have the deepest, cleanest joints in the world, but if there is a layer of dust at the bottom, the new grout will not stick. It will sit on top of the dust and fail within months. I use a stiff nylon brush and a vacuum to agitate the joints. Then, I wipe them down with a damp (not dripping) sponge. This removes the micro-dust that the vacuum misses. You also need to check for any remnants of old sealant. If the previous homeowner used a silicone-based sealer, your new grout will never bond to those spots. You have to scrape every bit of that silicone out. It is a tedious, mind-numbing task, but it is the difference between a professional result and a DIY failure. The new grout needs a pristine surface to reach its maximum strength. This is especially true in showers where water pressure and chemicals are constantly attacking the joints. For those looking at future designs, modern shower designs often incorporate larger tiles to minimize the number of joints that need this level of maintenance.
- Wear a high-quality N95 respirator to protect against silica dust.
- Always use eye protection to guard against flying grout shards.
- Test a small, inconspicuous area first to check for tile scratching.
- Change your carbide blades frequently; a dull blade causes more damage.
- Keep a bucket of clean water and a sponge nearby for immediate dust control.
- Inspect the subfloor for any signs of movement or rot while the joints are open.
- Use a shop-vac with a fine-particle filter to keep the air clean.
Final assessment
Scraping grout from deep joints is a task that requires the right blend of power and precision. The oscillating multi-tool with a carbide blade is the workhorse of the industry, but it cannot do the job alone. You need the manual control of hand scrapers and a strict adherence to cleaning protocols to ensure the new installation holds up over time. Flooring is a structural challenge, not a decorative one. Every layer, from the subfloor to the grout, must be integrated into a solid, cohesive system. If you treat the process with the respect it deserves, you will end up with a floor that is beautiful and durable. If you take shortcuts, the floor will eventually tell on you. Take the time to zoom into the details, understand the chemistry of your materials, and never underestimate the importance of a clean, deep joint. For more tips on maintaining your home, you can see tile cleaning tips to keep your new grout looking fresh for years to come.