I spent three days grinding concrete on a job last month just so the floor would not click like a castanet, and let me tell you, that kind of prep work is what separates a floor that lasts forty years from one that fails in forty days. You might think baseboards are just the jewelry of the room, the final trim that hides the ugly expansion gap, but in an old house with plaster walls, they are a structural challenge. Most guys skip the leveling compound and try to hide the dip with a bit of extra caulk. They think the underlayment will hide the dip. It won’t. When you are dealing with lath and plaster, you are dealing with a surface that has moved and breathed for decades, creating a topographical map of swells and valleys that will make a straight piece of wood look like a mistake. I smell like oak dust and WD-40 because I spend my life making sure these transitions are tight. If you want chic baseboard designs that transform rooms in 2025, you have to respect the physics of the wall first.
The ghost in the expansion gap
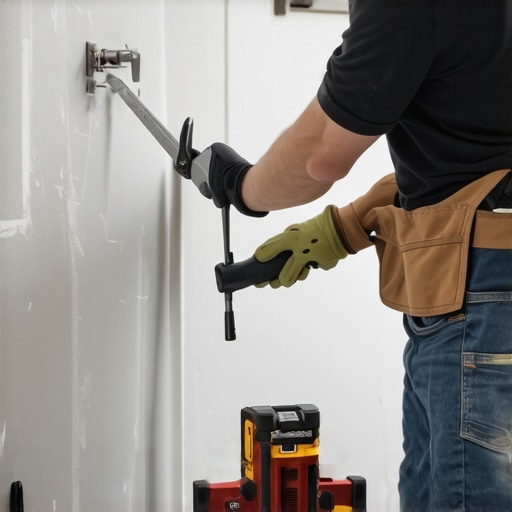
Baseboard installation on uneven plaster requires scribing, back-planing, and mechanical tension management to ensure a tight fit against the wall surface. You cannot simply nail a board to a wavy wall and expect the gap to disappear; instead, you must transfer the wall’s sinusoidal profile onto the wood substrate using a marking compass and then remove the excess material with a jigsaw or belt sander. This technique prevents the wood from being forced into a curve that would eventually lead to fastener failure or plaster cracking. Plaster is a brittle medium. It is essentially a layer of calcium sulfate or lime spread over wooden lath. Over time, the house settles, the lath bows, and the plaster follows. When you try to pull a rigid piece of MDF or finger-jointed pine tight against a valley in that plaster, you are introducing mechanical stress. Something has to give. Usually, it is the nail pulling out of the stud or the plaster crumbling under the pressure of the board. I have seen beautiful installations of baseboards makeover ideas to elevate your space ruined because the installer thought he could just use more nails. You can’t out-nail a bad wall.
“A floor is only as good as the subfloor beneath it; deflection is the enemy of every joint.” – Master Flooring Axiom
Why your walls are lying to you
Plaster walls often hide structural deviations such as bowed studs, lath accumulation, and moisture-induced swelling that create gaps between the trim and the vertical surface. To identify these areas, use a six-foot magnesium level or a straightedge to find the high points along the floor line before you even cut a single piece of trim. Most homeowners assume their walls are vertical and flat, but in the world of professional floor architecture, we know that every wall is a lie. The chemistry of old plaster is fascinating. It starts as a wet slurry that undergoes a carbonation process, turning into a hard, stone-like substance. However, that substance is attached to wood lath that reacts to every change in humidity. If you are working in an area where tile cleaning tips for a sparkling bathroom are a priority, you probably have moisture issues that have already caused your plaster to swell. This makes the baseboard installation even more difficult. You aren’t just fitting wood to a wall; you are fitting it to a living, moving entity.
| Material Type | Flexibility Rating | Moisture Resistance | Scribing Ease |
|---|---|---|---|
| Solid Oak | Low | Medium | Difficult |
| Finger-Jointed Pine | Medium | Low | Easy |
| MDF (Medium Density Fiberboard) | High | Very Low | Moderate |
| PVC (Vinyl) Trim | Very High | Maximum | Moderate |
The 1/8 inch that ruins everything
Gaps larger than one-eighth of an inch between the baseboard and the wall will cause caulk shrinkage, aesthetic shadow lines, and structural instability of the trim piece. When the gap exceeds this threshold, the volumetric shrinkage of standard acrylic caulk will pull away from the plaster, leaving a jagged, unsightly line that catches dust and ruins the clean transition. I always tell my apprentices that if they are relying on caulk to fill a gap wider than a nickel, they have already lost the battle. In wet areas, like near showers that wow, this gap is a highway for moisture to get behind your trim and start rot in the sill plate. You need to understand the Young’s Modulus of the wood you are using. If you use a hardwood like white oak, the force required to bend that board into a 1/4 inch dip in the plaster is immense. That force is stored energy. One day, that energy will release, usually when the humidity drops in winter, and your beautiful mitered corners will fly apart. Scribing is the only way to neutralize that energy. By removing the wood from the back of the board, you allow the face to sit flush against the wall without any internal tension.
Physics of wood tension and scribe lines
Scribing involves using a compass to mirror the wall’s profile onto the back or top edge of the baseboard, allowing for a bespoke fit that accommodates every hump and hollow. You set the compass to the width of the largest gap, drag the point along the wall, and the pencil transfers that exact wave to your trim. But here is the trick that most guys miss: you have to back-cut the scribe. If you cut the line at a 90-degree angle, you are still going to fight the wood. You need to bevel the cut toward the back of the board at about 15 or 20 degrees. This creates a thin leading edge that can be finely tuned with a sanding block for a surgical fit. It is the same logic we use when dealing with grout restoration secrets for long-lasting results; if the preparation of the joint isn’t perfect, the final product will fail. For those working in regions with high humidity, like the coastal South, this is even more critical. The wood will expand across its grain, and if it is locked into a tight, stressed position, it will cup or crown, pulling your baseboards right off the plaster.
- Identify high points using a long straightedge or laser level.
- Secure the baseboard in place with temporary clamps or a helper.
- Set your scribing compass to the widest gap found along the run.
- Transfer the wall profile to the trim with a steady, horizontal hand.
- Remove excess material using a jigsaw with a scroll blade or a power plane.
- Back-cut the edge to ensure only the front face touches the plaster.
- Test fit and fine-tune with 80-grit sandpaper on a hard block.
The structural reality of lath and plaster
Lath and plaster systems create a variable thickness across the wall surface that requires flexible adhesive polymers and long-shank fasteners to achieve a permanent bond. Because the plaster can be anywhere from half an inch to over an inch thick, standard two-inch finish nails often fail to bite deeply into the wooden studs behind the lath. You need to use 2.5 inch or even 3 inch 16-gauge nails to ensure you are hitting structural timber. And don’t just rely on nails. I use a bead of high-solids construction adhesive, but only on the high points of the wall. If you glue the whole thing, you are making it impossible for the next guy to ever remove that trim without destroying the wall. If you are also dealing with bathroom renovations, like looking for showers with a style, remember that the baseboard transition to the tile is a high-moisture zone. You might even consider how to refresh grout without replacing it if your baseboards have been leaking moisture into the subfloor for years. The chemistry of the bond matters. Use a siliconized acrylic caulk that has at least 25 percent joint movement capability. This allows the house to breathe without the bead cracking.
“Deflection is the enemy of every joint; a floor is only as good as the subfloor beneath it.” – TCNA Handbook for Ceramic, Glass, and Stone Tile Installation
Selecting materials that survive the bend
Material selection dictates the success of a baseboard installation on irregular surfaces, with finger-jointed poplar and MDF offering the best balance of malleability and structural integrity. While solid hardwoods are beautiful, they are the least forgiving. If you must use solid wood, you need to kerf the back of the board. This means cutting a series of vertical slots half-way through the thickness of the wood on the back side. This breaks the tension of the wood fibers and allows the board to bend more easily without snapping. It is a technique used in fine cabinetry that works wonders for baseboards on wavy walls. If you are interested in sustainability, look into eco-friendly tile solutions for sustainable homes in 2025, as these often pair well with low-VOC MDF trim. Contrarian point: Don’t use more nails to force a gap closed; you will just create a mechanical stress point that will eventually crack the plaster or pop the nail head. Instead, let the scribe do the work. If you have a massive gap at the floor, you might need a shoe molding or a