Why your subfloor is lying to you
Blotchy shower grout occurs because of inconsistent hydration, excessive water during the cleaning process, and improper mixing ratios. To fix a blotchy finish, one must address the underlying moisture levels in the substrate and use specialized colorants or chemical cleaners to unify the appearance of the joints.
I spent three days grinding concrete on a job last month just so the floor wouldn’t click like a castanet. That is the reality of professional work. Most guys skip the leveling compound. They think the underlayment will hide the dip. It won’t. I smelled like WD-40 and oak dust for a week after that, but that is the cost of doing it right. When it comes to showers, that same laziness manifests as blotchy grout. You see it every day. A beautiful porcelain tile installation is ruined because the grout looks like a Dalmatian. It is not just an eyesore. It is a sign that the chemistry of your installation has failed at a molecular level. A floor is a performance surface. It is a structural engineering challenge. If you treat it like a cosmetic choice, you will fail. I have seen guys install showers that wow modern designs for 2025 only to have the homeowner call them back a week later because the dark gray grout has turned white in patches. That white stuff is not just dirt. It is often efflorescence, a migration of salts through the capillary network of the cement. You can read more about showers that wow modern designs for 2025 to see how the pros handle layout, but the finish depends on the bucket.
“A floor is only as good as the subfloor beneath it; deflection is the enemy of every joint.” – Master Flooring Axiom
The ghost in the water bucket
Inconsistent grout color is primarily caused by adding too much water to the mix or using a soaking wet sponge during cleanup. These actions wash out the pigment and cause the cement to cure at different rates, leading to visible shading variations across the tile surface.
The chemistry of Portland cement is a fickle beast. When you mix grout, you are initiating a hydration reaction. It is not drying. It is curing. This means the water and the cement powder are forming a crystalline structure called calcium silicate hydrate. If you use a dirty bucket or a drill that is spinning too fast, you introduce air. You create bubbles. These bubbles pop and leave microscopic pits that catch the light differently. It will buckle. It will crack. I once saw a guy who thought he could eyeball the water ratio. He ended up with a soup. The pigment particles in grout are heavier than the water. If the mix is too thin, those pigments settle at the bottom of the joint. The top looks pale. The bottom looks dark. This is why you need to follow the manufacturer’s directions to the gram. While most people want the thickest underlayment for comfort, too much cushion actually causes the locking mechanisms on LVP to snap under pressure, and similarly, too much water in your grout mix snaps the chemical bond of the colorant. If you are struggling with old grout, check out grout restoration secrets for long lasting results for a deeper look at the recovery process.
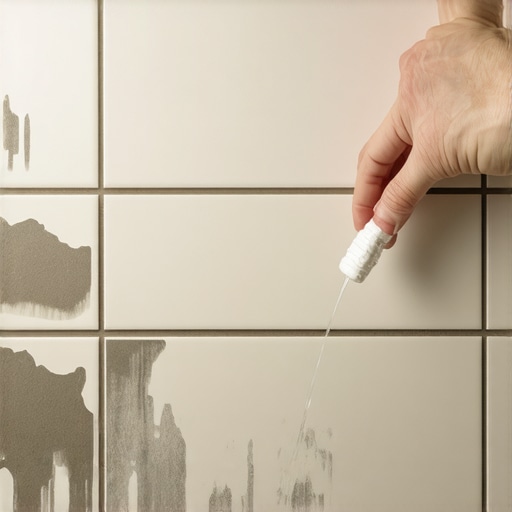
When the sponge becomes a weapon of destruction
Over-washing grout joints with a saturated sponge pulls the liquid pigment from the cement matrix and deposits minerals on the surface. This creates a hazy, blotchy finish known as pigment washout, which is the most common error made by DIY installers and hurried professionals.
You need to wring that sponge until it is barely damp. If you can squeeze a single drop of water out of it, it is too wet. When you swipe a wet sponge over a fresh grout joint, you are essentially performing a mini-excavation. You are removing the binder. You are leaving behind the sand. This is why some joints feel gritty and look light, while others feel smooth and look dark. It is a disaster. If you are working in a high-humidity environment like the swampy humidity of Houston, your grout will take longer to set. If you are in the dry heat of Phoenix, it will dry too fast. Both lead to blotchiness. In Houston, the water stays on the surface too long. In Phoenix, the moisture is sucked out of the grout by the dry air and the porous edge of the tile before the crystals can grow. You must manage the microclimate of the bathroom. If you need help with the maintenance after the fact, tile cleaning tips for a sparkling bathroom in 2025 provides a guide on how to handle the surface without destroying the sealer.
| Grout Type | Water Sensitivity | Cure Time | Color Consistency |
|---|---|---|---|
| Sanded Grout | High | 24-48 Hours | Moderate |
| Unsanded Grout | Very High | 24 Hours | Low |
| Epoxy Grout | Zero | 8-12 Hours | Very High |
| High-Performance | Low | 4-6 Hours | High |
The chemistry of the blotchy finish
Efflorescence is a white, powdery salt deposit that forms on grout when moisture carries soluble minerals to the surface through capillary action. This chemical process is exacerbated by damp subfloors, improper waterproof membranes, and high mineral content in the mixing water.
I have spent twenty-five years on my knees with a moisture meter. I know when a slab is breathing. If you install tile over a concrete slab that hasn’t fully cured, that moisture has to go somewhere. It travels up through the thin-set. It travels through the grout. As the water evaporates, it leaves the salts behind. This is the white blotchiness that drives homeowners crazy. You can’t just wash it away with more water. That just feeds the cycle. You need an acidic cleaner to break down the minerals. But be careful. Too much acid will eat the grout itself. You have to be a chemist. You have to be an architect. If the damage is done, you might need to learn how to refresh grout without replacing it to save the project. It is a delicate balance. I have seen guys try to cover it up with more grout. It never works. The new layer is too thin. It will flake off like old paint. You are better off using a grout colorant. These are essentially epoxy-based paints that soak into the grout and seal it. They provide a uniform color and a moisture barrier all in one shot.
“Variation in color and shading is inherent in all cementitious products and is influenced by the rate of hydration.” – TCNA Handbook for Ceramic, Glass, and Stone Tile Installation
The checklist for a perfect grout finish
Achieving a uniform grout color requires precision in mixing, environmental control, and mechanical application. Following a strict protocol ensures that the pigment remains locked in the cement matrix and that the surface reflects light evenly across the entire shower.
- Use distilled water if your local tap water has high mineral content.
- Mix the grout by hand or with a low-RPM paddle to avoid entraining air.
- Let the grout slake for ten minutes to allow the chemicals to fully activate.
- Check the tile edges for thin-set squeeze-through which causes dark spots.
- Wring sponges until they are bone-dry to the touch.
- Avoid using fans or heaters that cause uneven drying rates.
If you follow these steps, you won’t end up with a blotchy mess. You will have a floor that lasts. You will have a shower that doesn’t leak. If you are also looking at the surrounding areas, consider how chic baseboard designs that transform rooms in 2025 can complement a perfect tile floor. You can find inspiration at chic baseboard designs that transform rooms in 2025. A good baseboard hides the expansion gap. It protects the wall. It is the finishing touch on a professional job.
The final inspection
Fixing blotchy grout involves either a deep chemical cleaning to remove efflorescence or the application of an epoxy-based grout colorant to create a permanent, uniform finish. Prevention through proper water ratios and substrate preparation remains the only way to avoid these labor-intensive repairs.
I don’t care how much you spent on your tile. If the grout is blotchy, the job looks cheap. It looks like an amateur did it. Don’t be the guy who thinks a wet sponge is a magic wand. It is a tool. Use it with respect. If you find yourself in a position where the floor is already a disaster, don’t panic. There are solutions. But remember, a floor is a structural system. Every layer matters. From the moisture barrier on the subfloor to the sealer on the grout. It all has to work together. If you want to see how to elevate the rest of your space, look at baseboards makeover ideas to elevate your space. And if you ever have questions about the integrity of your installation, you can always contact us for professional advice. Stay off your knees until the grout is cured. And for the love of the craft, stop using so much water.
Comments
One response to “Why Your New Shower Grout is Drying Blotchy and How to Fix the Finish”
This post offers such a comprehensive overview, especially around the importance of proper mixing and environmental control when grouting. I recall a project where we missed the microclimate aspect, and the grout dried unevenly, causing noticeable blotchiness even after curing. It made me realize how crucial it is to regulate humidity and temperature—something I think many DIYers overlook. I’ve also found that using epoxy grout or high-performance formulas can significantly mitigate these issues because of their faster curing times and lower water sensitivity. Has anyone experimented with different grout brands or additives to improve uniformity, especially in challenging environments? It seems that mastering substrate prep and environmental control are just as vital as the actual mixing technique for achieving a flawless finish.