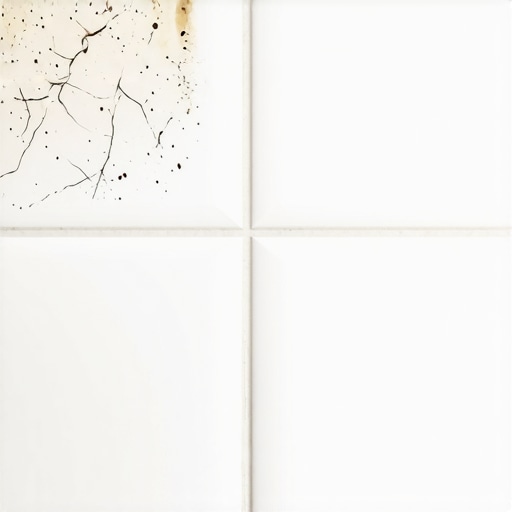
I once walked into a luxury bathroom where the homeowner had spent forty thousand dollars on Italian marble, yet the grout was crumbling into a fine white powder that looked like spilled flour. They thought the tile was defective. I took one look at the chalky residue and knew the installer had committed the cardinal sin of hydration. They had added too much water to the mix to make it easier to spread, effectively killing the chemical bond before it even had a chance to cure. I spent the next four days with a oscillating tool, grinding out every single joint because someone wanted to save twenty minutes on the mixing process. It is a heartbreak I see weekly. Most people treat grout like a cosmetic filler, but in the structural reality of a shower, it is the primary line of defense against hydraulic pressure and structural shifting. When grout flakes, it is not just an eyesore. It is a diagnostic alarm that your shower system is failing from the inside out.
The chemistry of a failed grout bond
Grout flaking occurs when the cementitious bond fails due to improper water-to-powder ratios, premature drying, or substrate deflection. High-performance grout requires a specific molecular hydration process where calcium silicate hydrate crystals interlock with the tile edges. If this process is interrupted by excessive moisture or rapid evaporation, the grout remains brittle and structurally unsound. This microscopic failure manifests as surface flaking and deep cracks. Most installers treat grout as an afterthought, but it is a complex chemical compound. When you mix a standard portland cement grout, you are initiating a reaction. If you dump in too much water, you create microscopic voids as that water eventually evaporates. These voids leave the grout soft. You can literally scratch it out with a fingernail. If you want to avoid this, you might consider grout restoration secrets for long-lasting results to understand how a proper bond is maintained over time. The physics of the bond also depend on the tile itself. A high-porosity ceramic tile can actually suck the moisture out of the grout too fast. This is called a flash dry. It stops the hydration process in its tracks. You end up with a hard shell and a powdery center. It is a disaster waiting to happen every time you turn on the shower head.
“A floor is only as good as the subfloor beneath it; deflection is the enemy of every joint.” – Master Flooring Axiom
Why your subfloor is lying to you
Subfloor deflection and wall stud movement are the silent killers of shower grout integrity in modern homes. If the wooden framing behind your tile is not stiff enough, it will flex under the weight of water and the person standing in the shower. This movement, measured as L/360 or L/720 in technical manuals, creates enough stress to snap the rigid grout lines. Grout has zero tensile strength. It cannot bend. When the wall moves, the grout flakes. I have seen countless showers where the installer didn’t use enough screws in the backer board. Every time the door slams or someone leans against the wall, the tiles micro-shift. This micro-shifting is what leads to the flaking. You see it first in the corners and along the base. It starts as a hairline fracture and then the edges start to crumble. If you are noticing these issues, you might need tile cleaning tips for a sparkling bathroom in 2025 to at least clear the debris before assessing the structural damage. Many homeowners think they can just smear more grout over the top. This is a waste of time. New grout will not bond to old, dirty grout. It is like trying to tape a broken window. It might look okay for a day, but the underlying movement will just break the new layer too.
Comparing the structural integrity of grout types
The choice between sanded, unsanded, and epoxy grout is a decision of engineering, not just aesthetics. Each material has a specific threshold for stress and moisture resistance. Choosing the wrong one for your joint width is a guaranteed path to flaking and failure.
| Grout Type | Joint Width Suitability | Water Absorption Rate | Flexural Strength |
|---|---|---|---|
| Standard Sanded | 1/8 inch to 1/2 inch | High | Moderate |
| Unsanded Cement | Less than 1/8 inch | High | Low |
| Epoxy Grout | 1/16 inch to 1/2 inch | Near Zero | Extremely High |
| Urethane Grout | 1/16 inch to 1/2 inch | Low | High |
The ghost in the expansion gap
Expansion gaps at the change of plane are mandatory for preventing grout from popping and flaking during thermal shifts. Any area where a wall meets another wall, or where a wall meets the floor, must be filled with a flexible 100 percent silicone sealant rather than rigid grout. When heat from hot water hits the tile, the materials expand. Without a flexible joint, the pressure has nowhere to go but out, causing the grout to shatter. This is a mistake I see in nearly every DIY job. People want the look of a continuous grout line from the floor to the ceiling. It looks great for three months. Then the seasons change. The house settles. The grout in the corners starts to flake off in chunks. If you are working on a full bathroom renovation, integrating showers that wow modern designs for 2025 requires understanding these technical boundaries. You can even use color-matched caulk that looks exactly like grout but has the elasticity of a rubber band. This is how you build a shower that lasts thirty years instead of three. You also have to consider the transition to other materials. If your shower tiles meet your chic baseboard designs that transform rooms in 2025, that transition point is a prime candidate for movement-related flaking. Never grout the gap between the tile and the baseboard. Use a flexible sealant every time.
The 1/8 inch that ruins everything
Using unsanded grout in a joint wider than one eighth of an inch leads to massive shrinkage and subsequent flaking. Unsanded grout lacks the aggregate necessary to hold its shape across a wide span. As it cures, it shrinks significantly, pulling away from the tile edges and leaving a hollow, brittle bridge that collapses under the lightest pressure. Sanded grout uses silica sand to act as a bridge. Think of it like rebar in concrete. The sand provides the structure that prevents the cement from shrinking too much. If you have wide gaps and your grout is falling out in strips, you likely have an aggregate failure. You cannot fix this without a full removal. If the damage is localized, you might try how to refresh grout without replacing it, but even then, you must ensure the product you use is compatible with the existing joint width. I always tell my apprentices that the tape measure is the most important tool in the grout bag. If you guess the width, you are guessing the lifespan of the floor. For those looking for eco-friendly tile solutions for sustainable homes in 2025, ensure your installer is using low-VOC, high-aggregate grouts that meet the ANSI A118.7 standard for polymer-modified cement.
“Cement hydration is a journey, not a destination; if you rush the cure, you embrace the crumble.” – Tile Council of North America Handbook Insight
Moisture barriers and the invisible leak
A failing waterproof membrane behind the tile causes the substrate to swell, which pushes the grout out of the joints from the back. When water gets behind the tile because of a pinhole leak or poor sealing, the cement board or plywood starts to expand. This expansion creates an internal pressure that the grout cannot withstand. It is essentially being evicted from the joint. This is the most dangerous type of flaking because it indicates a structural rot issue. If you touch the flaking grout and it feels damp even when the shower hasn’t been used, you have a moisture management crisis. You should look into showers with a style trendy ideas for small bathrooms to see how modern waterproofing systems like Schluter-Kerdi or Wedi boards are used to create a watertight shell that protects the grout from this back-side pressure. If you ignore this, the next step is mold. Not the surface mold you can scrub off, but the black rot that eats your wall studs. By the time you see the grout flaking, the damage is already well underway. You need to act fast.
The definitive checklist for grout preservation
- Verify the subfloor meets L/720 deflection standards for stone or L/360 for ceramic.
- Ensure 100 percent silicone sealant is used at all changes of plane and corners.
- Check that the grout was mixed with a low-speed drill to avoid air entrainment.
- Confirm the installer waited at least 24 hours after tiling before applying grout.
- Use a pH-neutral cleaner to avoid eroding the cementitious bond over time.
- Seal all cement-based grout joints with a high-quality penetrating sealer.
- Maintain consistent humidity levels in the home to prevent excessive substrate movement.
While most people want the thickest underlayment, too much cushion actually causes the locking mechanisms on LVP to snap under pressure. This same logic applies to tile. Too much flex in the mortar bed or the use of an overly thick, soft waterproofing mat can cause the grout to crack because the tile is literally floating on a sponge. You want a rigid, solid assembly. If you are unsure about the state of your bathroom, you should contact us for a professional evaluation. Dealing with flaking grout early can save you from a complete tear-out. You might also want to explore baseboards makeover ideas to elevate your space once your flooring is secure. Remember that a shower is a machine. Every component, from the thin-set to the grout, has a job to do. When one fails, the whole machine breaks. Stop looking at the flakes as a nuisance and start seeing them as the structural warning they truly are. Proper maintenance and a deep understanding of the chemistry involved will keep your bathroom dry and your tiles in place for the long haul.
Comments
2 responses to “Why Your Shower Grout is Flaking Off the Wall”
Reading this deep dive on grout failure really highlights the importance of proper installation and ongoing maintenance. I had a similar issue in my bathroom where the grout started crumbling after just a couple of years. It turned out the installer used the wrong type of grout for the joint width and skipped the expansion gaps altogether. Since then, I’ve become a firm believer in flexible sealants at all change-of-plane joints, especially around corners and along the transition to different materials. One thing I’ve noticed is how many DIYers underestimate the impact of substrate movement — often simply re-grouting over existing cracks without addressing underlying problems. Has anyone tried re-sealing or injecting epoxy resin into existing cracks to reinforce the structure, or is full removal always the best solution? It seems that understanding the chemistry involved can really prevent a lot of future headaches and costly repairs.
This article sheds light on some often overlooked aspects of grout failure that many homeowners might not consider, especially the importance of substrate stability and proper sealing. I recently had a similar issue in my renovated bathroom where I noticed tiny cracks developing along the grout lines. After some research, I realized that I hadn’t paid enough attention to expansion joints and the waterproof membrane behind the tiles. It’s interesting how such small details can lead to major problems down the line when not addressed during installation. I’m curious whether using epoxy grout might be a better choice for areas with higher movement or moisture exposure, given its high flexural strength and zero water absorption rate. Has anyone here had experience switching to epoxy for their showers or kitchens to prevent flaking? I’d love to hear how it worked out, especially in terms of longevity and ease of maintenance. Properly addressing these issues early on can save a lot of money and hassle in the long run.