I spent three days grinding concrete on a job last month just so the floor wouldn’t click like a castanet. Most guys skip the leveling compound because they think the underlayment will hide the dip. It wont. I have seen the same laziness when it comes to tile maintenance. I once walked onto a job where a homeowner had poured raw muriatic acid on their grout lines because a blog told them it was a quick fix. The acid did not just clean the grout, it dissolved the binder. Within six months, the tiles were shearing off the thin-set. Cleaning grout is not about making it white. It is about preserving the structural integrity of the cementitious matrix that holds your floor together. If you treat your grout like a cosmetic after-thought, you are inviting subfloor rot and tile failure into your home. This is why I only advocate for the use of oxygen bleach, specifically sodium percarbonate, for deep restoration. It is the only chemistry that respects the physics of your flooring system.
The myth of the indestructible grout line
To clean grout safely with oxygen bleach, you must mix the powder with warm water until fully dissolved, apply the solution to the grout lines, and let it sit for at least thirty minutes. This process allows the oxygen ions to break the molecular bonds of the stains without eroding the cementitious structure or stripping the pigment from the tile joints. Unlike harsh acids or chlorine, oxygen bleach is pH-neutral enough to leave the surface of the tile intact while penetrating deep into the porous voids of the grout. Grout is essentially a petrified sponge. It has billions of microscopic voids that collect grease, skin cells, and microscopic debris. When you use chlorine bleach, you are only whitening the top layer. You are not actually removing the organic material. Oxygen bleach works through a process called oxidation where it releases concentrated oxygen to physically lift the debris out of those pores. This is the only way to achieve a true clean that lasts. For more general advice on maintaining these surfaces, you should look into tile cleaning tips for a sparkling bathroom in 2025 to keep the overall aesthetic sharp.
“A floor is only as good as the subfloor beneath it; deflection is the enemy of every joint.” – Master Flooring Axiom
Why your subfloor is lying to you
The stability of your grout lines depends entirely on the lack of deflection in your subfloor and the moisture levels within the slab. If your subfloor flexes even a fraction of an inch, the grout will crack regardless of how clean it is. This is why cleaning with excessive water is a gamble. If your grout is cracked and you flood the floor with cleaning solution, that moisture travels straight down into the plywood or the concrete. In humid environments like the Pacific Northwest or the Gulf Coast, this trapped moisture leads to mold growth that you will never see until you rip the floor up. Oxygen bleach is superior here because it requires less liquid volume than traditional mopping. You are targeting the lines, not soaking the assembly. When you understand that grout is a structural component of the grout restoration secrets for long lasting results, you start to treat it with the respect a structural engineer would. You are protecting the substrate from the top down.
The 1/8 inch that ruins everything
Maintaining a consistent 1/8 inch grout line is the standard for most ceramic and porcelain installations because it allows for slight thermal expansion without causing tile tenting. If you allow dirt and grime to pack into these lines, the floor loses its ability to breathe. It becomes a rigid, brittle mass. When the house settles or the temperature changes, the tile has nowhere to go but up. Oxygen bleach restores that 1/8 inch of space by clearing out the compacted minerals that cause this rigidity. I have seen floors buckle in the heat of a Phoenix summer simply because the grout lines were so full of wax and dirt that they acted like solid stones. You need those joints to be clean and slightly flexible. Proper cleaning ensures the floor performs as designed for decades. This attention to detail is just as important when you are considering chic baseboard designs that transform rooms in 2025, as the transition from floor to wall is where most moisture problems begin.
The ghost in the expansion gap
Expansion gaps at the perimeter of a room are often hidden by baseboards, but they are the most critical part of a tile installation for long-term survival. Many DIY cleaners make the mistake of shoving cleaning slurry into these gaps. When oxygen bleach is used, it should be applied with precision to avoid saturating the perimeter. If you clog the expansion gap with debris and dried cleaning agents, the floor can no longer expand. This leads to the ghost in the machine, the mysterious clicking sound when you walk across the room. That sound is your tile separating from the thin-set because it has no room to move. You must protect these areas. If your current trim looks worn from years of wet cleaning, it might be time for baseboards makeover ideas to elevate your space to ensure a clean and functional perimeter. A clean floor is a moving floor, and a moving floor is a floor that does not crack.
The chemistry of the oxygen lift
Sodium percarbonate breaks down into sodium carbonate and hydrogen peroxide when mixed with water, creating a high-pressure gas release inside the grout pores. This is the molecular zooming that homeowners miss. The hydrogen peroxide acts as the oxidizing agent, while the sodium carbonate acts as a surfactant to lower the surface tension of the water. This allows the solution to soak into the grout faster. It is a dual-action attack on dirt. You do not need to scrub like a maniac if you let the chemistry do the heavy lifting. I tell my clients to mix the powder with water that is approximately 120 degrees Fahrenheit. This temperature accelerates the decomposition of the percarbonate and maximizes the oxygen output. If the water is too cold, the powder won’t dissolve. If it is boiling, you exhaust the reaction too quickly. It is about the physics of the bond. Proper chemical application is the difference between a floor that looks clean and a floor that is structurally sound.
| Cleaner Type | pH Level | Surface Safety | Deep Cleaning Power |
|---|---|---|---|
| Oxygen Bleach | 10.5 | High | Excellent |
| Chlorine Bleach | 12.6 | Low | Surface Only |
| White Vinegar | 2.4 | Low | Moderate |
Protecting your perimeter assets
Baseboards and wall transitions are often the first victims of aggressive floor cleaning, as moisture wicks into the wood or MDF causing swelling and paint failure. When you are scrubbing your grout, you need to be mindful of the capillary action at the edge of the room. Wood baseboards will drink up any excess water you leave on the floor. This is a common failure point I see in showers with a style trendy ideas for small bathrooms where the waterproofing was not carried up high enough behind the trim. Use a masking tape or a shield if you are working near expensive millwork. The goal is to keep the oxygen bleach on the grout, not on the walls. If you are doing a full refresh, consider how to refresh grout without replacing it to save money and time while achieving a professional result.
“Tile installations require a stable substrate where the L/360 deflection limit is strictly maintained to prevent grout cracking.” – TCNA Handbook Standards
The physics of the scrub
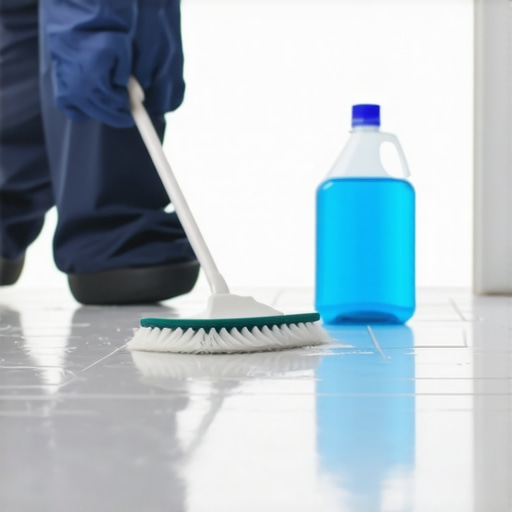
Using a stiff nylon brush is essential because metal bristles will scratch the glaze of the tile and leave metallic streaks on the grout. You are not trying to grind the grout away. You are trying to agitate the oxygen bubbles so they can carry the dirt to the surface. I prefer a brush with a tapered head that fits directly into the joint. This focuses the kinetic energy where it is needed most. Start from the center of the room and work toward the exit. This prevents you from walking over your clean lines and pushing oils from your shoes back into the pores. It is a systematic approach. Once the dwell time is up and the bubbles have stopped forming, the dirt is suspended in the liquid. You must wipe it up with a microfiber cloth immediately. If you let it dry, the dirt just settles back into the grout and you have wasted three hours of your Saturday.
- Always use warm water to dissolve the sodium percarbonate powder completely.
- Wear gloves to prevent the high pH from drying out your skin.
- Allow for a thirty minute dwell time to ensure the oxygen reaches the bottom of the joint.
- Use a wet-vac if possible to pull the dirty slurry out of the grout lines.
- Rinse the floor with plain water to remove any residual sodium carbonate.
If you follow these steps, you are not just cleaning. You are performing maintenance on a complex structural system. You are ensuring that the bond between your tile, your thin-set, and your subfloor remains uncompromised by organic decay. This is the way of the master flooring architect. We do not look at the shine. We look at the integrity. When the integrity is there, the shine follows naturally.