The phantom on the stone face
Removing grout haze from porous natural stone requires identifying if the residue is cementitious or polymer-modified and using a pH-neutral cleaner with a non-woven abrasive pad to lift the film without etching the surface. Because natural stone is chemically reactive and physically absorbent, standard acid cleaners will cause permanent damage to the mineral structure of the slab. I once spent four days on my knees in a custom shower in Scottsdale because the previous guy used an acidic cleaner on a $30,000 travertine installation. He thought he was saving time. Instead, he etched the stone so deep it looked like it had been sandblasted. I spent three days grinding and polishing that stone back to life just so the homeowner wouldn’t have to rip the whole thing out and start over. Most guys skip the prep. They think they can just wipe the haze away later. They are wrong. Natural stone is a sponge made of ancient minerals. If you treat it like ceramic, you will kill the finish. This is about chemistry and physics, not just cleaning. You are dealing with microscopic pores that have literally swallowed the grout particles. To get them out, you need to understand the molecular bond you are trying to break.
Molecular reality of travertine and slate
Natural stone surfaces like travertine, slate, and limestone possess a high rate of absorption and a delicate chemical balance that reacts poorly to traditional cleaning agents. These stones are often calcareous, meaning they are composed primarily of calcium carbonate, which dissolves instantly when it touches even a mild acid. This isn’t just a surface stain. It is a structural reality. When you apply grout, the water in the mixture carries fine particulates of Portland cement and pigments deep into the stone pores. If you don’t seal the stone before grouting, you are basically dyeing the stone from the inside out. This is why tile cleaning tips for a sparkling bathroom in 2025 always emphasize the importance of stone density. A slate tile has layers that can trap grout like a series of tiny caves. Travertine has pits and voids that act as reservoirs for cementitious sludge. You aren’t just cleaning a flat plane. You are cleaning a three-dimensional landscape of mineral deposits.
“A floor is only as good as the subfloor beneath it; deflection is the enemy of every joint.” – Master Flooring Axiom
The chemical betrayal of acid cleaners
Using acidic cleaners on natural stone like marble or limestone results in etching, which is a chemical burn that permanently dulls the stone surface. Most grout haze removers found at big-box retailers are phosphoric or sulfamic acid based. They work great on ceramic because ceramic is inert. Stone is alive, chemically speaking. The acid attacks the calcium in the stone faster than it attacks the grout haze. You end up with a clean spot that is permanently matte while the rest of the stone is polished. It is a disaster. You need a pH-neutral surfactant. This breaks the surface tension of the water and allows it to get under the grout film. It doesn’t dissolve the grout. It lubricates the bond so you can mechanically lift it. I’ve seen people try to use vinegar. Vinegar is an acid. Do not put it on your stone. It will eat the finish before you can even say the word grout. We focus on grout restoration secrets for long-lasting results by respecting the pH scale. A neutral cleaner, usually around a pH of 7 or 8, is the only safe bet for your natural stone surfaces.
| Stone Type | Mineral Composition | Mohs Hardness | Acid Sensitivity |
|---|---|---|---|
| Marble | Calcareous | 3-4 | Extreme |
| Travertine | Calcareous | 3-4 | Extreme |
| Limestone | Calcareous | 3 | High |
| Slate | Siliceous | 2.5-4 | Moderate |
| Granite | Siliceous | 6-7 | Low |
Mechanical versus chemical removal strategies
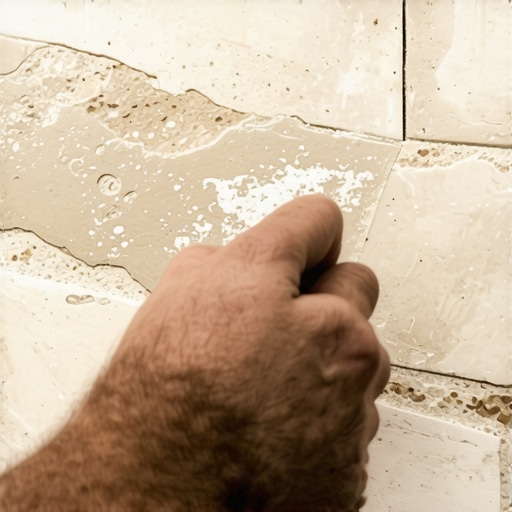
Mechanical removal of grout haze involves using friction and specific abrasive tools that are harder than the grout but softer than the stone. This is a delicate balance. If you use a steel wool pad, you will scratch the stone. If you use a soft sponge, you won’t touch the haze. I recommend white nylon scrub pads. They are designed to be non-abrasive to the stone but firm enough to catch the edges of the dried cement. You have to work in small circles. This isn’t a power tool job. It’s a hand tool job. You need to feel the resistance change as the haze lifts. If the haze is polymer-modified, you might need a specific enzyme cleaner. These enzymes are designed to eat the plastic binders in the grout without touching the stone minerals. It is slow work. It is painful work. But it is the only way to save a floor that wasn’t cleaned properly during the installation phase. If you are looking at how to refresh grout without replacing it, you have to start with a clean face. You can’t put new sealer or colorant over a hazy stone.
The friction coefficient of cheesecloth
Cheesecloth is the secret weapon for removing the final microscopic layer of grout dust once the heavy haze has been lifted. After you’ve done the heavy scrubbing, there is usually a fine dust left behind. It looks fine when wet, but as soon as it dries, it turns into a cloudy mess. This is where the cheesecloth comes in. The open weave of the cloth acts like a series of tiny hooks. It grabs the dust and pulls it away from the stone instead of just pushing it around. You have to use it dry. If you use it wet, you are just making a slurry. Buff the stone until it shines. If you see a streak, you still have residue. I’ve spent hours buffing out showers in showers with a style trendy ideas for small bathrooms where the tiles were so small the grout lines were everywhere. The smaller the tile, the more haze you’ll have to deal with. It’s a math problem. More linear feet of grout equals more potential for a hazy disaster.
- Always perform a test patch in an inconspicuous area like a closet or under a vanity.
- Use two buckets of water, one for the cleaning solution and one for rinsing your pad.
- Change your rinse water every 20 square feet to prevent re-depositing minerals.
- Work in small sections no larger than 3 by 3 feet to maintain control.
- Never leave standing water on natural stone for more than a few minutes.
- Dry the stone immediately with a microfiber towel to inspect your progress.
Why sealing before grouting is not optional
Pre-sealing natural stone creates a temporary barrier that prevents grout pigments and cement from penetrating the deep pores of the material. This is the step that most weekend warriors skip because they want to get to the finishing part. If you don’t pre-seal, the grout becomes part of the stone. Especially with dark grouts on light stones like Carrara marble. The pigment will bleed into the stone and create a permanent shadow that no cleaner on earth can remove. I call it the ghost in the stone. Once it’s in there, it’s in there. I always use a high-quality impregnating sealer at least 24 hours before the grout hits the floor. It fills the pores so the grout has nowhere to go but the joints. This makes the haze removal process about ten times easier. It’s the difference between a one-hour job and a three-day nightmare. When planning showers that wow modern designs for 2025, don’t let the beauty of the stone blind you to the technical requirements of the installation.
“A stone floor is a living surface; if you treat it with disrespect, it will show its scars for a lifetime.” – Master Flooring Axiom
The hierarchy of stone sensitivity
Understanding the difference between siliceous and calcareous stones determines the aggressiveness of your haze removal protocol. Siliceous stones like granite and slate are tough. They can handle a bit more friction and slightly more acidic cleaners, though I still wouldn’t risk it. Calcareous stones like marble, travertine, and onyx are the divas of the flooring world. They react to everything. Even the oils on your hands can leave a mark if you aren’t careful. If you are dealing with a polished marble, your margin for error is zero. Any haze removal attempt that is too aggressive will kill the polish and require a professional stone restorer to come in with diamond pads. This is why chic baseboard designs that transform rooms in 2025 look best when the floor meeting them is perfectly executed. A hazy floor makes even the most expensive baseboards look cheap. It ruins the lines. It ruins the light. It ruins the whole room. Take your time. Respect the stone. Use the right chemistry. Your knees will hurt, but the floor will look like it was meant to be there, not like it was a mistake that got covered up with a cloudy film.