
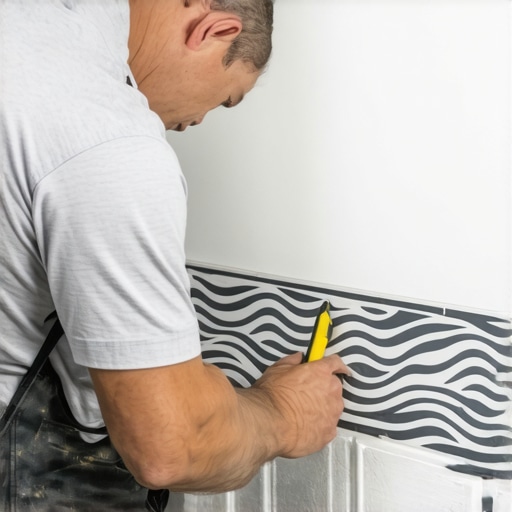
Mastering the Geometry of Scribing Baseboards to Wave Patterned Wall Tile
Most guys skip the leveling compound. They think the underlayment will hide the dip. It won’t. I spent three days grinding concrete on a job last month just so the floor wouldn’t click like a castanet. That job was a reality check for the client who thought they could just slap luxury vinyl over a 1970s slab without prep. When you transition from that level of floor prep to the wall, specifically when you encounter these new 3D wave-patterned tiles, the difficulty doubles. If you think you can just run a bead of caulk to hide a gap between a flat baseboard and a tile that undulates like the North Atlantic, you are a hack. A real installer understands that the wall is a performance surface. The baseboard must be anatomically fitted to the tile, not just placed near it. We are talking about scribing, a process that is as much about structural engineering as it is about carpentry.
The ghost in the expansion gap
To scribe a baseboard to wave-patterned wall tile, you must use a compass or scribing tool to transfer the tile’s topographical profile onto the wood. This requires back-cutting the trim at a 45-degree angle to ensure the face edge sits flush against the grout lines and ceramic peaks. This is the only way to maintain the structural integrity of the installation while providing a professional aesthetic that does not rely on massive amounts of filler. When you deal with showers or bathroom wet zones, the precision of this fit determines whether moisture will wick into the wall cavity or stay on the surface where it belongs. I have seen countless baseboards rot from the inside out because an installer left a quarter-inch gap behind a wave tile and filled it with cheap acrylic caulk. That caulk eventually shrinks, pulls away from the glaze of the tile, and creates a funnel for water. You need to look at chic baseboard designs that transform rooms in 2025 to see how high-end trim should actually interface with modern surfaces. It is not about the wood itself, it is about the physics of the joint.
“A floor is only as good as the subfloor beneath it; deflection is the enemy of every joint.” – Master Flooring Axiom
Why your subfloor is lying to you
Before you even touch a piece of trim, you have to look at the floor. If your subfloor has a dip of more than 3/16 of an inch over 10 feet, your baseboard scribe will never look right. The wood will pivot on the high spots of the tile waves, and every time someone walks near the wall, the floor will flex, causing the baseboard to rub against the tile. This friction eventually grinds down the finish on the wood. I use a 6-foot box level and a set of feeler gauges on every single job. If the floor is not flat, I am not installing. Most homeowners think the grout lines in their tile are just for looks, but they act as the grid for your layout. If the tile is wave-patterned, those grout lines are valleys. If the floor is dipping while the tile is waving, you are working in three dimensions of chaos. You have to stabilize the subfloor first. Only then can you begin the delicate process of mapping the ceramic peaks. This is why baseboards makeover ideas to elevate your space always start with the foundation. You cannot build a skyscraper on a swamp, and you cannot scribe a baseboard to a wavy wall on a bouncy floor.
The geometry of the scribe line
Scribing is the process of translating a complex, non-linear surface onto a linear material. When you hold your baseboard up to a wave tile, you will see gaps where the tile recedes and contact points where the tile protrudes. You need a dedicated scribing compass with a hardened steel point and a lead holder. You set the compass width to the largest gap between the board and the wall. As you run the steel point along the undulations of the tile, the lead marks the exact same path onto the wood. But here is the secret most carpenters miss. You cannot cut that line straight. You must back-cut it. By tilting your jigsaw or table saw blade to a 45-degree angle, you remove the bulk of the material from the back of the board, leaving only a razor-thin edge on the face. This allows the wood to tuck into the ceramic waves without the back of the board hitting the high spots first. It is a game of millimeters. If you are off by a hair, the whole piece is ruined. This level of detail is especially critical in showers where the transition between the floor tile and the wall tile must be protected. If you are looking for showers that wow modern designs for 2025, you will notice that the best ones have zero-visible-gap transitions. That is not magic. That is a back-cut scribe.
| Material Type | Expansion Coefficient | Scribing Difficulty | Best Use Case |
|---|---|---|---|
| Solid White Oak | High | Hard | Dry living areas |
| MDF (Medium Density Fiberboard) | Medium | Easy | Stable climates |
| PVC Composite | Low | Medium | Showers and Bathrooms |
| Finger-Jointed Pine | High | Easy | General trim work |
The 1/8 inch that ruins everything
In the world of flooring, 1/8 of an inch is a mile. When you are fitting trim to 3D tile, you have to account for the thickness of the grout. Grout is porous. It is essentially a hard sponge made of sand and cement. If your baseboard is pressed too tightly against a grout line without a proper sealant, the wood will suck the moisture right out of the grout. This leads to premature wood rot and grout cracking. I always recommend a 100 percent silicone sealant for these joints. Do not use siliconized acrylic. You need the pure stuff that stays flexible. The National Wood Flooring Association is very clear about perimeter expansion gaps. Wood moves. Tile does not. If you scribe your wood so tight that there is no room for the house to breathe, the wood will cup. I have seen $20,000 floors ruined because someone forgot that wood is a biological material that reacts to humidity. You must maintain a tiny, microscopic gap at the very bottom of the scribe and fill it with a color-matched high-performance sealant. This is the difference between a floor that lasts fifty years and one that fails in five.
- Check subfloor levelness using a 10-foot straight edge before starting.
- Acclimate all wood trim for at least 72 hours in the room where it will be installed.
- Use a compass with a locking nut to prevent the width from shifting during the scribe.
- Always back-cut the wood at a 45-degree angle to create a sharp face edge.
- Apply a high-quality wood sealer to the cut edge before installation to prevent moisture wicking.
- Use 100 percent silicone for the transition joint between tile and wood.
“Expansion gaps at the perimeter of a tile installation are not optional; they are structural requirements to prevent tenting.” – TCNA Handbook for Ceramic, Glass, and Stone Tile Installation
Chemistry of the bond in wet environments
When you are working in bathrooms, the chemistry of your adhesives and sealants is just as important as your carpentry. Most guys grab whatever is on the truck. That is a mistake. When you are bonding baseboards near showers, you have to deal with constant vapor pressure. If the tile was installed with a modified thin-set containing high levels of polymers, the surface might be slightly hydrophobic. Standard wood glue will not bite. You need a polyurethane-based construction adhesive that can bridge the gap between the organic cellulose of the wood and the inorganic glaze of the tile. Furthermore, you need to be thinking about tile cleaning tips for a sparkling bathroom in 2025 because the chemicals used to clean that tile will eventually hit your baseboard. If you used a cheap finish, the bleach in the cleaner will eat the paint right off your scribe. I always use a conversion varnish or a high-solids poly on my scribed edges. It creates a plastic-like barrier that keeps the cleaning chemicals from reaching the wood fibers. It is about protecting the work long after I leave the job site. If the grout starts to look dingy, the homeowner should know how to refresh grout without replacing it, but they should never have to worry about the baseboard failing because of a little spray cleaner.
The physics of moisture wicking and rot
Capillary action is a silent killer. When water hits a floor, it looks for the path of least resistance. Usually, that is the gap between the tile and the baseboard. If that gap is not perfectly scribed and sealed, water gets pulled behind the trim. Once it is there, it cannot evaporate. It sits against the drywall and the bottom plate of your wall studs. Within weeks, you have mold. Within months, you have structural rot. This is why I am so obsessed with the scribe. It is not just about the look. It is a mechanical seal. By scribing the baseboard to the wave tile, you are creating a baffle that prevents water from easily entering the wall cavity. You are essentially building a dam. If you are dealing with old grout, you might need grout restoration secrets for long-lasting results to ensure the substrate is even stable enough to hold a seal. I have walked into jobs where the grout was so soft I could scrape it out with a fingernail. You cannot scribe to that. You have to fix the grout, let it cure for 72 hours, and then do your trim work. There are no shortcuts in this business. You either do it right or you do it twice. My knees cannot handle doing it twice.