
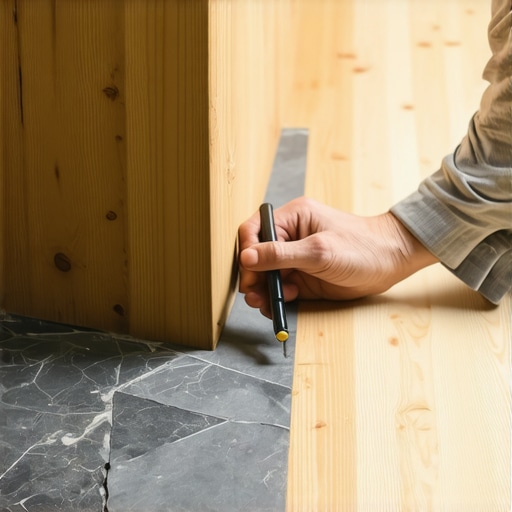
I spent three days grinding concrete on a job last month just so the floor wouldn’t click like a castanet. Most guys skip the leveling compound and think the underlayment will hide the dip. It won’t. When you are dealing with natural stone, the floor is never flat. It is a series of peaks and valleys, a geological map of slate or travertine that defies the logic of a straight piece of wood. If you try to force a straight baseboard against a rugged stone surface, you will end up with gaps large enough to swallow a pencil. I have seen installers try to fill those voids with a mountain of caulk. It looks like a mess within six months because caulk shrinks and attracts every piece of dust in the house. Scribing is the only way to make wood meet rock with the precision of a fine furniture maker. It is a slow, methodical process that requires a sharp eye and a steady hand, but it separates the professionals from the weekend warriors who just want to get home in time for the game. Smelling like WD-40 and oak dust is part of the job when you are chasing a perfect fit. Natural stone has a soul, and your trim needs to respect that. We are talking about the physics of wood fibers and the structural integrity of the wall assembly. Let us look at why your subfloor is lying to you and how we fix it. Establishing a baseline is the first step in any successful installation.
The myth of the flat stone floor
Natural stone tile is inherently irregular and requires scribing to achieve a professional fit because no two tiles sit at the exact same elevation. Scribing involves transferring the specific contour of the floor onto the baseboard using a compass or divider tool. This ensures the wood follows every bump and dip in the grout and stone surface. When you look at a floor made of natural slate or tumbled marble, you are looking at variations in thickness that can exceed an eighth of an inch. If you are also interested in baseboards makeover ideas to elevate your space, you must understand that the scribe is the foundation of that aesthetic. Without a proper scribe, even the most expensive molding looks cheap. The stone surface is a crystalline structure that does not compress. Wood, however, is cellular. It moves. It breathes. When these two materials meet, the wood must be the one to adapt. You are essentially carving the wood to mirror the face of the earth. This is particularly important in high-moisture areas like bathrooms where showers that wow can create humidity fluctuations. If the fit is not tight, moisture will find its way behind the baseboard and rot your drywall from the inside out. I have seen it happen a hundred times. The homeowner thinks it is a leak, but it is just poor craftsmanship at the floor line.
“A floor is only as good as the subfloor beneath it; deflection is the enemy of every joint.” – Master Flooring Axiom
The 1/8 inch that ruins everything
Precision in flooring is measured in fractions of an inch and even a minor deviation can cause structural failure or aesthetic ruin over time. If your subfloor has a crown or a dip, the stone tile will follow that arc. Most people think a little bit of thin-set can level a floor. That is a lie. Thin-set is for bonding, not for leveling. If you did not use a self-leveling underlayment before the tile went down, you are now paying the price at the baseboard stage. You can see chic baseboard designs that transform rooms in 2025 that rely on this level of detail. When I scribe, I am looking for the highest point on the floor. That becomes my reference. I set my dividers to the distance between that high point and the top of my baseboard. If you miss that high point by just an eighth of an inch, your entire run of trim will be crooked. It will look like the house is sinking. You have to be a stickler for the details. I have used moisture meters on every piece of wood that enters a job site because if the wood is too wet, your perfect scribe will shrink and reveal a gap later. It is about the chemistry of the wood and the geology of the stone. You cannot ignore one and expect the other to behave. Natural stone floors, especially in regions with high humidity like the Gulf Coast, require specific attention to expansion gaps. If you scribe too tight without a back-bevel, the wood might bind against the stone when it expands in the summer.
| Material | Scribing Difficulty | Best Tool for Precision |
|---|---|---|
| Solid White Oak | High | Power Planer or Belt Sander |
| Pine or Fir | Low | Block Plane or Rasp |
| MDF Trim | Medium | Jigsaw with Fine Blade |
| PVC Molding | Low | Utility Knife or File |
Tools for the master scribing kit
Successful scribing requires a specialized kit including a professional compass, a jigsaw with a scrolling blade, and various hand files for fine adjustment. You cannot do this with a standard pencil and a prayer. I prefer a set of dividers with a locking nut so the measurement does not slip while I am dragging it across a rough stone surface. The pencil must be sharp. A dull lead will give you a line that is a sixteenth of an inch thick, which is enough to ruin the fit. You also need a jigsaw that has a high-quality base plate that won’t mar the face of your expensive trim. I often use blue painter’s tape on the baseboard before I mark my line. This protects the finish and makes the pencil line much easier to see. If you are working with tile cleaning tips for a sparkling bathroom in 2025, you know that keeping surfaces clean is part of the professional mindset. The same applies to your tools. A dirty saw blade will burn the wood and create a smell that lingers. After the initial cut, I use a belt sander or a power planer to fine-tune the edge. This is where the back-bevel comes in. You want to remove more material from the back of the board than the front. This creates a sharp edge that can bite into the stone. It is a trick that old-timers use to make sure the visible line is razor-sharp even if the floor has major undulations.
The ghost in the expansion gap
Expansion gaps are the invisible necessity of every floor installation and must be maintained even when scribing baseboards to a tight fit. Wood expands and contracts with changes in relative humidity. If you scribe a baseboard so tightly that it is wedged against the stone with zero room for movement, you are asking for trouble. The baseboard might bow out from the wall or the floor might start to buckle. This is particularly true with engineered floors or LVP, but it applies to natural stone too. The stone itself doesn’t move much, but the house framing does. I always leave a tiny micro-gap or use a back-cut to allow for this movement. If you are worried about the look of the grout lines, check out grout restoration secrets for long-lasting results to see how to keep that transition looking clean. When scribing across a grout joint, your pencil will drop into the dip. You have to decide if you want to follow that dip or bridge it. Most of the time, following the dip is the way to go, but it requires surgical precision with a jigsaw. If the grout is recessed significantly, you might need to use a specialized color-matched sealant at the very end to bridge the microscopic air gap. Do not use standard silicone from a big-box store. It looks like plastic and will peel off the stone. Use a high-quality, sand-textured caulk that mimics the look of the grout.
- Select the longest piece of baseboard to minimize joints.
- Level the floor as much as possible before starting.
- Use a sharp 2H pencil for a fine, clean line.
- Back-cut the wood at a 45-degree angle.
- Test fit every three feet to check for drift.
- Sand the final edge by hand for a smooth transition.
Why shoe molding is a lazy choice
Shoe molding is often used to hide gaps between the baseboard and the floor but it is considered an inferior solution compared to a true scribe. To me, shoe molding is the mark of a builder who is in a hurry. It is a secondary piece of trim that is flexible enough to follow the floor, but it adds a busy, layered look that ruins clean lines. If you are going for a minimalist or high-end look, you want the baseboard to grow right out of the stone. Using shoe molding is like putting a band-aid on a broken leg. It hides the problem but doesn’t fix the underlying issue of a poor fit. I have had homeowners beg me for shoe molding because they saw it in a magazine. I tell them that if they want a floor that looks like a million bucks, they let me scribe it. The only time shoe molding is acceptable is in an old Victorian where the floors have settled so much that a scribe would remove half the height of the baseboard. In a modern home with a natural stone floor, there is no excuse. If you are concerned about the longevity of your grout and how it meets the wood, you can how to refresh grout without replacing it later on, but you can’t easily fix a bad trim job. Take the time to do it right. The physics of the installation demand it. A scribe shows that you cared enough to spend the extra hour on your knees getting the angle right.
“Every 1/16th of an inch matters when the light hits the floor at a low angle; shadows don’t lie.” – Master Flooring Axiom
The chemistry of a lasting seal
Applying the correct sealant between the scribed wood and the natural stone is the final step to prevent moisture infiltration and finish the look. Even the best scribe will have tiny, microscopic gaps because stone is porous and wood has grain. In a bathroom or kitchen, these gaps are magnets for water. I use a high-grade polyurethane sealant or a color-matched acrylic that has high flexibility. You want something that can handle the house shifting without cracking. If you are working with eco-friendly tile solutions for sustainable homes in 2025, look for low-VOC sealants that don’t off-gas. When you apply the bead, keep it incredibly thin. You are not filling a hole; you are sealing a joint. Wipe the excess immediately with a damp, lint-free cloth. This is where the artistry comes in. The seal should be invisible to the naked eye. If I walk into a room and the first thing I see is the caulk line, I have failed. The goal is to make it look like the wood and stone were born together. This level of detail is what keeps my clients calling me back twenty years later. They know that I don’t just slap things together. I build them to last. Whether it is a slate floor in a mudroom or a marble floor in a grand entryway, the scribe is the signature of a master. It is the final word in a long conversation between the structure of the house and the materials we choose to cover it with.