The silent rot behind your tile
To spot a failing shower liner, look for dark spots in the grout, dampness on the baseboards outside the stall, or a persistent musty odor. These indicate that moisture has breached the waterproofing membrane or the pan, leading to structural rot and mold before a visible drip appears.
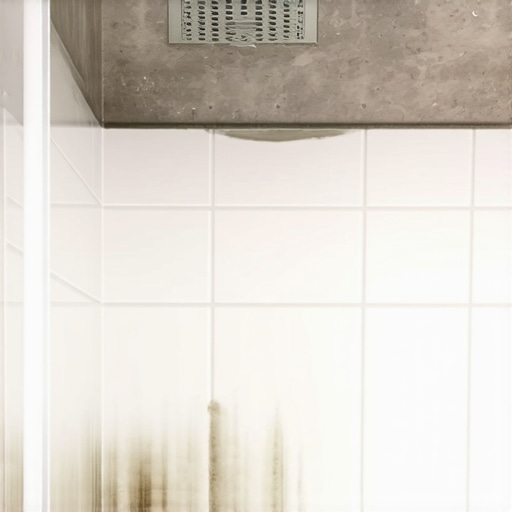
I once walked into a luxury master bath where the twenty thousand dollar marble was popping off the walls because the installer forgot to tape the seams of the cement board. The owner thought the shower was just humid. In reality, the water was wicking through the mortar and rotting the studs until the whole assembly was a structural nightmare waiting to happen. I spent three weeks tearing out every square inch of that stone just to get back to the timber. It smelled like a swamp and looked like a science experiment. Most people think a leak is a sudden event, a burst pipe or a flooded floor. In the world of high-end flooring and wet rooms, a leak is a slow, methodical invasion of your home. It starts with a microscopic crack in a corner fold or a single clogged weep hole in the drain assembly. By the time you see a drip on the living room ceiling below, the subfloor is usually half gone. I have seen solid oak joists turned into the consistency of wet cardboard because of a forty dollar PVC liner that was installed by someone who didn’t understand the physics of hydrostatic pressure. When you are dealing with showers, you are dealing with a controlled flood every time you turn on the tap. If that water is not directed with surgical precision, it will find a way into your walls. You need to understand that tile and grout are not waterproof. They are water resistant. The real work happens beneath the surface where you cannot see it. [IMAGE_PLACEHOLDER]
The mechanics of hydrostatic pressure
Hydrostatic pressure occurs when water weight builds up within the mortar bed, forcing moisture through any weakness in the liner. This usually happens when the pre-pitch slope is missing or the drain is improperly seated.
A shower floor is a sandwich of chemical and physical layers. At the bottom, you have your subfloor. On top of that, if the installer knew what they were doing, there is a pre-pitch. This is a layer of sloped mortar that ensures any water that reaches the liner flows toward the drain. If your installer skipped the pre-pitch and put the liner flat on the subfloor, you are living on borrowed time. Water will sit in the corners of that liner, stagnating and eventually eating through the material. Whether it is a forty mil PVC liner or a chlorinated polyethylene sheet, standing water is the enemy. This is where the chemistry of the adhesive comes into play. If the PVC cement used to fuse the corner dams was applied in a humid environment or without proper primer, the bond will eventually crystallize and snap. Once that happens, gravity takes over. The water travels along the top of the joists and moves toward the lowest point. This is often why you see a wet spot on a ceiling that is ten feet away from the actual shower. The water is traveling like a slow river along the wood. You might also notice that your baseboards in the hallway are starting to swell or the paint is peeling. That is not a humidity issue from the air. That is capillary action pulling water out of the shower pan and into the drywall. We call it wicking, and it is the first sign of a total system failure.
Why your grout is lying to you
Grout is a porous cementitious material that acts like a sponge rather than a shield. While it fills the gaps between tiles, it allows moisture to pass through to the setting bed via capillary action.
“The waterproofing layer must be continuous and integrated with the drain assembly to ensure moisture management.” – TCNA Handbook
Many homeowners believe that if they just apply a fresh layer of sealer, they can stop a leak. That is a dangerous myth. Sealer is designed to prevent staining, not to provide a waterproof barrier against a failing liner. When the liner fails, the grout often starts to change color. You might see dark patches that never seem to dry out even after the shower has been empty for twenty four hours. This is because the mortar bed beneath the tile is saturated. In small bathrooms, this saturation happens even faster because there is less surface area for evaporation. If you see white, chalky powder appearing on your grout lines, that is efflorescence. It is a sign that minerals from the cement are being carried to the surface by escaping moisture. It is the footprint of a leak. If you find yourself looking for grout restoration secrets, you must first ensure that the structure underneath is sound. No amount of cleaning will fix a broken PVC membrane. You can try to refresh grout without replacing it, but if the substrate is mush, you are just putting a band-aid on a gunshot wound. I have seen guys try to caulk over cracked grout lines to stop a leak. All they did was trap the water inside the wall, which accelerated the mold growth.
The threshold of structural failure
A failing liner will eventually manifest as movement in the tile or a soft feeling underfoot. If you hear a crunching or clicking sound when you step on the shower floor, the mortar bed has detached from the subfloor.
The physics of the bond are quite simple. Mortar needs a rigid surface to stay intact. When the liner leaks, the plywood subfloor underneath begins to expand and contract. This movement breaks the mechanical bond of the thin-set. Suddenly, your modern shower design is a collection of loose stones. This is particularly common in areas with high seasonal humidity where the wood is already under stress. In these cases, the moisture from the leak acts as a lubricant for the rot. You might notice the gap between the floor and the wall tile getting larger. This is not just settling. It is the floor literally sinking as the joists lose their integrity. You should also pay close attention to the transition where the tile meets the bathroom floor. If that threshold feels warm or damp, the water has breached the curb. Most curbs are built with three stacked two-by-fours. If the installer nailed the liner to the top of the curb, they created six holes for water to enter. Water will soak those boards like a sponge, causing them to swell and pop the tiles right off the front of the curb. This is why we use one piece curb covers or liquid membranes in high-end installs today.
| Membrane Type | Thickness (mils) | Material | Common Failure Point |
|---|---|---|---|
| PVC Liner | 40 | Polyvinyl Chloride | Corner folds and seams |
| Liquid Membrane | 20-30 | Elastomeric Polymer | Pinholes and thin spots |
| Bonded Sheet | 8-10 | Polyethylene | Thin-set bond failure |
| CPE Liner | 40 | Chlorinated Polyethylene | Improper chemical welding |
The ghost in the expansion gap
The expansion gap at the perimeter of a shower is meant to allow for structural movement, but it is often the entry point for water if it is not filled with a high-quality 100 percent silicone sealant.
I have spent days grinding concrete just to get a floor flat enough for a proper install. In a shower, that level of precision is even more vital. If the shower floor meets the wall at a sharp ninety degree angle without a proper bead of silicone, you have a direct path to the wall studs. Acrylic caulk is not enough. It will shrink and pull away within six months. You need the chemical resilience of pure silicone that can handle the thermal expansion of the hot water. Every time you turn on the shower, the materials expand. When the water stops, they contract. This movement, while microscopic, is enough to tear open a weak seal. Once the seal is gone, water travels behind the tile and hits the top of the liner. If the liner isn’t wrapped high enough up the wall, the water goes over the top and into the wall cavity. This is how you end up with mold behind your bathroom chic baseboards. It is a slow death for a house. I always tell my clients that the most expensive part of a shower is the part they never see. You can spend five thousand dollars on gold plated faucets, but if your five dollar silicone bead is failing, your bathroom is a liability.
Testing the integrity of your shower pan
A flood test is the only definitive way to confirm if a shower liner is leaking. This involves plugging the drain and filling the basin with water for twenty four to forty eight hours.
“Slope to the drain is the most critical element of a shower assembly; standing water will eventually find a way out.” – Master Flooring Axiom
If you suspect a leak, do not wait for the drip. You can perform a diagnostic check yourself. First, look at the drain. Remove the grate and check if the weep holes are clear. If they are blocked by mortar or hair, water will back up into the bed. Then, perform a flood test. You will need a test plug from a hardware store. Seal the drain below the level of the liner and fill the shower floor until the water is about an inch below the top of the curb. Mark the water line with a piece of tape. Wait twenty four hours. If the water level drops and you haven’t used the shower, you have a leak. It is that simple. This test places the entire liner under pressure, forcing water out of any pinhole or failed seam. This is the same test we do on every professional install before we ever lay a single tile. If an installer tells you a flood test isn’t necessary, find a new installer. They are cutting corners that will cost you ten times the price of the job later on.
- Inspect the grout lines for persistent dark spots that indicate saturation.
- Check the baseboards on the opposite side of the shower wall for swelling.
- Look for efflorescence which appears as white salty deposits on the tile surface.
- Check the ceiling below for soft spots or discoloration.
- Verify that the silicone in the corners is not peeling or moldy.
- Smell for a damp earthy odor that does not go away after cleaning.
- Press on the floor tiles to check for movement or a hollow sound.
- Examine the curb for any cracking or loose tiles.
- Check the drain assembly for any visible gaps between the metal and the tile.
- Perform a 24 hour flood test to verify the integrity of the membrane.
Maintaining a bathroom requires more than just tile cleaning tips. It requires an understanding of the chemistry of the seals and the physics of the drainage. If you find a leak early, you might be able to save the subfloor. If you wait until the ceiling is dripping, you are looking at a full gut renovation. Always respect the water. It is patient, it is heavy, and it never stops trying to find a way out of the box you built for it. The best defense is a perfectly installed liner and an obsessive attention to the details of the subfloor. If you start with a solid foundation, the rest is just decoration.