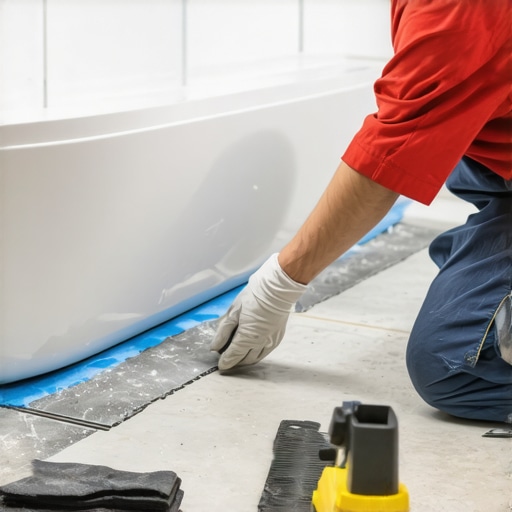
Defeating the rot that hides under the tub
Most guys skip the leveling compound. They think the underlayment will hide the dip. It won’t. I spent three days grinding concrete on a job last month just so the floor wouldn’t click like a castanet. That experience taught me that the gap between your bathtub and the subfloor is the most dangerous 1/8 inch in your entire house. If you ignore it, you are not just looking at a cosmetic crack, you are looking at a structural failure. I have seen 3/4 inch plywood turn into black mush because a homeowner thought a little bead of cheap caulk was enough to stop the physics of water. Water is a patient enemy. It finds the path of least resistance. When you step into a tub, the weight of the water and your body causes the floor to deflect. If that gap is not properly waterproofed with a flexible, high performance material, that movement will tear the seal open. Once the seal is gone, every splash from the shower head becomes a slow motion flood into your floor joists. You can find more on keeping things pristine at tile cleaning tips for a sparkling bathroom in 2025. We are talking about the difference between a floor that lasts fifty years and a floor that needs to be ripped out in five.
The 1/8 inch that ruins everything
To waterproof the gap between the tub and the subfloor, you must use a 100% silicone sealant or a liquid waterproofing membrane like RedGard. This barrier prevents moisture from reaching the wood or concrete below. Proper cleaning of the tub flange and the subfloor surface is required for adhesion. The gap exists because materials expand and contract at different rates. A cast iron tub is a heavy, rigid beast. Your plywood or OSB subfloor is a living, breathing organic material that reacts to the humidity in your home. When these two meet, they fight. If you bridge them with a rigid material like grout, the grout will crack. If you leave it open, the humidity from the shower will condense and drip straight onto the subfloor. This is where the mold begins. It starts in the dark, damp space where the tub meets the floor, and by the time you see it on your baseboards, the damage is already done. You need a solution that can handle the L over 360 deflection standard required by the TCNA.
“A floor is only as good as the subfloor beneath it; deflection is the enemy of every joint.” – Master Flooring Axiom
Why your subfloor is lying to you
Subfloors often appear flat and stable until a heavy bathtub is installed and filled with forty gallons of water. This added weight reveals structural weaknesses that allow water to penetrate the gap. Ensuring the subfloor is level and reinforced prevents the mechanical failure of your waterproofing seals and protects the joists. I have seen installers throw down LVP or tile right up to the tub without checking for levelness. They assume the tub is sitting flush. It rarely is. If there is a dip, the tub will rock. Even a microscopic movement is enough to break the chemical bond of your sealant. You need to examine the subfloor with a ten foot straight edge. If you see more than 1/8 inch of light under that level, you need to grind the high spots or fill the low spots with a high compression strength self leveler. For those looking to upgrade their aesthetics after the structural work is done, check out baseboards makeover ideas to elevate your space. A solid subfloor is the only way to ensure your waterproofing doesn’t snap like a dry twig when someone sits on the edge of the tub. OSB is particularly prone to swelling at the edges when it gets wet, which can lift your tile or buckle your floor.
| Material Type | Elasticity Rate | Water Resistance | Subfloor Compatibility |
|---|---|---|---|
| 100% RTV Silicone | 25% to 50% | Maximum | Plywood, Concrete, Backer Board |
| Polyurethane Sealant | 35% | High | Concrete, Wood |
| Acrylic Latex Caulk | 10% | Low | Not recommended for subfloors |
| Liquid Membrane | 300% | Impermeable | Concrete, Plywood (with primer) |
The chemical reality of silicone versus polyurethane
Silicone sealants provide the best flexibility for the tub and subfloor transition because they do not shrink during the curing process. Polyurethane is tougher and better for high traffic areas but can be harder to apply cleanly. Choosing the right chemistry ensures the seal remains intact despite the constant vibration and weight changes in a bathroom. When we talk about RTV silicone, we are talking about Room Temperature Vulcanizing. This is a chemical reaction that creates a rubbery solid. Unlike water based caulks that lose volume as the water evaporates, 100% silicone stays the same size. This is vital. If your sealant shrinks, it pulls away from the edges of the tub flange. This creates a capillary channel where water is literally sucked into the gap through surface tension. I have seen guys try to use cheap contractor grade caulk in these spots and it always fails within six months. You want a product with high movement capability. If the tub moves 1/16 of an inch, the sealant needs to stretch without tearing or delaminating from the subfloor surface. This is why I always wipe the area down with denatured alcohol first. Any dust or sawdust will kill the bond. If you are doing a full renovation, you might want to look at showers with a style trendy ideas for small bathrooms to see how the pros integrate these seals into modern designs.
Showers that wow start with structural integrity
High end shower designs and modern tubs rely on hidden waterproofing layers that go far beyond what the eye can see. Protecting the subfloor at the tub entry point is the foundation of a long lasting bathroom renovation. Without this protection, even the most expensive tile will eventually fail due to subfloor rot and movement. Many people spend thousands on Italian marble but won’t spend twenty dollars on a high quality backer rod. If the gap between the tub and the subfloor is wider than 1/4 inch, you cannot just fill it with sealant. It will slump. You need to insert a closed cell foam backer rod into the gap first. This provides a “bond breaker” and allows the sealant to stick only to the two side surfaces. This is a technical detail most DIYers miss. If the sealant sticks to the bottom of the gap as well, it cannot stretch properly and will tear in the middle. This is called three point adhesion and it is the primary cause of sealant failure. For more inspiration on beautiful and functional designs, see showers that wow modern designs for 2025. The beauty is only skin deep, but the waterproofing is what keeps your house standing.
“Waterproofing is not a product; it is a system of overlapping defenses designed to redirect moisture to the drain.” – TCNA Handbook Principles
Grout restoration secrets for long lasting results
Maintaining the area where the tile meets the tub is essential for keeping the subfloor dry over the long term. Grout is porous and will allow water to seep through to the subfloor if the transition is not handled with a flexible color matched sealant. Regular inspection and maintenance of these joints prevent the need for expensive structural repairs later. If you already have a floor installed and you suspect the gap is leaking, you need to act fast. You can learn about fixing these issues at grout restoration secrets for long lasting results. Often, I see grout packed into that tub gap. It looks fine for a week, then it cracks. Water then sits in that crack. Because the subfloor is usually wood, it absorbs that water and expands. This expansion then cracks more grout. It is a vicious cycle. You have to scrape out that old grout and replace it with a high quality siliconized acrylic or 100% silicone that matches your grout color. This maintains the aesthetic while providing the mechanical flexibility needed to protect the subfloor. I have spent years fixing floors where someone thought grout was a waterproof material. It is not. It is a filter.
The steps for a professional subfloor seal
Achieving a professional grade seal requires a methodical approach that prioritizes cleanliness and material compatibility. Follow these steps to ensure the gap between your tub and subfloor remains waterproof for the life of the floor.
- Clear all debris from the gap using a vacuum and a thin putty knife.
- Scrub the tub flange and the subfloor with 90% isopropyl alcohol or denatured alcohol to remove oils.
- Install a closed cell backer rod if the gap exceeds 3/16 of an inch to prevent three point adhesion.
- Apply a continuous bead of 100% RTV silicone sealant, ensuring it contacts both the tub and the subfloor.
- Tool the bead with a soapy finger or a specialized caulking tool to ensure it is pressed firmly into the surfaces.
- Allow the sealant to cure for at least 24 hours before exposing the area to any moisture or foot traffic.
- Check the seal every twelve months for any signs of delamination or mold growth.
The final word on subfloor protection is about vigilance. You cannot just set it and forget it. Houses settle. Tubs shift. The environment in your bathroom changes with the seasons. If you live in a place like Chicago or New York, the dry winters will shrink your subfloor and the humid summers will swell it. This constant movement puts immense stress on that 1/8 inch gap. By using the right materials and following these structural rules, you are protecting the bones of your home. Do not let a cheap tube of caulk be the reason you have to replace your bathroom floor in five years. Do it right the first time, and you will never have to think about it again.