
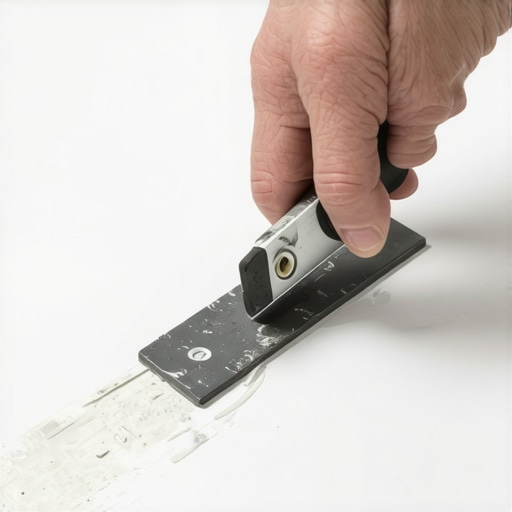
Removing old caulk from a plastic shower base requires a surgical approach because acrylic and fiberglass surfaces are incredibly soft. Unlike ceramic tile, these materials scratch if you even look at them wrong. Use plastic scrapers or stiff nylon tools instead of metal putty knives to protect the finish while ensuring every molecular trace of the old sealant is gone to allow for a proper new bond.
Lessons from a rotted subfloor
Homeowners always ask why their waterproof vinyl or their shower base is buckling. Usually, it is because they locked it under a heavy fixture or let a tiny seal fail. I once walked into a job where a homeowner had used a metal flathead screwdriver to scrape out old silicone from an acrylic base. He got the caulk out, but he also carved deep channels into the plastic. Those channels became highways for water. By the time I arrived, the leak had traveled under the base and turned the plywood subfloor into something resembling wet oatmeal. The entire bathroom had to be gutted because of a five dollar tool mistake. That is the reality of residential construction. A floor or a shower is a system, and the seal is the most vulnerable part of that system. If the seal fails, the structure follows soon after. I have spent thirty years fixing things that were broken by people trying to save thirty minutes. You have to respect the materials you are working with. Plastic is not stone. It is a petroleum product that responds to heat, pressure, and chemicals in very specific ways. If you do not understand the physics of the bond, you are just making a mess that the next guy will have to fix for three times the price.
The chemical reality of old silicone
To remove caulk effectively, you must understand that 100 percent silicone does not just sit on top of the plastic. It forms a mechanical and chemical bond with the microscopic pores of the surface. Over time, soap scum, body oils, and hard water minerals infiltrate the edges of this bond. This causes the edges to lift, creating a dark line of mold. Once that mold takes root, the seal is compromised. You cannot just scrub it away. You have to break the bond entirely. Most people reach for harsh solvents, but many of those will melt a plastic shower base or cause it to yellow and crack. Isopropyl alcohol at 91 percent concentration is your best friend here. It softens the silicone without attacking the polymers of the base. It is about patience and chemistry, not brute force. You are trying to slide a microscopic wedge between the sealant and the base. This is why professional installers emphasize preparation over the actual application of the new bead.
“A floor is only as good as the subfloor beneath it; deflection is the enemy of every joint.” – Master Flooring Axiom
Tools that won’t ruin your morning
The right tool kit for this job excludes anything made of carbon steel or stainless steel. You need a set of plastic caulk removal tools, which usually look like a three-pronged fork with a scraper on the end. You also need a sharp utility knife, but only for the very top layer where the caulk meets the tile or the baseboards. For the plastic base itself, stick to nylon or wood. A popsicle stick sharpened to a point can be surprisingly effective. You also need a pile of clean microfiber cloths. Paper towels leave behind lint that will ruin your new caulk job. If you are dealing with showers with a style that involves intricate corners, a stiff nylon brush is helpful for digging out the last bits of residue from the textured areas.
The surgical extraction process
Start by slicing the very top and bottom of the caulk bead. Do not press hard. You only want to score the surface of the silicone. Once you have scored the entire length, use your plastic scraper to get under one edge. Pull the caulk toward you at a forty five degree angle. If it is high quality silicone, it might come off in long, satisfying strips. If it is cheap latex caulk, it will crumble. After the bulk is gone, you will see a thin film left behind. This is the most dangerous part. If you leave that film, the new caulk will not stick to it. This is called a bond failure. Apply a caulk remover gel or high grade isopropyl alcohol to that film and let it sit for twenty minutes. Then, use a piece of coarse denim or a nylon pad to scrub the residue away. It takes elbow grease, but it is the only way to get back to a virgin surface. You should also take this time to look at the surrounding grout to ensure no moisture is leaking from the walls into the base area.
Comparing sealant performance
| Sealant Type | Adhesion to Plastic | Flexibility | Mold Resistance |
|---|---|---|---|
| 100% Silicone | Excellent | High | High |
| Siliconized Latex | Good | Medium | Low |
| Polyurethane | Very High | Low | Medium |
Why your new caulk will fail
Most DIY jobs fail because the installer did not wait for the area to dry. Plastic bases can hold water in the microscopic scratches or in the gap between the base and the wall for hours. If you trap that moisture under new caulk, you are just sealing in a mold colony. I tell people to let a fan blow on the area for at least four hours before even thinking about opening a new tube of sealant. You also need to ensure the surface is chemically clean. Use a final wipe of denatured alcohol or a specific surface prep. If there is even a fingerprint of oil from your skin on that plastic, the silicone will eventually peel back. It is about the surface energy of the material. Plastics have low surface energy, meaning they are naturally resistant to things sticking to them. You have to maximize the contact area by having a perfectly clean surface. Check out tile cleaning tips for a sparkling bathroom in 2025 for more on maintaining these surfaces after you finish the repair.
Pre-caulking inspection checklist
- Ensure all old residue is gone by rubbing your finger across the surface; it should squeak.
- Check the gap width between the base and the tile.
- Verify that the subfloor under the base does not flex when you stand in it.
- Vacuum out any dust or debris from the expansion gap.
- Wipe the area with 91 percent isopropyl alcohol.
The ghost in the expansion gap
Many installers forget that a shower base is a floating structure in many ways. When you fill that shower with three hundred pounds of water and a human being, the plastic base flexes and settles. If you caulk the shower while it is empty, that joint is under immediate tension the moment someone steps inside. For the best results, fill the shower base with water before you apply the new caulk and leave the water in there until the caulk has cured. This ensures the joint is sealed while in its most stressed state. This is the difference between a job that lasts two years and a job that lasts twenty. If you are looking to upgrade the whole look, consider showers that wow with modern designs that incorporate better drainage and more stable base structures. A stable base means less movement and less stress on your caulk lines. Also, pay attention to the transition where the base meets the chic baseboard designs near the floor, as this is a common spot for hidden water damage to start. Proper maintenance of grout restoration in the surrounding walls will also keep the entire system dry. For those concerned about the environment, exploring eco friendly tile solutions can offer materials that bond more predictably with modern sealants.
“Sealant failure is rarely a product failure; it is almost always a preparation failure.” – Master Flooring Axiom