
The subfloor secret that precedes every great grout line
Perfect grout lines start with a subfloor that does not move, dip, or flex under the weight of the installer. Most guys skip the leveling compound. They think the underlayment will hide the dip. It won’t. I spent three days grinding concrete on a job last month just so the floor wouldn’t click like a castanet. When the subfloor is uneven, the tile edges sit at different heights, creating lippage that makes a straight grout line impossible to achieve regardless of how much tape you use. Precision in the foundation is the only way to ensure the surface reflects professional craftsmanship. I have seen beautiful marble ruined because the installer ignored a 1/8 inch deviation in the plywood. That deviation translates into a jagged shadow line in your grout. You cannot fix physics with a plastic spacer.
The mechanics of the perfect joint
I smell like WD-40 and oak dust most days because I live in the reality of mechanical bonds. A floor is a structural system. When we talk about the masking tape trick, we are talking about controlling the capillary action of the grout as it enters the joint. This is not about being fancy. It is about preventing the polymer modified cement from staining the micro-pores of a high end porcelain or natural stone. If you are working on showers, the stakes are even higher. Moisture behind the tile will find every weakness in your grout. You need to ensure the joint is packed tight, not just smeared on top. This is why professionals look at the technical data sheets for every bag of thin-set. We want to know the open time and the shear strength. A floor that shifts will crack your grout lines no matter how straight they look on day one.
“A floor is only as good as the subfloor beneath it; deflection is the enemy of every joint.” – Master Flooring Axiom
The logic of masking tape for grout precision
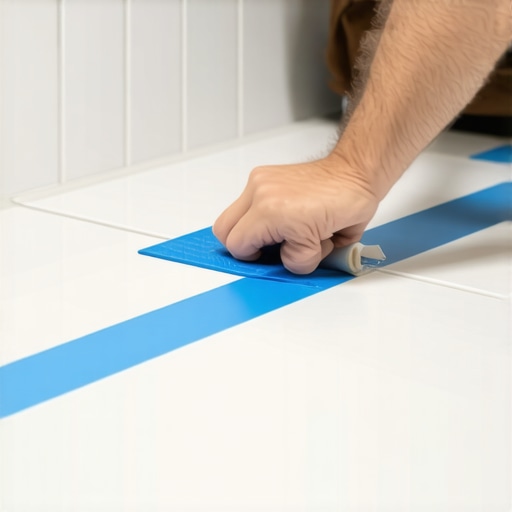
Masking tape serves as a physical barrier that prevents grout haze and ensures the grout stays within the intended cavity. By taping the edges of the tile before the grout is applied, you create a clean stencil for the material. This technique is particularly effective for highly textured tiles where cleaning excess grout is a nightmare. It saves hours of scrubbing and protects the finish of the tile from abrasive grout particles. I have seen guys spend days with a toothbrush trying to get grout out of faux-wood grain. If they had used tape, they would have been home for dinner. The trick is to use a high quality painter’s tape that does not leave adhesive residue on the surface of your stone. Cheap tape will melt under the heat of a work light and leave a sticky mess that is harder to clean than the grout itself.
| Grout Type | Cure Time | Masking Requirement | Flexibility Rating |
|---|---|---|---|
| Sanded Grout | 24 Hours | Highly Recommended | Low |
| Unsanded Grout | 24 Hours | Optional | Medium |
| Epoxy Grout | 12 Hours | Mandatory | High |
| High Performance Cement | 4 Hours | Recommended | Medium |
Step by step execution of the tape method
Applying tape requires a clean tile surface and a steady hand to align the tape exactly with the edge of the tile. First, ensure the tile is completely set and the thin-set has cured for at least 24 to 48 hours. Any moisture trapped under the tile will try to escape through the grout lines, and if you tape too early, you trap that moisture. Use a vacuum to remove every speck of dust from the joints. Dust is the enemy of adhesion. Lay the tape along the edge of the tile, leaving only the gap exposed. Press the edges of the tape down firmly with a plastic tool to prevent grout from bleeding under the tape. This is where the laser-straight line is born. If the tape is wavy, the grout will be wavy. There is no middle ground here. Once the tape is secure, you apply the grout as usual, pushing it deep into the joints with a rubber float at a 45 degree angle. This ensures the air pockets are forced out.
Why your subfloor is lying to you
People think a concrete slab is flat. It is not. It is a series of hills and valleys that change as the house settles and the seasons shift. In the dry heat of Phoenix, concrete can shrink and crack. In humid coastal areas, the moisture vapor emission rate can blow the tiles right off the floor. I always use a moisture meter. If that slab is pushing out more than 3 pounds of moisture per 1,000 square feet, I am not laying a single tile until a vapor barrier is applied. This technical rigor is what separates a master from a handyman. When you are looking at showers that wow modern designs for 2025, remember that the beauty is only skin deep. The waterproofing membrane behind those tiles is the real hero. Without it, the straightest grout lines in the world will not save your framing from rot.
The chemistry of grout and adhesive bonds
Grout is not just colored dirt; it is a complex mixture of hydraulic cement, graded aggregates, and chemical modifiers. These modifiers control the hydration rate and the final color consistency. If you add too much water to the bucket, you wash out the pigments and weaken the crystalline structure of the cement. The result is a chalky grout line that will crumble within a year. I treat my mixing like a laboratory experiment. I measure the water to the ounce. When using the masking tape method, the consistency of the grout is even more vital. If it is too runny, it will seep under the tape. If it is too thick, you cannot pack the joint properly. You want the consistency of creamy peanut butter. Let the grout slake for ten minutes after the initial mix to allow the chemicals to fully activate. This is a step most people skip because they are in a hurry. Speed is the killer of quality.
“Standard ceramic tile installations shall not exceed a deflection of L/360 under live load conditions.” – TCNA Handbook
Managing the transition to baseboards
The intersection of the floor and the wall is a dynamic joint that requires a flexible sealant rather than rigid grout. This is a common failure point. Houses expand and contract. If you grout the gap between the tile and the wall, it will crack. You must leave an expansion gap. This gap is later covered by chic baseboard designs that transform rooms in 2025. The tape method works here too. Tape the floor and the bottom of the baseboard to create a perfect bead of color-matched caulk. This provides a clean, finished look that allows the floor to move without damaging the walls. I see so many jobs where the grout is smashed against the drywall. It is a rookie mistake that leads to structural stress and unsightly cracks. A master installer knows that the floor needs to breathe.
The 1/8 inch that ruins everything
Small errors in spacing accumulate over a large area, leading to significant alignment issues at the far end of the room. This is known as cumulative error. If your grout lines are off by just 1/32 of an inch per tile, by the time you cross a twenty foot room, you are off by more than an inch. This makes the floor look crooked and unprofessional. Masking tape helps you visualize the grid before the grout goes in. If I see a line drifting, I can address it. I use a laser level to snap lines across the entire subfloor before a single drop of mortar hits the ground. It is about math, not just eyesight. If you find your grout is already failing or stained, you might need to learn how to refresh grout without replacing it to save the installation. But for a new build, the tape is your insurance policy against a messy finish.
Tools for the perfect grout line checklist
- High quality painter’s tape with medium adhesion.
- A vacuum with a HEPA filter to clean joints.
- A margin trowel for precise mixing.
- A rubber grout float with squared corners.
- Microfiber sponges for the final wipe.
- A digital moisture meter for subfloor testing.
- A laser level for layout verification.
Information gain on underlayment cushion
While most people want the thickest underlayment, too much cushion actually causes the locking mechanisms on LVP to snap under pressure. The same logic applies to tile. If you use a decoupling membrane that is too thick or incorrectly installed, the floor will have too much vertical play. This movement will shear the grout right out of the joints. You want a solid, unyielding surface. When I am working on a bathroom, I make sure the tile cleaning tips for a sparkling bathroom in 2025 include checking for grout integrity. If the grout is failing, the subfloor is usually the culprit. Masking tape will give you the straight line, but the engineering underneath gives you the longevity.
The ghost in the expansion gap
Every floor has a ghost, the movement you cannot see but can definitely hear. It is the sound of wood rubbing or tile clicking. To avoid this, the expansion gap at the perimeter is non-negotiable. I use spacers that I pull out right before I install the baseboards. I have walked into million dollar homes where the hardwood was buckling because they pinned the floor down with heavy cabinetry or failed to leave a gap at the stone hearth. It is heartbreaking to see expensive materials wasted by simple ignorance of thermal expansion. The masking tape method is the final touch on a project that has been planned with these physics in mind. It is the difference between a floor that lasts ten years and one that lasts fifty. When you pull that tape up and see a line as sharp as a razor, you know the work was done right. It is a satisfying moment that every craftsman lives for.