
The myth of the perfect ninety degree angle
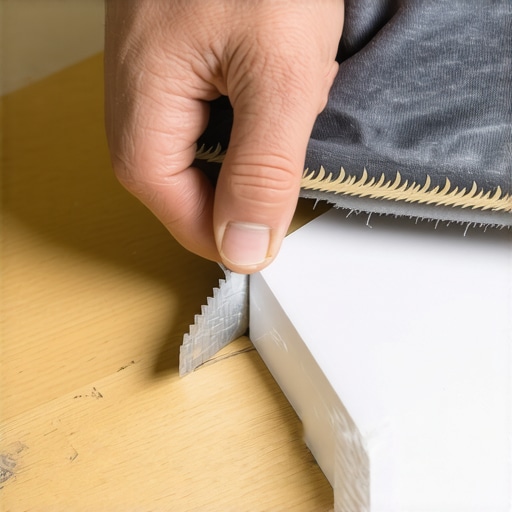
To cut inside corners on PVC trim correctly, you must utilize a coped joint rather than a standard miter to account for material expansion and wall irregularities. This method involves cutting one piece square against the corner and back-cutting the second piece to follow the profile of the first. This ensures a tight fit that resists the inevitable thermal movement of cellular PVC products in high-moisture environments.
I once walked into a luxury bathroom remodel where the installer had spent five days laying down expensive marble tile. The client was thrilled until the humidity from the first few showers hit the room. Every single inside corner of the PVC baseboard had opened up like a hungry mouth. The installer had used simple 45-degree miter cuts and pinned them with a few finish nails. He didn’t understand the molecular reality of the material he was working with. PVC is not wood. It does not behave like oak or pine. When the temperature or humidity spikes in a small bathroom, that plastic expands along its length. If you miter that corner, the heel of the joint stays put while the nose pushes out. I spent two days ripping out his work and doing it the right way. Most guys skip the leveling compound on the floor and they skip the coping saw on the trim. They think the underlayment or a bit of caulk will hide the dip. It won’t. I spent three days grinding concrete on a job last month just so the floor wouldn’t click like a castanet, and I apply that same level of obsession to every piece of trim I cut.
Why miter joints fail in wet zones
Inside miter joints fail in bathrooms and kitchens because the substrate is rarely square and the PVC material undergoes significant linear thermal expansion. When you force two 45-degree cuts into a corner that is actually 91 degrees, you create a structural tension that will eventually snap the adhesive bond. This leads to unsightly gaps that collect moisture and mold behind the baseboards.
The chemistry of Polyvinyl Chloride is fascinating when you look at it under a microscope. We are dealing with long chain polymers that are essentially frozen in a specific state. When heat is applied, or even just the ambient warmth of a house in summer, those chains want to stretch. In a 12 foot run of trim, you might see up to an eighth of an inch of movement. If you have mitered both ends, that movement has nowhere to go but out. This is especially problematic when you are trying to integrate chic baseboard designs that transform rooms in 2025 into a space that features heavy tile work. Unlike wood, which expands mostly across the grain, PVC expands along its length. This is why a coped joint is superior. The square-cut piece sits firmly against the wall, and the coped piece ‘nests’ inside it, allowing the material to slide slightly back and forth without showing a visible gap at the face.
“The integrity of a trim joint is dictated by the stability of the substrate and the management of thermal flux.” – Master Flooring Axiom
The physics of PVC thermal movement
PVC trim has a high coefficient of linear thermal expansion, meaning it grows and shrinks significantly more than traditional wood or MDF products. This movement is calculated at approximately 1/8 inch for every 10 feet of material for every 50 degree change in temperature. Understanding this physics is the difference between a lifetime installation and a failure.
When I am working on showers with a style that requires waterproof trim, I always check the temperature of the material before I cut. If the trim has been sitting in a cold truck, it is at its smallest state. If you cut it tight in that condition, it will buckle when the room warms up. You need to acclimate your PVC just like you acclimate hardwood. I prefer to leave my material in the room for 24 hours. This allows the polymers to stabilize at the local environment’s baseline. If you are working in a region like the Pacific Northwest, the constant humidity flux makes this even more vital. In Arizona, the dry heat will make the PVC brittle if it is not handled with care. Always use a high-tooth count blade to avoid melting the plastic during the cut. A 60-tooth or 80-tooth carbide blade is the standard for a clean edge that doesn’t require hours of sanding.
Coping versus mitering for inside corners
Coping is the process of removing the back material of a trim profile so that it sits flush against the face of an adjacent piece. This technique is preferred because it conceals gaps caused by out-of-square walls and allows the trim to expand without opening the joint. It requires a coping saw or a specialized grinding wheel to achieve the necessary precision.
To start a cope, you cut the first piece of trim square and butt it tight into the corner. For the second piece, you cut a 45-degree inside miter. This exposes the ‘profile’ of the trim along the cut edge. You then take your coping saw and cut along that profile line, but you angle the blade backward. This is called a back-cut. By removing more material from the back than the front, you ensure that only the very tip of the trim face touches the first piece. This creates a razor-sharp line. If the wall is slightly out of square, say 88 degrees instead of 90, the back-cut gives you the clearance to push the joint tight without the back of the board hitting the wall. This is a skill that takes years to master, but once you do, you will never go back to miters. It is the same level of precision required when you how to refresh grout without replacing it. Details matter. Small errors at the start of a project become massive headaches by the end.
| Material Type | Expansion Rate | Moisture Resistance | Best Use Case |
|---|---|---|---|
| Cellular PVC | High | Maximum | Bathrooms, Mudrooms |
| Solid Oak | Medium | Low | Living Areas, Bedrooms |
| MDF | Low | None | Dry Closets Only |
| Engineered Wood | Low | Medium | Over Concrete Slabs |
Adhesive chemistry for cellular PVC
Using the correct solvent-based cement or cyanoacrylate adhesive is required for PVC trim joints because traditional wood glue will not bond to the non-porous plastic surface. You are essentially welding the two pieces of plastic together at the molecular level to create a unified structural element. I prefer a two-part adhesive system for the best results.
When I am joining a coped corner, I apply a small bead of PVC cement to the face of the square-cut piece where the coped edge will rest. Then, I use a fast-acting CA glue on the cope itself. When they meet, the CA glue holds the joint tight instantly while the solvent cement creates a long-term chemical bond. This prevents the joint from ever pulling apart, even if the wall moves. You have to be careful with the squeeze-out. PVC is porous in a way that it can absorb the oils from your skin, but it won’t absorb wood glue. If you get adhesive on the face, you must wipe it immediately with a specialized cleaner. This is just as vital as knowing the secrets to grout restoration secrets for long-lasting results. If the chemistry is wrong, the aesthetics won’t last a season.
Dealing with showers and tile transitions
Transitions between PVC trim and tiled surfaces require a flexible sealant rather than rigid grout to prevent cracking at the interface. Because tile and PVC have different expansion rates, a hard bond will eventually fail, leading to water infiltration and damage to the subfloor or wall studs. I always leave a 1/16 inch gap for a silicone bead.
In high-end showers that wow, you often see the baseboard meeting the shower curb. This is a high-traffic, high-moisture zone. If you are using a baseboards makeover ideas to elevate your space approach, you need to ensure that the bottom of the PVC is sealed. I like to back-prime the bottom edge of my PVC with a clear sealant before I install it. This creates a secondary barrier. Even though PVC is ‘waterproof’, the wall behind it is not. If water wicks up through the floor-to-wall transition, you will end up with rot in your bottom plate. I always recommend checking out tile cleaning tips for a sparkling bathroom in 2025 to keep the area around your trim free of harsh chemicals that might degrade the plastic over time.
“A floor is only as good as the subfloor beneath it; deflection is the enemy of every joint.” – Master Flooring Axiom
A checklist for the professional installer
- Verify the moisture content of the wall substrate using a professional-grade meter.
- Acclimate PVC trim in the installation environment for at least 24 hours.
- Use an 80-tooth carbide saw blade to ensure clean, melt-free cuts.
- Always cope inside corners instead of mitering to account for wall variance.
- Apply a back-cut of at least 5 degrees to the coped edge for a tighter fit.
- Use PVC-specific solvent cement for all permanent joints.
- Leave a 1/8 inch expansion gap at the end of long runs, hidden by the casing.
- Seal the bottom edge of the trim with a high-quality silicone in wet areas.
The final step is the fastening. I see guys using framing nails on trim. It is a disaster. You need 15-gauge or 16-gauge stainless steel finish nails. Stainless is a requirement because the moisture in a bathroom will cause standard galvanized nails to rust and bleed through your paint within two years. If you want the look of eco-friendly tile solutions for sustainable homes in 2025, you cannot have rust streaks ruining the perimeter. Drive the nails into the studs, not just the drywall. Drywall has no holding power. If you don’t hit the wood or metal framing, that expansion we talked about will pull the trim right off the wall. It is about the structure. It is about the engineering. It is about doing it right the first time so you don’t have to come back and fix it when the seasons change.