I spent three days last month grinding down a luxury shower pan because the original installer thought he could skip the pre-slope and rely on a thick bed of thin-set to find the drain. It was a disaster. The grout looked fine to the untrained eye, but the moment I stepped on the tile, I heard that sickening squish. Most guys skip the leveling compound and the proper membrane because they think the underlayment will hide the dip. It won’t. I spent those days breathing in dust and fixing a mess that started with a single hairline crack. If you want to know if your shower is currently rot-forming behind the scenes, you do not need an infrared camera. You need your hands and a blunt understanding of moisture physics.
The physics of a failing cementitious bond
Grout failure occurs when the internal crystalline structure of the cement bond breaks down due to water saturation or improper mixing ratios during the initial installation phase. When you mix grout, you are initiating a chemical reaction called hydration where water molecules integrate with portland cement to create a rigid matrix. If the installer uses too much water, those water molecules eventually evaporate and leave behind microscopic voids. These voids make the grout porous and brittle. If your shower floor feels like it is shedding sand, you are witnessing the literal disintegration of the material at a molecular level. This is not just an aesthetic problem. It is a structural warning that water is no longer being managed by the surface and is instead migrating into the thin-set and the substrate below. You can find more about managing these issues in our guide on grout restoration secrets for long lasting results which explains how to revive these surfaces before they crumble entirely.
“A floor is only as good as the subfloor beneath it; deflection is the enemy of every joint.” – Master Flooring Axiom
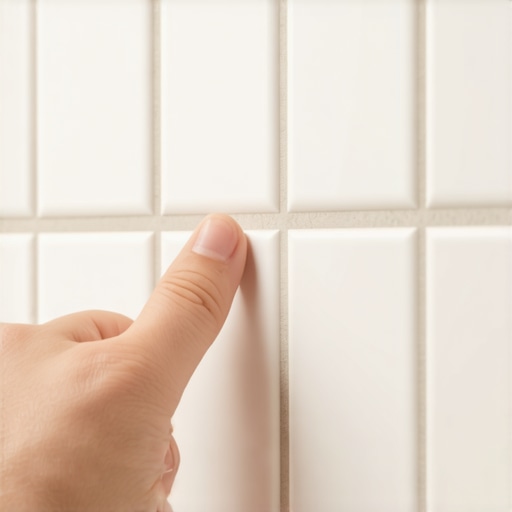
The simple finger test and the gritty truth
The finger test involves applying firm pressure to the grout lines and checking for moisture transfer or textural changes that indicate the material has lost its structural integrity. Run your index finger along the dampest part of the shower floor about twenty minutes after you have finished a shower. If the grout feels soft like wet chalk or if a slurry of grey paste comes off on your skin, the bond has failed. You are looking for physical displacement. Grout should be as hard as the tile it surrounds. If there is any give, the polymers have been washed away by harsh chemicals or the moisture has reached a point of no return. This test works because it identifies the loss of the binder. When the binder is gone, only the sand remains, and sand cannot hold back five gallons of water per minute. If you find your grout is failing, it might be time to look at showers that wow modern designs for 2025 to see how modern waterproofing systems prevent this from happening in the first place.
Why your subfloor is lying to you
Subfloor deflection and improper joist spacing create micro-movements that snap the rigid bonds of grout even if the material itself was mixed perfectly by the book. Tile is a rigid surface. Wood and even some concrete slabs are dynamic. If the subfloor moves more than 1/360th of the span, the grout will crack. It starts as a pinhole. Then it becomes a hairline. Soon, the water travels through that crack via capillary action and begins to rot the plywood or saturate the mortar bed. I have seen guys try to caulk over these cracks. That is like putting a band-aid on a gunshot wound. The moisture is already trapped. In high-humidity areas like Florida or the Gulf Coast, this trapped moisture leads to black mold colonies within weeks. You should check the perimeter of your shower near the floor where the tile meets the wall. This is a common failure point that often involves baseboards makeover ideas to elevate your space when the moisture starts to wick into the wood trim.
| Grout Type | Water Resistance | Flexibility Rating | Best Use Case |
|---|---|---|---|
| Sanded Grout | Moderate | Low | Joints wider than 1/8 inch |
| Unsanded Grout | Low | Very Low | Wall tile and thin joints |
| Epoxy Grout | High | Moderate | Heavy moisture and steam |
| High-Performance Cement | High | Low | Residential shower floors |
The microscopic war against efflorescence
Efflorescence is the white powdery residue that appears when water soluble salts migrate to the surface of the grout and crystallize upon contact with the air. This is not just a stain. It is a symptom of a wet subfloor. If you see white fuzz on your grout lines, it means water is moving from the bottom up. It is leaching minerals out of the concrete or the mortar bed and depositing them on your floor. This constant flow of water through the grout lines eventually hollows them out. A hollow grout line is a dead grout line. You can try to clean it, but you are just scrubbing the symptoms. If you need cleaning advice that actually works without destroying the remaining sealer, refer to our tile cleaning tips for a sparkling bathroom in 2025. However, if the efflorescence returns every week, the finger test will likely show that the grout has become soft and ready for replacement.
The 1/8 inch that ruins everything
Expansion gaps are required at every change of plane because different materials expand and contract at different rates during temperature shifts. If your installer put hard grout in the corners where the wall meets the floor, it will fail. Every single time. You need a 100 percent silicone sealant in those joints. Hard grout cannot handle the stress of the wall moving independently of the floor. When that corner grout cracks, water pours behind the tile. This is why you see tiles falling off the bottom row of a shower or baseboards rotting in the bathroom. If you are planning a renovation, look at chic baseboard designs that transform rooms in 2025 and make sure you choose materials that handle moisture better than standard MDF. Always ensure there is a gap for movement. A floor that is locked in too tight will eventually buckle or explode its joints.
“Cementitious materials are porous by nature; the sealer is your only line of defense against the molecular intrusion of hard water.” – TCNA Technical Bulletin
- Check for dark spots in the grout that do not dry out after 24 hours of non-use.
- Look for pinholes or small craters where the grout has literally washed away.
- Press a coin against the grout line to see if it leaves an indentation or creates dust.
- Inspect the area around the drain for any separation between the metal and the tile.
- Search for crumbling sections near the base of the shower door where water pools.
The ghost in the expansion gap
A ghost leak is moisture that escapes through failed grout and travels along the waterproof membrane until it finds a screw hole or a gap in the plumbing. You might see a stain on the ceiling below the bathroom and think it is a pipe. Often, it is just failed grout. The finger test is your first diagnostic tool. If the grout is firm but you still have a leak, the problem is likely the membrane. But if the grout fails the finger test, you have found the entry point. For those with smaller bathrooms, managing this moisture is even more critical because the concentrated humidity accelerates the decay. See showers with a style trendy ideas for small bathrooms for tips on layout and drainage. If you find your grout is consistently failing, you might consider eco friendly tile solutions for sustainable homes in 2025 which often feature denser, less porous materials that resist this cycle of failure. If the damage is already done, knowing how to refresh grout without replacing it can save you thousands if the substrate is still dry. Otherwise, you are looking at a full tear-out.