
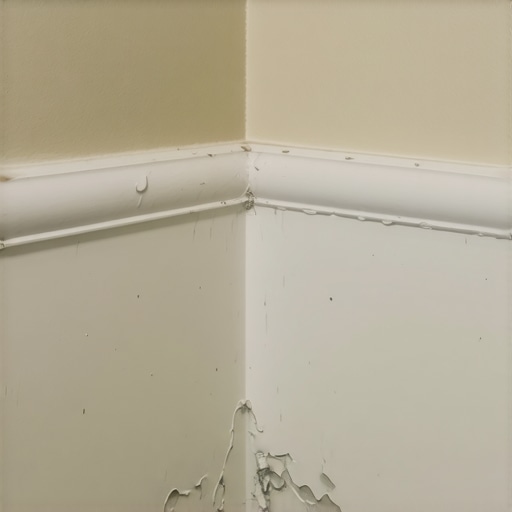
The smell of oak dust and WD-40 is what greeted me this morning as I inspected a failed bathroom remodel in a suburban ranch home. My knees have the calluses to prove I have spent three decades at floor level, and I can tell you exactly why your bathroom baseboards are bubbling and peeling. Most guys skip the leveling compound. They think the underlayment will hide the dip. It won’t. I spent three days grinding concrete on a job last month just so the floor wouldn’t click like a castanet. That same disregard for the fundamentals is why your trim is rotting. People treat flooring like a cosmetic choice, but it is a structural engineering challenge that begins at the molecular level. If you ignore the physics of moisture, the moisture will eventually ignore your design choices.
The silent war against moisture
Bathroom baseboards bubble because of capillary action, high relative humidity, and hydrostatic pressure from the subfloor. This usually occurs when Medium Density Fiberboard (MDF) absorbs liquid water through its unfinished bottom edge or through cracked grout joints in the adjacent tile floor. When the cellulose fibers within the trim saturate, they expand at a rate disproportionate to the adhesive resins, causing the visible blistering and paint failure you see today. It is not just about a splash from the tub. It is about how the material breathes or fails to breathe in a high-moisture environment.
I have seen it a thousand times. A homeowner picks out some chic baseboard designs and thinks they are done. They do not realize that the back of that board is raw wood or compressed fiber. In a bathroom, the air is often at 80 percent relative humidity after a shower. That water vapor is looking for a home. It finds the unsealed back of your trim and moves in. Once it gets inside, the urea-formaldehyde resins that hold MDF together start to break down. The board swells. The paint, which is a rigid film, cannot stretch with the swelling wood. So, it cracks. It bubbles. It peels off in sheets like a bad sunburn. This is why material choice is more than just an aesthetic decision. It is about chemical resistance to H2O molecules.
“A floor is only as good as the subfloor beneath it; deflection is the enemy of every joint.” – Master Flooring Axiom
The 1/8 inch that ruins everything
The gap between the bottom of your baseboard and the top of your tile is the most critical failure point in a bathroom. If this gap is too small, water sits in the caulk line through surface tension and eventually wicks up into the trim. If the gap is too large without a backer rod, the sealant will fail and allow water to migrate under the tile and into the subfloor assembly. Most installers jam the baseboard tight against the tile. That is a death sentence for the wood. You need a 1/8 inch expansion gap, properly sealed with 100 percent silicone, not cheap acrylic latex.
When I talk about the 1/8 inch, I am talking about the difference between a floor that lasts 30 years and one that rots in three. If you look at baseboards makeover ideas, you will see beautiful photos, but you won’t see the expansion joint. In reality, the floor moves. Even tile moves. If the baseboard is pinned against the tile, there is nowhere for that energy to go. The joint breaks. Once the joint breaks, the water from your showers finds a path. It travels by capillary action, a physical phenomenon where liquid flows in narrow spaces without the assistance of external forces. It literally climbs up the back of your wall. This is how you end up with mold behind the walls before you even see a bubble on the paint.
Why your subfloor is lying to you
Subfloors often hide moisture issues that manifest as peeling baseboards long before the floor itself shows signs of distress. A concrete slab that was poured without a vapor barrier will constantly emit moisture vapor. This vapor travels upward, hits the bottom of your non-porous LVP or tile, and is forced laterally toward the edges of the room, which is exactly where your baseboards sit. You might think your floor is dry, but your moisture meter would tell a different story. If the calcium chloride test shows more than three pounds of vapor emission per 1,000 square feet, your trim is at risk.
I remember a job where the client had just installed modern showers with high-end porcelain. They called me because the baseboards were turning black. They blamed the plumber. I pulled a piece of trim and found the subfloor was soaking wet. The installer had used a standard thin-set over a green concrete slab without a moisture mitigation membrane. The moisture had nowhere to go but out the sides. It is a common mistake. People spend $10,000 on tile and $0 on moisture testing. You have to understand the chemistry of the slab. If the pH is too high because of the moisture, it will also eat the adhesive holding your baseboards to the wall. It is a total system failure.
Comparing trim materials for wet environments
| Material | Moisture Resistance | Expansion Rate | Best Use Case |
|---|---|---|---|
| MDF (Fiberboard) | Very Low | High | Dry Hallways only |
| Solid Pine | Moderate | Medium | Guest Bathrooms |
| PVC (Vinyl) | Total | Very Low | Main Showers/Wet Rooms |
| Primed Poplar | Moderate | Medium | High-end Remodels |
The ghost in the expansion gap
Grout is porous by nature and acts like a sponge if it is not properly sealed or maintained. When you have showers for small bathrooms, the water spray is concentrated in a small area. This water hits the grout lines, penetrates the cementitious matrix, and sits on the waterproof membrane. If that membrane is not sloped or if the perimeter joint is clogged with debris, the water stays there, saturating the bottom of the drywall and the baseboard. This is why grout restoration is a functional necessity, not just a cleaning task.
Many people don’t realize that grout is not waterproof. It is water-resistant at best. If you don’t follow grout restoration secrets, you are leaving your home vulnerable. Water is a persistent enemy. It will find a pinhole in your caulk. It will find a hairline crack in your grout. Once it gets behind the tile, it creates a micro-climate of 100 percent humidity. This is the “ghost” in your walls. It rots the studs, it bubbles the baseboards, and it smells like a wet basement. I have seen 2x4s that looked like shredded wheat because someone didn’t want to spend twenty dollars on a tube of high-quality sealant.
The technical specs of modern grout restoration
Effective grout maintenance requires an understanding of the Janka hardness of the surrounding materials and the chemical bond of the sealer. You cannot just slap a new layer of grout over the old stuff. You have to remove the top 1/8 inch of the old material to create a mechanical bond for the new grout. Furthermore, using epoxy grout in the perimeter joint is a mistake. You need a flexible sealant that meets ASTM C920 standards to handle the movement between the wall and the floor.
If you want to know how to refresh grout without replacing it, you need to look at colorants that act as epoxy-based sealers. These products don’t just sit on top. They penetrate the pores of the grout and create a hydrophobic barrier. This prevents the moisture from ever reaching your baseboards. It is a technical solution to a physical problem. When I am on a job, I don’t just look at the dirt. I look at the integrity of the cement. If the grout is soft, it means the polymer bonds have broken down. No amount of cleaning will fix that. You have to address the structural integrity of the joint.
“Cementitious grout is a filter, not a barrier; treat it as such or the subfloor will pay the price.” – TCNA Installation Manual Reference
- Always use a moisture meter before installing any trim in a bathroom.
- Seal the bottom and back of wood baseboards with a high-quality oil-based primer.
- Leave a 1/8 inch gap between the floor and the trim for a proper silicone bead.
- Opt for PVC or composite materials in bathrooms with heavy steam or splash.
- Inspect grout lines annually for cracks that allow water to migrate behind the baseboard.
- Use a fan during and after showers to drop the relative humidity below 50 percent.
A better way to install bathroom baseboards
To prevent bubbling and peeling, you must treat the baseboard installation as a multi-stage waterproofing process. Start by ensuring your subfloor is level within 1/8 inch over 10 feet. Any dips will collect water. Use eco-friendly tile solutions that offer low porosity. When it comes to the trim, back-prime every single piece. This creates a vapor retarder on the side of the board you will never see again. It is the most skipped step in the industry, and it is why I stay busy fixing other people’s mistakes.
While most people want the thickest underlayment, too much cushion actually causes the locking mechanisms on LVP to snap under pressure. This same movement will tear the caulk line at your baseboard. You want a firm, stable base. I prefer a high-density rubber underlayment that doesn’t compress more than 5 percent under load. This keeps the floor stable, which keeps the joint at the baseboard stable. If the joint is stable, the water stays on top of the floor where it can be wiped away or evaporated. If you are struggling with maintenance, check out these tile cleaning tips to ensure you aren’t using too much water during your weekly chores.
The chemistry of the adhesive also matters. Don’t use water-based construction adhesive for bathroom trim. Use a polyurethane-based adhesive. Polyurethane is naturally waterproof and creates a bond that can handle the slight expansion and contraction of the wall studs. It is about building a system that is resilient to the realities of a wet environment. You are not just decorating a room. You are building a shield. Every nail hole should be filled with a waterproof putty. Every miter joint should be glued. This is how you stop the peeling before it starts. It takes longer. It costs more. But it only has to be done once. That is the difference between a master and a hobbyist.