I spent three days grinding concrete on a job last month just so the floor wouldn’t click like a castanet. Most guys skip the leveling compound. They think the underlayment will hide the dip. It won’t. When it comes to showers, that level of laziness is what leads to catastrophic failure. I once walked into a luxury bathroom where the marble tile looked pristine, but the moment I stepped near the drain, dirty water squeezed up through the grout like a wet sponge. The subfloor had turned into oatmeal. The homeowner thought they had a minor cleaning issue. In reality, the entire structural assembly was rotting from the inside out because of a failed waterproof membrane and porous grout. This is the reality of modern flooring. It is a performance surface, not a decoration. If you smell a faint musty odor or see a slight discoloration in your baseboards, you are already in trouble.
The structural lie of the perfect tile
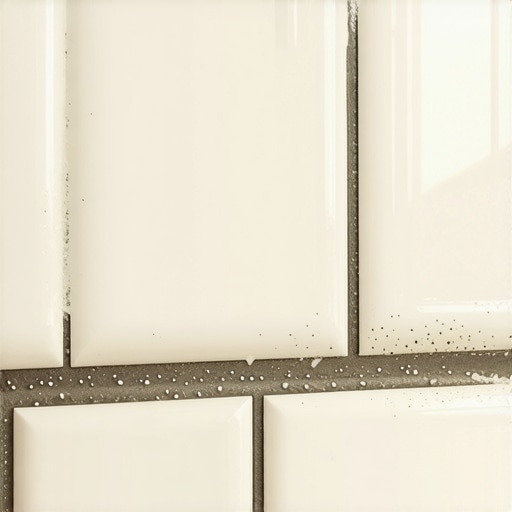
Shower leaks often hide behind visually perfect tile installations because water follows the path of least resistance through microscopic grout pores. To understand why your shower might be failing, you have to look at the chemistry of the grout itself. Most residential showers use cementitious grout, which is essentially a specialized concrete mix. It is naturally porous. Without a high-performance sealer or a polymer additive, water moves through these joints via capillary action. This moisture hits the thin-set mortar and, if the waterproofing layer below was installed with even a pinhole defect, the subfloor begins to drink. The 2026 Grout Test is designed to identify these failures before you have to tear out the joists. You need to stop looking at the surface and start analyzing the hydro-static behavior of the assembly.
“A floor is only as good as the subfloor beneath it; deflection is the enemy of every joint.” – Master Flooring Axiom
[IMAGE_PLACEHOLDER_1]
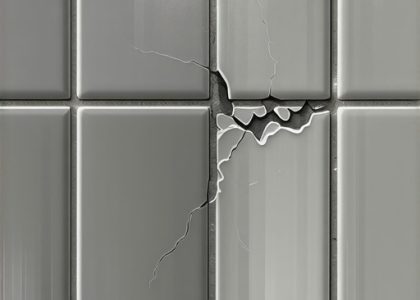
The 2026 liquid dye extraction method
The 2026 Grout Test uses a non-staining fluorescent dye and a vacuum extraction tool to map moisture pathways within the tile grid. Most homeowners try the old spray bottle trick. That tells you nothing. To truly know if your shower is leaking, you need to apply a hydrostatic load to the grout lines. I use a specialized dye that glows under UV light. We flood the floor of the shower, let it sit for twenty minutes, and then use a moisture meter at the perimeter where the tile meets the baseboards. If that dye shows up on the back side of the wall or under the baseboard trim, your pan is cooked. It is a binary reality. Either it is watertight or it is a liability. You cannot have a 99 percent waterproof shower. That 1 percent will grow mold that will eat your house.
The physics of the weeping drain
A common failure point in modern showers is the clogging of the weep holes within the integrated drain flange. When we build showers that wow, we focus on the slope. But beneath the tile, there is a secondary drainage system. If your installer was a hack, they probably glopped thin-set right over the weep holes. This traps water in the mortar bed. The water has nowhere to go, so it sits there. It becomes stagnant. It begins to dissolve the bond between the tile and the substrate. This is why you see grout cracking. The grout isn’t the problem. The movement caused by the saturated mortar bed is the problem. You can learn more about maintaining these surfaces in our guide on tile cleaning tips, but remember that cleaning won’t fix a structural drainage failure.
| Grout Type | Porosity Level | Flexibility | Best Use Case |
|---|---|---|---|
| Cementitious | High | Low | General residential use |
| High-Performance | Medium | Medium | High-traffic bathrooms |
| Epoxy | Near Zero | High | Commercial and steam showers |
| Urethane | Low | High | Flexible joints and DIY |
The 1/8 inch that ruins everything
The width of your grout joint dictates the structural integrity of the entire shower floor because it manages the expansion and contraction of the tile. If you go too thin with a large format tile, you leave no room for the house to breathe. Houses move. They settle. They vibrate when the laundry is running. If your grout lines are too narrow, the tiles will tent or the grout will pulverize into dust. I see this all the time with people trying to get that seamless look. There is no such thing as a seamless tile floor. You need movement joints. You need an 1/8 inch gap at minimum for most sanded grouts. Anything less and you are just waiting for a hairline crack to become a highway for water. If you already have damage, you might need to look into grout restoration secrets to save the installation.
The chemistry of polymer modified thinset
Modern adhesives rely on long-chain polymers to create a mechanical and chemical bond that resists water penetration. When I talk about molecular zooming, I am talking about the way these polymers wrap around the silicate grains in the mortar. If you used a cheap, non-modified thin-set in a wet area, you made a mistake. You need the flexibility that polymers provide. Without them, the bond is brittle. A brittle bond cracks. A crack leaks. It is a simple chain of failure. I always tell people to check the bag. If it doesn’t meet ANSI A118.11 standards, keep it away from my subfloor. I’ve spent twenty years watching cheap glue fail, and it smells like wet wood and regret every single time. Sometimes you can fix the surface, but often you have to refresh grout before the damage goes deep.
“Cementitious grout is a filter, not a waterproof barrier; the membrane does the heavy lifting.” – TCNA Handbook Principle
The ghost in the expansion gap
Every shower must have a flexible sealant joint at all change of plane locations to prevent stress fractures in the grout. This means where the wall meets the floor, and where two walls meet in the corner. If your installer put hard grout in those corners, they failed you. That grout will crack within six months. You need a 100 percent silicone sealant that matches the grout color. This allows the shower to flex as the framing members expand with seasonal humidity changes. In places like Houston or Miami, this is even more critical because the wood framing moves constantly. Ignoring this 1/8 inch gap is the most common reason for leaks behind the tile. It is a ghost because you don’t see the leak until the drywall on the other side of the wall starts to bubble.
- Inspect grout lines for pinholes every six months.
- Check the perimeter of the shower for baseboard swelling.
- Ensure the drain cover is clear of debris to prevent back-pressure.
- Use a moisture meter around the shower curb once a year.
- Re-seal cementitious grout annually without exception.
The truth about waterproof claims
Many manufacturers market products as waterproof when they are actually only water-resistant under specific ASTM testing conditions. This is the biggest scam in the industry right now. Just because a tile is waterproof doesn’t mean the installation is. You have to think about the system. The tile, the grout, the thin-set, the membrane, and the subfloor. If any one of those fails, the word waterproof means nothing. I’ve seen LVP flooring marketed as a bathroom solution that buckled because the homeowner didn’t leave an expansion gap under the chic baseboard designs they installed. The floor tried to grow but had nowhere to go, so it popped the locking mechanisms. The same thing happens in showers. Pressure builds, something snaps, and water finds a way in. If you want a sustainable solution, look into eco-friendly tile solutions that prioritize long-term durability over marketing buzzwords.

![Shower Tile Rattling? 3 Grout Fixes That Actually Work [2026]](https://elegantfloorz.com/wp-content/uploads/2026/04/Shower-Tile-Rattling-3-Grout-Fixes-That-Actually-Work-2026-420x300.jpeg)