Most guys skip the leveling compound. They think the underlayment will hide the dip. It won’t. I spent three days grinding concrete on a job last month just so the floor wouldn’t click like a castanet. When you are staring at a high-end tile installation, especially in showers or bathrooms, the wall is almost never perfectly flat. If you try to slap a straight piece of baseboard against a wall with a 1/8 inch wave, you are going to see a gap that no amount of caulk can fix. Scribing is the only way to get a professional result that honors the craft. I have spent 25 years on my knees fixing the mistakes of installers who thought they could shortcut the physics of a room. You cannot negotiate with a crooked wall. You have to adapt the wood to the stone.
The 1/8 inch that ruins everything
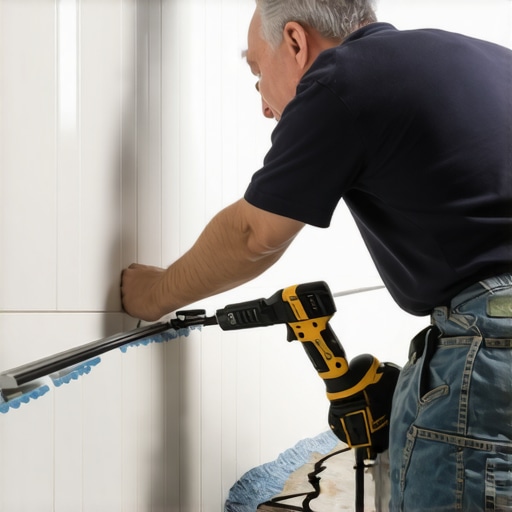
Scribing baseboards accounts for the planar deviation common in tiled walls. This process involves using a scribe tool or compass to trace the wall contours onto the baseboard material. Cutting along this line ensures the trim sits flush against uneven tile and grout lines, eliminating the need for unsightly filler or silicone beads that will eventually pull away from the surface. When you are looking for chic baseboard designs that transform rooms in 2025, understand that the cleanest design is the one that fits the architecture perfectly. A gap-free transition is what separates a master from a handyman.
“A floor is only as good as the subfloor beneath it; deflection is the enemy of every joint.” – Master Flooring Axiom
Why your subfloor is lying to you
Subfloor flatness is the most ignored variable in flooring installation. Whether you are working with hardwood, LVP, or tile, the substrate must be within 1/8 inch of level over 10 feet to avoid structural failure. If the floor is not flat, the baseboard will sit at an angle, making the wavy wall look even worse as it creates compounding geometric errors at every inside corner. I have seen guys try to use thick underlayment to hide a bad slab. While most people want the thickest underlayment, too much cushion actually causes the locking mechanisms on LVP to snap under pressure. It is better to have a firm, flat base than a soft, bouncy one. This flatness is the foundation for a successful scribe.
The physics of the scribe line
Scribe markers translate the horizontal distance between the wall and the baseboard into a visual guide. By setting a divider or marking block to the widest gap, you can mirror the irregularities of the tile surface onto the trim piece. This requires a steady hand and a mechanical understanding of how light and shadow interact with the joint between the wall and the floor. If you are working in a bathroom with clean tile surfaces, the goal is to make the wood appear as though it was molded to the stone. You need to account for the grout lines as well. A deep grout joint can create a shadow line that makes the scribe look like it failed when it actually followed the contour perfectly.
Tool selection for the precision obsessed
The choice of marking tool and cutting implement determines the accuracy of your finish carpentry. For solid wood baseboards, a jigsaw with a fine-tooth blade or a power planer offers the best control for removing material along the scribed edge. For MDF, you have to be careful not to chip the surface or inhale the urea-formaldehyde dust. When working near showers, you must also consider the moisture resistance of your tools. Rust on a blade will leave metallic stains on white oak or maple. Always use carbide-tipped blades to ensure the cellulose fibers are sheared cleanly rather than crushed, which leads to fiber swelling in humid environments.
| Material Type | Density (kg/m3) | Scribing Difficulty | Expansion Risk |
|---|---|---|---|
| Solid White Oak | 750 | High | Moderate |
| MDF (Medium Density Fiberboard) | 600-800 | Low | High |
| Primed Pine | 450 | Medium | Low |
| PVC Trim | 500-600 | Low | None |
The ghost in the expansion gap
Expansion gaps are the breathing room every floor needs to survive seasonal humidity changes. Without a 1/4 inch gap at the perimeter, your hardwood will cup or buckle as the moisture content rises. The baseboard is not just a decorative element, it is a mechanical cover for this expansion zone. If you scribe the board too tight to the wall, you might think you achieved a flush fit, but if the wall itself moves or the floor swells, the pressure will cause the baseboard to pop off or the miters to open up. In Houston or the deep south, where humidity is constant, this is a death wish for solid wood. You have to leave room for the molecular expansion of the wood cells.
Chemical bonds and the grout problem
Grout lines present a discontinuous surface that can snag a scribe tool and lead to jagged markings. When navigating a tiled wall, you should fill the grout joints with temporary tape or use a wide-base marking block that bridges the gaps between tiles. If you are dealing with grout restoration, do it before you install the baseboards. You don’t want acidic cleaners or stains hitting your newly scribed trim. The chemical interaction between wood tannins and cementitious grout can cause permanent discoloration at the contact point. I always recommend back-priming the baseboard to create a moisture barrier between the wood and the tile.
The mechanical step by step process
- Check the wall for protrusions like excess thin-set or tile spacers.
- Place the baseboard against the wall and plumb it using a level.
- Set your compass to the width of the widest gap found along the tile surface.
- Trace the profile from top to bottom, keeping the compass perpendicular to the wall.
- Use a jigsaw to back-cut the marked line at a 5-degree angle.
- Test fit and sand the edge with 80-grit paper for a precise match.
- Apply a bead of sealant to the bottom edge if installing in a wet area.
“Variation in tile thickness and wall planar deviation are the primary causes of baseboard gapping.” – NWFA Field Manual
Regional humidity and material behavior
Regional climate affects how a scribed joint holds up over time. In a dry heat environment like Phoenix, wood baseboards will shrink, potentially revealing a gap where there was none before. Conversely, in Florida, the wood will expand, pushing against the tile. For these reasons, engineered wood or PVC is often a smarter choice for baseboards in humid climates. If you must use solid wood, acclimation is essential. Leave the material in the room for at least 72 hours so the equilibrium moisture content stabilizes before you ever pick up a scribe tool. I once saw a walnut floor look like a potato chip because the installer ignored the crawlspace humidity. Don’t let your baseboards suffer the same fate.
The lie of the caulking gun
Caulking should be used as a dust seal, not a structural filler. Most contractors use caulk to hide poor craftsmanship, but a large bead of caulk will shrink, crack, and collect dirt within a year. A properly scribed baseboard requires only a micro-bead of flexible sealant to create a clean finish. This is especially true in showers where water intrusion is a risk. If you rely on caulk to fill a 1/4 inch gap, you are inviting mold and rot behind your walls. Use mechanically sound techniques first, and use chemistry only to refine the result. This is how you build a floor that lasts for generations. [IMAGE_PLACEHOLDER]