The trap of the textured surface
Removing soap scum from textured stone tiles requires a neutral pH cleaner and mechanical agitation with a soft nylon brush to lift fatty acid deposits without etching the calcium carbonate structure of the stone. Most homeowners make the mistake of using acidic bathroom cleaners, which chemically react with stones like marble, travertine, and slate, leading to permanent surface damage known as etching. To clean effectively, you must emulsify the organic oils found in soap and the mineral deposits from hard water through a process of dwell time and gentle scrubbing. I remember a job last year where a client had spent three thousand dollars on a beautiful slate shower only to ruin the finish within six months because they used a generic vinegar spray every morning. The acid in the vinegar didn’t just kill the soap scum; it literally dissolved the binder holding the slate layers together. I spent three days grinding the stone back to a workable surface and resealing it just because they thought natural meant indestructible. It was a mess that could have been avoided with a simple understanding of stone chemistry.
The physics of the shower floor
Stone is not a solid, impenetrable mass. It is a porous network of microscopic capillaries that act like a sponge for moisture and organic debris. When you install textured stone in showers, you are increasing the surface area available for soap scum to anchor itself. Textured stone, whether it is tumbled marble or riven slate, features peaks and valleys that provide a mechanical bond for biofilm and calcium stearate, the scientific name for soap scum. This residue forms when the fatty acids in soap react with the minerals in your water. If you have hard water, you are essentially manufacturing a layer of waterproof wax on your tile every time you lather up. This layer fills the texture of the stone, making it slippery and dull. The removal process is not about scraping; it is about chemical suspension. You need to introduce a surfactant that can get under the scum and lift it into the water stream. This is where most people fail because they do not allow for dwell time. A cleaner needs to sit on the surface for at least ten minutes to break those chemical bonds. If it dries, you are back to square one.
“The Tile Council of North America emphasizes that stone maintenance requires neutral cleaners to prevent the breakdown of natural binders.” – TCNA Handbook Summary
The chemistry of the clean
To understand why soap scum is so persistent, we must look at its molecular structure. It is a non-polar substance, meaning it does not like to dissolve in water. This is why just rinsing the shower never works. You need a bridge between the oily scum and the water, which is what a professional stone soap provides. These soaps are formulated to have a pH of exactly 7.0. This is the neutral point. If the cleaner is too acidic, it eats the stone. If it is too alkaline, it can strip the sealer and leave the stone vulnerable to deep staining. When dealing with tile cleaning tips for a sparkling bathroom in 2025, the focus is always on maintaining this delicate balance. I always tell my guys to treat stone like a fine wool rug. You wouldn’t throw bleach on wool, and you shouldn’t throw it on your travertine. The baseboards and transitions in these areas are also at risk. If you are updating your space, look into chic baseboard designs that transform rooms in 2025 to ensure your edges are as protected as your floors.
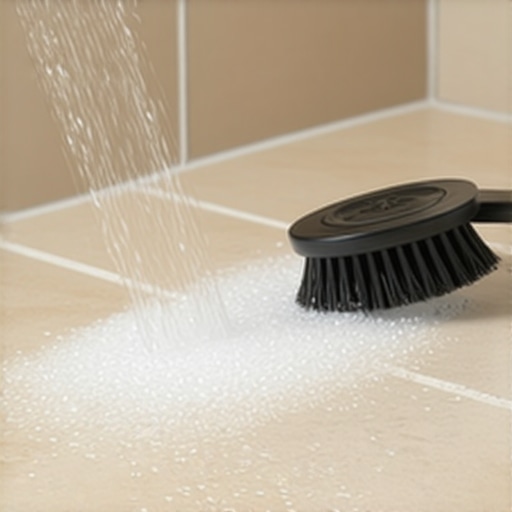
Tools of the trade
You cannot clean textured stone with a flat mop or a rag. You need tools that can reach into the valleys of the texture. A soft-bristled nylon brush is the gold standard. Wire brushes will scratch the stone and leave metal traces that will eventually rust, turning your shower orange. Steam is another powerful ally. The high temperature of the steam melts the fatty acids in the soap scum, turning them back into a liquid state that can be easily wiped away. However, you must be careful not to use steam on stone that has an active topical sealer, as it can cause the sealer to cloud or peel. The interplay between heat and chemistry is a fine art. I have seen guys try to use pressure washers in bathrooms, which is a recipe for disaster. All that does is drive the moisture deep into the subfloor, leading to mold and rot behind the tile. For more on maintaining the integrity of your shower, check out showers with a style trendy ideas for small bathrooms to see how professional layouts handle drainage and moisture management.
Comparison of cleaning agents on natural stone
| Cleaner Type | pH Level | Effect on Natural Stone |
|---|---|---|
| White Vinegar | 2.5 | Etches and dulls surface permanently |
| Commercial Scum Remover | 12.0 | Strips sealers and can cause yellowing |
| Dish Soap | 8.0 – 9.0 | Leaves a film that attracts more scum |
| Neutral Stone Soap | 7.0 | Safely emulsifies oils without damage |
The ghost in the expansion gap
One area that people always forget is the perimeter where the floor meets the wall. This expansion gap is usually filled with caulk or silicone, not grout. Soap scum loves to hide in these corners, and if it sits there too long, it begins to breed mold. The mold doesn’t just sit on the surface; it eats into the silicone. This is why I always recommend using a high-quality, mold-resistant silicone and ensuring that your baseboards makeover ideas to elevate your space include waterproof materials. If the scum has already turned black, you aren’t just cleaning soap residue anymore; you are fighting a biological colony. You might need to look at how to refresh grout without replacing it if the staining has moved from the surface of the stone into the cementitious joints. Grout is even more porous than stone, and it acts as a highway for moisture to travel into your walls.
Why your subfloor is lying to you
If you find that your stone tiles are constantly covered in a white, powdery substance even after cleaning, you might not be dealing with soap scum at all. You might be seeing efflorescence. This happens when moisture moves through the concrete subfloor or the mortar bed, dissolves mineral salts, and carries them to the surface of the tile. As the water evaporates, the salt stays behind. This is a structural warning sign. It means your shower pan or your waterproofing membrane might be failing. I spent three days grinding concrete on a job last month just so the floor wouldn’t click like a castanet, but if the waterproofing is gone, no amount of cleaning will save it. You have to ensure that your installation meets the highest standards. For those interested in sustainable building, exploring eco-friendly tile solutions for sustainable homes in 2025 can provide insight into better membranes and mortars that resist salt migration.
“A floor is only as good as the subfloor beneath it; deflection is the enemy of every joint.” – Master Flooring Axiom
The 1/8 inch that ruins everything
The biggest mistake in stone showers is the lack of proper pitch. If water pools anywhere on that textured stone, soap scum will accumulate at ten times the normal rate. We call this a birdbath. It happens when the installer doesn’t pre-slope the subfloor before putting down the liner. You want a minimum of 1/4 inch of fall per linear foot toward the drain. Without this, gravity works against you. The water sits in the texture, evaporates, and leaves behind a concentrated layer of minerals and soap. This is why I am so obsessed with level subfloors and proper drainage. If you are planning a new project, looking at showers that wow modern designs for 2025 will show you that linear drains are becoming a standard because they allow for a single-slope floor, which reduces pooling and simplifies the cleaning of textured tiles.
Step by step stone restoration checklist
- Inspect the stone for etching or deep cracks before applying any liquid.
- Vacuum or sweep the surface to remove loose grit that could scratch the stone during scrubbing.
- Apply a pH-neutral stone cleaner diluted according to the manufacturer’s instructions.
- Allow for a 10-minute dwell time to break the bond of the fatty acids.
- Agitate the texture using a soft-bristled nylon brush in circular motions.
- Rinse thoroughly with clean, warm water to remove all emulsified residue.
- Dry the surface immediately with a microfiber towel to prevent water spots.
- Check the sealer’s integrity by dropping water on the stone; if it doesn’t bead, it is time to reseal.
Maintaining the molecular shield
Once you have the stone clean, you must protect it. Sealing stone is not a one-time event. In a high-use shower, you should be looking at sealing every six to twelve months. A penetrating sealer, also known as an impregnator, works by filling the pores of the stone with silicone or fluoropolymer resins. This doesn’t change the look of the stone, but it lowers the surface tension so that water and soap cannot soak in. They just sit on top. If you neglect this, you are inviting the soap scum to move back into the house and take up permanent residence. If the grout is looking particularly rough, you may need to investigate grout restoration secrets for long-lasting results to bring the whole system back to its original glory. Remember, a floor is a performance surface. It requires maintenance, respect, and the right chemistry to last a lifetime. If you ever run into a situation where the stone seems beyond help, don’t hesitate to contact us for professional advice. We have seen every type of failure imaginable, and most of them start with a bottle of the wrong cleaner and a lack of patience. Keep it neutral, keep it dry, and keep your subfloor in mind. That is the only way to win the war against soap scum on textured stone.