The hidden physics of a perfect finish
I spent three days grinding concrete on a job last month just so the floor would not click like a castanet. Most guys skip the leveling compound. They think the underlayment will hide the dip. It won’t. I have seen countless installations fail because the installer ignored the structural reality of the surface. A floor is a machine. It moves, it breathes, and it reacts to the atmosphere of the room. When you get to the finishing stages, such as applying sealant to baseboards or waterproof joints in showers, that same level of obsession is required. If your subfloor is uneven, your baseboards will show gaps. If your baseboards show gaps, your caulk lines will look like a mountain range. It is all connected. You cannot have a high-end finish on a low-end foundation. This guide focuses on the mechanical precision required to achieve lines that look like they were drawn with a laser.
The invisible failure of movement joints
Movement joints are essential gaps left between different materials to allow for expansion and contraction without causing structural damage. These joints are often filled with flexible sealant rather than rigid grout. In a shower, the change of plane where two walls meet or where the wall meets the floor must be caulked. If you use grout in these corners, it will crack. The physics of the house shifting, even by a fraction of a millimeter, will snap a rigid grout line. This is why understanding the chemistry of your sealant matters as much as your technique with the caulking gun. For those looking to modernize their space, showers that wow modern designs for 2025 often rely on these perfect transitions to maintain their aesthetic. The transition must be flexible. It must be waterproof. It must be perfect. If it is not, moisture will find its way behind the tile, leading to mold and rot in the wall cavity. This is not just about looks. This is about protecting the structural integrity of your home.
“A floor is only as good as the subfloor beneath it; deflection is the enemy of every joint.” – Master Flooring Axiom
Why your silicone bead peels away
Silicone failure is almost always caused by poor surface preparation or the presence of moisture during the application process. You must ensure the joint is bone dry and free of all old residue. I have seen installers try to caulk over old soap scum or leftover grout dust. It never works. The silicone cannot form a molecular bond with the substrate if there is a layer of contamination in the way. You need to use denatured alcohol to wipe down the tile and the tub or baseboard before you even think about opening a tube. This removes oils that the eye cannot see. If you are working on a bathroom refresh, you might also consider grout restoration secrets for long lasting results to ensure the entire surface is up to the same standard as your new caulk lines. The environment must be controlled. High humidity in the room can also affect the curing process of acetoxy silicone. If the air is too damp, the sealant may skin over too quickly or fail to adhere properly to the tile edges.
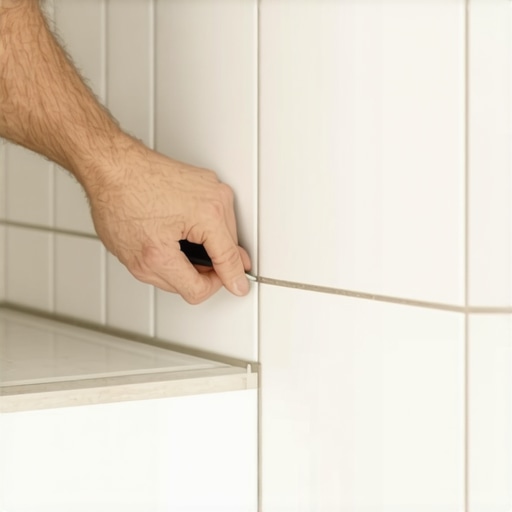
The physics of painters tape and soapy water
Achieving a perfectly straight line requires a combination of high-quality painters tape and a specific surface tension modifier like soapy water. Many people try to freehand their caulk beads. Unless you have been doing this every day for twenty years, you will fail. The tape provides a mechanical barrier that defines the edge of the sealant. You must apply the tape exactly where you want the caulk to end. This usually means leaving a gap of about one eighth of an inch on either side of the joint. Once the bead is laid, you spray it with a mixture of water and a few drops of dish soap. This reduces the surface tension of the silicone. When you run your finger or a tooling tool over the bead, the excess caulk slides off the taped areas and onto your tool without sticking to the adjacent tile or wood. It is a simple trick, but it requires precision. You must remove the tape while the caulk is still wet. If you wait until it skins over, you will pull the caulk out of the joint and ruin the line. This is the difference between a DIY job and a master installation.
| Sealant Type | Best Use Case | Flexibility Rating | Paintable |
|---|---|---|---|
| 100% Silicone | Showers and Tubs | High | No |
| Siliconized Latex | Baseboards and Trim | Medium | Yes |
| Polyurethane | Exterior Transitions | Very High | Yes |
| Acrylic Caulk | Drywall Corners | Low | Yes |
Baseboard transitions that actually hold
Baseboard caulking requires a sealant that can accept paint while remaining flexible enough to handle the expansion of the wood. Wood is a natural material. It grows and shrinks with the seasons. If you use a cheap, rigid caulk, it will pull away from the wall by mid-winter. This leaves a dark, ugly crack that catches dust. For a professional look, especially when exploring baseboards makeover ideas to elevate your space, you need a high-quality siliconized acrylic. This gives you the ease of water cleanup and the ability to paint, but with enough silicone content to keep the joint sealed as the wood moves. The gap between the baseboard and the floor is another story. If you have tile, you might be tempted to caulk it. If you have hardwood, you should never caulk that gap. The wood needs to move independently of the wall. Smearing caulk in that transition is a recipe for a mess. You should also ensure your cleaning routine does not damage these joints, perhaps by following tile cleaning tips for a sparkling bathroom in 2025 which emphasize gentle but effective methods.
“Movement joints are not optional; they are the pressure release valves of a rigid floor system.” – Master Flooring Axiom
The chemistry of the perfect bead
The chemical composition of your sealant dictates its viscosity and its ability to wet the surface of the tile or grout. Viscosity is the resistance of a fluid to flow. A high-viscosity silicone stays where you put it but is harder to tool. A low-viscosity caulk might slump out of a vertical joint. You want a medium-bodied sealant that fills the void completely. When you cut the tip of your caulking tube, do it at a 45-degree angle. The size of the hole should match the width of the joint. If the hole is too big, you will waste material and make a mess. If it is too small, you will not get enough sealant into the gap to create a durable bond. You are looking for 100% contact with both sides of the joint. If there are air bubbles or voids, the seal is compromised. If you find your grout is also failing, you can learn how to refresh grout without replacing it to fix the surrounding areas before applying your final sealant beads. Precision in the application of the bead is a mechanical skill that takes time to master. It requires steady hand-eye coordination and a consistent pressure on the trigger of the caulking gun. Do not rush. Rushing leads to uneven beads and wasted time.
- Strip all existing sealant using a plastic scraper to avoid scratching the tub.
- Vacuum the joint to remove every speck of dust and debris.
- Wipe the area with denatured alcohol or 90% isopropyl alcohol.
- Apply blue painters tape to both sides of the joint with surgical precision.
- Cut the caulk tube at a 45-degree angle and pierce the inner seal.
- Lay a consistent bead of sealant without stopping mid-way.
- Mist the bead with a soapy water solution.
- Tool the joint with a single, smooth motion using your finger or a caulk tool.
- Remove the tape immediately by pulling it away at a 45-degree angle.