The Steam Test and the Truth About Grout Sealer Performance
I spent three days grinding concrete on a job last month just so the floor wouldn’t click like a castanet. Most guys skip the leveling compound. They think the underlayment will hide the dip. It won’t. I have seen it a thousand times. You spend a fortune on Italian porcelain and then skimp on the prep work or the sealer. That is like putting a Ferrari engine in a lawnmower frame. It might look good for a week, but the second you put it under pressure, the whole system fails. I am a master floor installer with twenty five years of sawdust under my nails and I am here to tell you that the invisible parts of your floor are the only parts that actually matter. Your grout is the most vulnerable point in your entire bathroom. It is a porous, mineral-based bridge between your tiles that is constantly under attack from water, soap scum, and bacteria. If you do not understand the physics of how your sealer works, you are just waiting for a mold explosion. We are going to look at the microscopic reality of grout and how the steam test can save your subfloor from a watery grave.
The science of the invisible barrier
A grout sealer works by filling the microscopic pores of the cementitious material to prevent liquid absorption and staining. Effective sealers utilize fluoropolymers or silanes to create a hydrophobic surface that repels water while still allowing the transmission of moisture vapor from the subfloor to avoid structural rot. Most homeowners think that once the tile is down, the job is done. They do not realize that grout is essentially a hard sponge. When you take a shower, the water does not just sit on top of the tile. It searches for a way in. If your grout is not sealed, that water travels through the joints via capillary action. Once it hits the thin-set, it starts to migrate. If your installer did not use a proper waterproof membrane like Kerdi or a liquid-applied guard, that moisture hits your plywood or concrete. On concrete, it can trigger efflorescence, which is those white, crusty salts that ruin the look of your showers. On wood, it starts the slow process of rot. I have ripped up floors where the plywood was so soft you could poke a finger through it, all because a five dollar bottle of sealer was missing. You need to understand that grout is a portland cement product. It has a high pH and a structure full of tiny voids. A penetrating sealer goes into those voids and stays there. It does not sit on top like a wax. It changes the surface tension of the grout particles. When water hits it, the water beads up because it is more attracted to itself than it is to the grout. That is the physics of a dry home.
“A floor is only as good as the subfloor beneath it; deflection is the enemy of every joint.” – Master Flooring Axiom
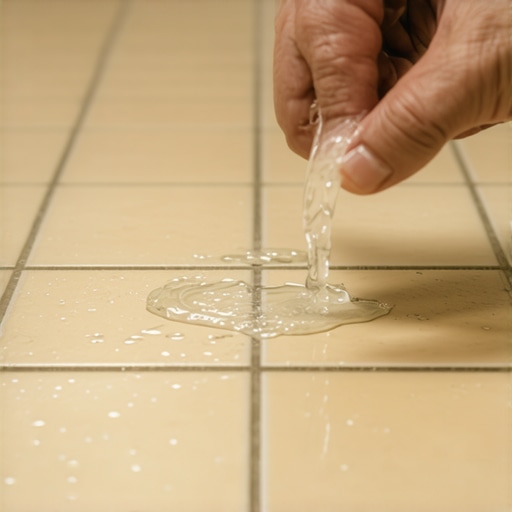
The steam test for your bathroom floors
The steam test is a diagnostic method used to verify the integrity of a grout sealer by applying localized heat and moisture to the joint. If the grout darkens immediately under steam, the sealer has failed or was never applied, indicating that the porous structure is open to contamination. You do not need a laboratory to know if your floor is failing. You just need a hand-held steamer. Take that steamer and point it at a grout line in the corner of your shower. If that grout turns dark within five seconds, you have a problem. The darkness is water entering the cement matrix. If the grout stays the same color and the water just rolls off, your sealer is holding the line. This is the difference between a floor that lasts forty years and one that needs grout restoration secrets for long lasting results within three years. I have seen guys try to fake this by using topical sealers that look shiny. Topical sealers are a nightmare. They are basically a plastic film. They peel. They trap moisture inside the grout, which can actually lead to the grout crumbling because the water cannot evaporate. You want a penetrating sealer. It is invisible, but it is much more effective at a molecular level. It bonds to the calcium carbonate in the cement. That bond is what keeps the oils from your skin and the minerals in your water from turning your white grout into a muddy gray mess. If your grout fails the steam test, you are effectively living on a damp sponge.
Why your subfloor is lying to you
Subfloors often appear dry and stable while masking high levels of hydrostatic pressure or moisture content that can blow the bond of your tile. Professionals use moisture meters to ensure the slab is below four percent moisture before any tile or baseboard installation begins to prevent future failures. Most installers are lazy. They walk onto a slab, see it looks gray, and start spreading thin-set. That is a recipe for a callback. I have spent days grinding down high spots on concrete just to get a floor flat to within an eighth of an inch over ten feet. If the floor is not flat, the tile will lippage. If the tile has lippage, the grout joints will be uneven. When you have uneven grout joints, the sealer cannot apply evenly. You get thin spots where the water will penetrate. This is especially dangerous near your baseboards. Water likes to travel to the edges of a room. If the perimeter is not sealed correctly, the moisture will wick up into your drywall or your baseboard material. If you have MDF baseboards, they will swell like a balloon the first time you mop with too much water. That is why I always recommend looking into baseboards makeover ideas to elevate your space that include moisture-resistant materials like PVC or solid primed wood. A floor is a system. The grout is the seal, the tile is the shield, and the subfloor is the foundation. If any part of that system is weak, the whole thing is junk. I have seen beautiful tile work ruined because the guy did not want to spend the time to check the moisture vapor emission rate. He just wanted to get paid and get out. I do not work like that. I want my floors to outlive me.
| Sealer Type | Longevity | Mechanism | Best Use Case |
|---|---|---|---|
| Water-Based Penetrating | 3 to 5 Years | Hydrophobic Resins | Interior Ceramic and Porcelain |
| Solvent-Based Penetrating | 5 to 10 Years | Deep Pore Saturation | Natural Stone and High Traffic |
| Topical Coating | 1 to 2 Years | Surface Film | Decorative Accents Only |
| Epoxy Grout (Built-in) | Lifetime | Non-porous Resin | Steam Showers and Commercial |
The 1/8 inch that ruins everything
Precision in grout joint width and expansion gaps at the perimeter is the primary factor in preventing tile tenting and grout cracking. A gap of at least one eighth of an inch must be maintained at all vertical obstructions to allow for the natural expansion of the subfloor. People think tile is static. It is not. Everything moves. Your house breathes. In the summer, the humidity goes up and your subfloor expands. In the winter, it shrinks. If you shove your tile tight against the wall and cover it with baseboards without an expansion gap, that tile has nowhere to go. It will tent. It will pop off the floor with a sound like a gunshot. The grout is the first thing to show the stress. It will crack and flake away. Once it cracks, the seal is broken. No amount of sealer will fix a structural crack. You have to remove the grout and start over. This is why I am so obsessed with tile cleaning tips for a sparkling bathroom in 2025 that focus on maintaining the integrity of the joints. You should be inspecting your grout every six months. Look for hairline fractures. If you see them, it means your subfloor is moving more than the grout can handle. You might need a flexible caulk in those areas instead of hard grout. We call this a change of plane joint. Every corner in a shower where two walls meet, or where the wall meets the floor, should be caulk, not grout. Grout will always crack in a corner. It is a law of physics. If you have grout in your corners, you do not have a waterproof shower. You have a leak waiting to happen.
“Grout is not waterproof; it is merely a filler. The membrane behind the tile is the only thing keeping your house from rotting.” – TCNA Handbook AXIOM
The ghost in the expansion gap
Expansion gaps hidden under baseboards are often filled with construction debris, which negates their purpose and leads to floor failure. Clearing these gaps and using flexible transitions ensures the longevity of both the tile and the grout sealer. When I am installing, I see guys sweep their thin-set scraps and dust right into the expansion gap at the edge of the room. They figure the baseboard will cover it. That debris is uncompressible. When the floor tries to expand, it hits that rock-hard junk and the pressure goes right back into the tile. This is how you end up with grout that turns to powder. You need to keep those gaps clean. If you are doing a bathroom remodel, check out showers that wow modern designs for 2025 and notice how they handle transitions. They do not use bulky T-moldings if they can help it. They use clever recessed profiles or flexible sealants. This keeps the aesthetic clean while allowing the floor to move. It is the same with grout. You want a high-performance, polymer-modified grout if you are using cement. Or better yet, go with an epoxy or a single-component resin grout. These materials are naturally non-porous. They do not even need a sealer. They are harder to install because they are sticky and have a short working time, but they are bulletproof. If you are tired of the steam test and tired of scrubbing, epoxy is the answer. It is more expensive and it takes a real pro to handle it, but it will never stain and it will never leak.
Your restoration checklist
- Clean the grout thoroughly with a pH-neutral oxygenated cleaner to remove all surface oils.
- Perform the steam test on multiple areas including high-traffic zones and corners.
- Allow the grout to dry for at least twenty four hours until the moisture content is below five percent.
- Apply a high-quality penetrating sealer using a brush or applicator to saturate the joints.
- Wipe away excess sealer from the tile surface within ten minutes to prevent hazy residue.
- Check the perimeter expansion gaps and ensure they are not filled with hard debris.
- Inspect the baseboards for signs of water wicking or swelling at the bottom edges.
Final inspection of your flooring system
The reality of flooring is that it is an engineering challenge disguised as a finish trade. You cannot have a beautiful floor without a perfect subfloor. You cannot have a durable shower without a science-backed sealing strategy. If you take anything away from my thirty years of experience, let it be this. Do not trust the marketing on the box. Trust the steam. If the water goes in, the sealer is out. Keep your showers clean, keep your baseboards dry, and always respect the expansion gap. If you find that your grout is beyond saving, it might be time for how to refresh grout without replacing it techniques that involve color-sealing. Color-sealer is a specialized epoxy coating that sits on top of old grout to both refresh the color and provide a permanent seal. It is a great way to save a floor that was poorly maintained. But moving forward, do it right the first time. Use a moisture meter. Grind your high spots. Use a penetrating sealer that actually penetrates. Your house will thank you twenty years from now when the subfloor is still as dry as a bone. If you have questions about your specific layout, you can always contact us for a professional evaluation. We have seen every failure imaginable and we know how to fix them for good. Keep your trowel flat and your levels true.