The Ugly Gap: How to Scribe Baseboards to an Uneven Bathroom Floor
Most guys skip the leveling compound. They think the underlayment will hide the dip. It won’t. I spent three days grinding concrete on a job last month just so the floor wouldn’t click like a castanet. The homeowner thought they could just slap some MDF trim over a wavy tile floor and call it a day. I told them the truth. If you do not scribe your baseboards, you are just building a highway for moisture and dust to live under your walls. Most bathroom floors are not flat. Between the slope for the shower drain and the settling of the house joists, you are lucky if you find a straight line anywhere near the toilet. Scribing is the only way to make a floor look like it was born into the house rather than forced there. It is the difference between a contractor who cares and a guy with a truck and a nail gun.
The physics of the wavy bathroom floor
Bathroom floors become uneven due to joist deflection, concrete slab shrinkage, and the weight of heavy fixtures like cast iron tubs. Scribing allows the baseboard to follow these natural contours by removing material from the bottom of the trim. This ensures a tight fit against the tile or stone surface without using massive amounts of caulk. Understanding the structural movement of your home is the first step in a successful bathroom renovation. In older homes, the floor joists often bow in the center of the room. This creates a dip that is impossible to hide with a straight piece of wood. When you add layers of thin-set and heavy porcelain tile, the weight increases the deflection. You need to account for this 1/8 inch or 1/4 inch dip when you set your trim. If you ignore it, your baseboard will sit high in the corners and show a dark, ugly gap in the middle of the wall. This gap is not just an aesthetic problem. In a high-moisture environment like a bathroom, that gap allows water from a splashing tub or a cleaning mop to seep under the wall plate. Once moisture hits that raw wood or drywall, mold is the next guest at the party. You have to seal that transition. Scribing is how you do it right. It involves using a compass to trace the exact topography of the floor onto your baseboard material. By cutting along that line, you create a custom-fit edge that hugs every high and low spot in the tile.
“A floor is only as good as the subfloor beneath it; deflection is the enemy of every joint.” – Master Flooring Axiom
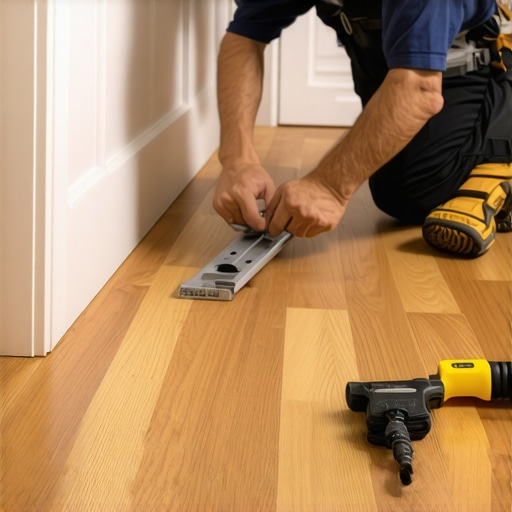
Tools for the precision scribe
A successful scribe requires a high-quality compass, a sharp pencil, and a jigsaw with a fine-toothed blade designed for scrolling. You also need a block plane or a belt sander for fine-tuning the back-bevel of the cut. Without the right tools, you will end up with a jagged edge that looks worse than the gap you started with. Professional installers often use a dedicated scribing tool with a brass wheel. This wheel rolls over the high spots of the tile while the pencil marks the wood. It provides more stability than a standard school compass. You also need to consider the material of your baseboard. If you are working with chic baseboard designs that transform rooms in 2025, you might be dealing with solid poplar or moisture-resistant MDF. Each material reacts differently to the jigsaw. Pine can splinter if your blade is too aggressive. MDF produces a fine dust that is hazardous if you do not wear a mask. PVC is great for wet areas but can melt if your blade speed is too high. You want a blade with at least 20 teeth per inch (TPI) to get a smooth finish on your scribe. Here is a breakdown of the essential equipment for this task.
| Tool Name | Primary Function | Pro Tip |
|---|---|---|
| General Compass | Tracing floor height | Keep the pencil tip sharp for a 0.5mm line. |
| U-Shank Jigsaw | Cutting the scribe line | Always cut on the waste side of the line. |
| Block Plane | Back-beveling the edge | Shave the back at a 45-degree angle. |
| Leveling Bar | Identifying high spots | Check the floor 6 inches out from the wall. |
| Pica Marker | Marking dark surfaces | Use white lead for dark tile or wood. |
The step by step scribing protocol
Follow this sequence to achieve a zero-gap fit between your trim and your flooring. Always start from the most visible corner and work your way toward the hidden areas like the space behind the toilet or vanity. Precision in the first piece ensures the rest of the room stays aligned. Many people make the mistake of measuring the wall and cutting the length before scribing. This is a mistake. Always scribe the height first. If the floor is very uneven, scribing the height might change the overall length of the board as it settles into a dip. Here is the professional checklist for a perfect scribe.
- Level the baseboard against the wall and find the widest gap between the wood and the floor.
- Set your compass to the exact width of that widest gap.
- Keep the compass vertical and drag the point along the floor while the pencil marks the board.
- Use a jigsaw to cut along the pencil line at a slight inward angle called a back-bevel.
- Test fit the board and use a block plane to remove high spots for a snug finish.
- Seal the bottom edge with a moisture-resistant primer before final installation.
Why your subfloor is lying to you
Subfloors often appear flat to the naked eye but contain micro-fluctuations caused by joist expansion and uneven adhesive application. These deviations are amplified once you install large-format tiles or luxury vinyl planks. When I talk about the chemistry of a floor, I am talking about how the thin-set cures. If a tiler used a 1/2 inch notched trowel but didn’t collapse the ridges properly, you end up with a tile that sits a fraction of an inch higher than its neighbor. This creates a lippage problem. When your baseboard hits that lippage, it kicks the bottom of the board out. This is why you cannot just nail it and hope for the best. You are fighting the physics of a rigid material meeting a bumpy surface. In bathrooms with showers that wow modern designs for 2025, the floor is often pitched toward a linear drain. This means your baseboard is essentially sitting on a ramp. Scribing is the only way to make the top of the baseboard remain level while the bottom follows the pitch of the drain. It is about geometry. You are turning a rectangle into a complex polygon that mirrors the floor topography.
“Every 1/8 inch of deflection in a floor joist will result in a 1/4 inch gap at the baseboard if scribing is ignored.” – Structural Flooring Standards
The 1/8 inch that ruins everything
A gap of just one-eighth of an inch is enough to break the visual continuity of a room and allow air infiltration. In a bathroom, this gap acts like a vacuum for hair, skin cells, and humidity. It is where the grout meets the wall, and it is the most vulnerable point for water damage. People spend thousands on grout restoration secrets for long-lasting results, but they forget that the baseboard transition is part of that system. If the baseboard is not tight to the tile, the caulk joint will eventually fail. Caulk is flexible, but it cannot bridge a massive gap forever. It will shrink and pull away from the wood. When you scribe a baseboard, you are minimizing the amount of caulk needed. A thin bead of high-quality silicone-acrylic caulk is all you should need to finish the job. If you find yourself reaching for a huge tube of ‘Big Stretch’ just to fill a hole, you didn’t scribe it well enough. Go back to the saw. The back-bevel is the secret. By cutting the bottom of the board at a 30 to 45-degree angle toward the back, you ensure that only the very front edge of the wood touches the tile. This makes it much easier to shave off tiny amounts of wood with a plane until the fit is perfect.
Material selection and moisture resilience
The choice of trim material dictates how well the scribe will hold up against the high humidity of a bathroom environment. Solid wood like poplar is the gold standard for pros because it cuts cleanly and resists rot better than cheap pine. However, in modern homes, PVC baseboards are becoming more common for wet zones. When looking for baseboards makeover ideas to elevate your space, consider the environment. In a dry climate like Phoenix, wood will shrink and expand significantly between the summer monsoons and the dry winters. This movement can pull a scribe away from the floor. In a humid place like Houston, the wood might swell and press into the tile. This is why acclimation is vital. You should never scribe a board that has just come off the truck. Let it sit in the bathroom for 48 to 72 hours. This allows the cellular structure of the wood to reach equilibrium with the room’s moisture levels. If you scribe a ‘wet’ board, your perfect fit will disappear within a month as the wood dries and curls. This is the molecular reality of flooring that most DIYers ignore. They want the ‘look’ now, but they get the ‘gap’ later.
Grout lines and their impact on trim
Grout lines create a series of miniature valleys that can snag the bottom of a baseboard if the scribe is not handled with care. Large format tiles with 1/16 inch grout lines are easier to trim than traditional 12×12 tiles with 1/4 inch sand-filled grout joints. When you are dragging your compass across a floor with deep grout lines, the point will drop into every joint. This creates a ‘sawtooth’ pattern on your pencil line. You should not follow every single grout dip with your jigsaw. Instead, you want to smooth out those transitions so the baseboard bridges the grout but hugs the tile. If your grout is old and crumbling, you might need how to refresh grout without replacing it before you start your trim work. A solid foundation is necessary for a clean scribe. Once the board is cut, you should apply a clear sealer to the bottom of the wood. This prevents the raw grain from sucking up any moisture that might sit in the grout lines. It is a small step that adds ten years to the life of the installation. Professionalism is found in the details that no one sees once the paint is dry.
Regional climate factors in floor movement
Regional humidity levels directly affect the expansion and contraction rates of both subfloors and baseboards. In the Pacific Northwest, the constant dampness means you need to leave a slightly larger expansion gap behind the baseboard, even if the bottom scribe is tight. In the desert Southwest, the extreme dry heat will cause wood to brittle and shrink. If you are installing in an area with high radiant heat use, the floor itself will expand and contract more than a standard subfloor. You must use a flexible adhesive or a floating installation method that allows for this movement. Scribing is not just about making things look pretty; it is about engineering a solution that accounts for the environment. Whether you are using eco-friendly tile solutions for sustainable homes in 2025 or traditional marble, the physics of the house remain the same. The house is a living thing that breathes and moves. Your trim is the skin that has to stretch and move with it. If you nail your baseboards too tightly into the studs without allowing for vertical movement, you might find that the scribe line lifts off the floor when the seasons change. It is a delicate balance of pressure and precision.
Finishing and caulking for longevity
A properly scribed baseboard requires only a hair-thin line of caulk to be completely waterproof and visually seamless. Use a siliconized acrylic caulk that is paintable. Avoid pure silicone for trim work because paint will not stick to it, and it is much harder to clean up. Apply the caulk in a continuous bead and wipe it with a damp finger or a specialized tool to push it into the micro-gaps. This final seal protects the work you did with the jigsaw. If you followed the steps correctly, your baseboard should look like it is submerged in the tile. There should be no visible shadows or daylight beneath the wood. This is the hallmark of a master installer. It takes more time, and it requires more patience than the average person has, but the result is a bathroom that looks high-end regardless of the budget. Don’t let an uneven floor ruin your remodel. Grab your compass, sharpen your pencil, and cut the line. It will buckle if you don’t. It will rot if you don’t. Scribe it right the first time.”, “image”: {“imagePrompt”: “A close-up shot of a master floor installer using a brass scribing compass to mark a white poplar baseboard against an uneven slate tile bathroom floor. The installer has sawdust on his hands and is using a sharp carpenter pencil. High detail on the wood grain and the texture of the grout lines.”, “imageTitle”: “Professional Scribing Technique for Bathroom Trim”, “imageAlt”: “A carpenter scribing a baseboard to a wavy tile floor in a bathroom.”}, “categoryId”: 12, “postTime”: “2023-10-27T10:00:00Z”}
Comments
2 responses to “The Ugly Gap: How to Scribe Baseboards to an Uneven Bathroom Floor”
This post really highlights how crucial detailed scribing is for a professional finish, especially in bathrooms where moisture is a concern. I’ve noticed that using a brass wheel scribing tool significantly improves accuracy when dealing with uneven tiles or grout lines, compared to just a standard compass. It’s amazing how a little extra effort with these tools can make a big difference visually and functionally. I also found that letting the baseboards acclimate as suggested prevents warping or gaps down the line, which is something many DIYers overlook. Has anyone here experimented with different types of sealants or caulk to improve long-term moisture resistance? I’ve had some success with hybrid silicone/latex options that make touch-ups easier, especially in high-moisture zones. Would love to hear if others have tried any specific brands or techniques to ensure durability in these tricky environments.
I really appreciate this detailed breakdown of scribing to accommodate uneven bathroom floors. In my experience, taking the time to do this meticulous work pays off immensely in the long run—not only visually but also for longevity and moisture management. One thing I’ve found helpful is sealing the bottom of the scribed baseboard with a high-quality, water-resistant primer before painting. It acts as an extra barrier against potential moisture infiltration, especially in high humidity areas like bathrooms. Also, for materials, I’ve had good results with moisture-resistant MDF in trending designs, but I always make sure to acclimate the boards for a few days to prevent warping once installed. Regarding sealants, do you have any brand recommendations? I’ve used a few different silicone and hybrid options, but I’d be interested to hear which have been most effective for people in this kind of environment. This post really underscores the importance of precision—a little extra effort here can save a lot of headaches later on.