
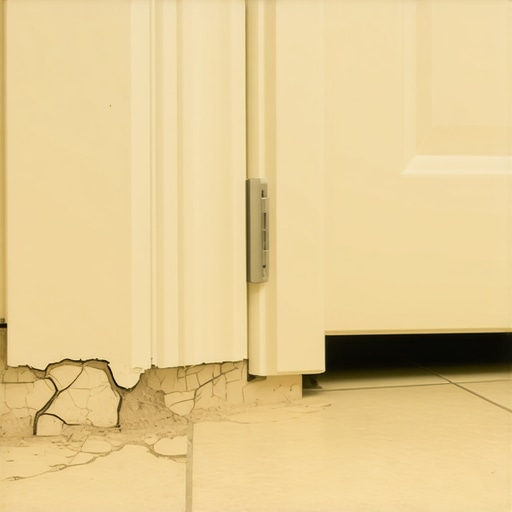
The structural lie of the doorway transition
Bathroom tile cracking near the door frame occurs because of subfloor deflection, lack of expansion joints, and differential movement between the wet zone of the bathroom and the dry structural framing of the hallway. These failures typically stem from a subfloor that does not meet the L/360 deflection standard required for rigid ceramic or porcelain installations. Most guys skip the leveling compound. They think the underlayment will hide the dip. It won’t. I spent three days grinding concrete on a job last month just so the floor wouldn’t click like a castanet. That specific job was a nightmare because the homeowner thought a thick layer of thin-set would act as a leveler. It does not work that way. Thin-set is an adhesive, not a structural filler. When it shrinks during the curing process, it creates voids. When you walk through a doorway, you are exerting concentrated point-load pressure on the exact spot where the floor is most likely to flex. If there is a void under that tile, it will snap. It is a mathematical certainty. You can look at the grout restoration secrets for long lasting results to see how to fix the aesthetic, but if the structural problem remains, the crack will return in six months.
The ghost in the expansion gap
Expansion gaps are non negotiable spaces left at the perimeter of a tile installation to allow for the natural movement of the building envelope. When tile is butt-jointed against a door jam or a transition strip without a 1/8 inch gap, the tile has nowhere to go when the house breathes. Houses are living organisms. They expand in the summer and contract in the winter. If your tile is locked against the wood framing of a door, the pressure transfer will cause the tile to tent or crack. We see this most often in bathrooms where the humidity is constantly fluctuating. This humidity affects the wood subfloor more than the tile. The wood swells, pushes against the rigid tile, and the tile loses the battle. You need to ensure your baseboards makeover ideas to elevate your space include a plan for these gaps. Covering the gap with a baseboard or a shoe molding allows the floor to move freely underneath without showing an ugly line. If you grout the tile directly to the door casing, you are asking for a fracture. Use a 100 percent silicone caulk that matches your grout color at these transition points. Silicone is flexible. Grout is a rock. Rocks break when they are squeezed.
“A floor is only as good as the subfloor beneath it; deflection is the enemy of every joint.” – Master Flooring Axiom
Why your subfloor is lying to you
Subfloor integrity is determined by the spacing of the floor joists and the thickness of the plywood or OSB panels used as the base layer. A 3/4 inch plywood subfloor over joists spaced 16 inches on center is the industry standard, but even this can fail if the bathroom layout places a heavy vanity or a cast iron tub near the doorway. The shear stress at the doorway is unique. It is the transition point between two different structural zones. I have seen countless DIY jobs fail because they used a standard thin-set over a single layer of plywood. You need a second layer of underlayment grade plywood or a cement backer board to increase the rigidity. Even better, use an uncoupling membrane. These membranes allow the subfloor to move independently of the tile. It is like a shock absorber for your floor. If you are dealing with moisture issues from showers that wow modern designs for 2025, that moisture can migrate through the grout and soften the subfloor near the door. Once that wood loses its stiffness, the tile above it is doomed. You must use a moisture meter. If your subfloor reads above 12 percent moisture content, do not lay tile. You are just burying a problem that will rot your investment from the bottom up.
The 1/8 inch that ruins everything
Precision in tile spacing near door frames is the difference between a lifetime floor and a five year failure. Most installers get lazy when they reach the door. They try to make complex cuts around the casing instead of undercutting the jamb. If you do not undercut the door jamb, you cannot get the tile and the underlayment far enough under the wood to hide the expansion gap. This forces you to grout right up to the wood. That grout will crack within weeks. I always use a jamb saw to cut the wood at the height of the new tile. This allows the tile to slide underneath. It looks cleaner and provides the structural relief the material needs. This is especially true when integrating chic baseboard designs that transform rooms in 2025. The baseboard should sit slightly above the tile, never pinched tight against it. Pinching the tile prevents it from shifting during seismic or thermal events. It is about physics. A rigid material like porcelain cannot absorb energy. It can only transmit it. If it cannot transmit that energy into a flexible joint, it will dissipate it by cracking.
| Material Type | Flexibility Rating | Best Use Case |
|---|---|---|
| Standard Grout | Very Low | Main floor areas |
| Epoxy Grout | Medium | High moisture showers |
| Silicone Caulk | Very High | Transitions and door frames |
| Modified Thin-set | High | Large format porcelain |
The chemistry of a failed bond
Modified thin-set adhesives use polymers to create a flexible bond that can withstand the micro movements of a bathroom floor. If you used a dry set mortar without additives, the bond is too brittle. Doorways are high traffic zones. The impact of a heel or the weight of a person stepping into the room creates a vibration. Over time, this vibration breaks the bond between the mortar and the tile if the mortar cannot flex. This is called delamination. Once the tile is loose, it acts like a lever. Every time you step on one side, the other side lifts. This movement eventually snaps the tile or the surrounding grout. If you are looking to fix this, check out how to refresh grout without replacing it, but remember that fresh grout won’t stick to a loose tile. You have to pop the tile, scrape the old mortar, and re-set it with a high quality polymer-modified adhesive. It is a messy, difficult job that could have been avoided with the right chemistry on day one. Always look for ANSI A118.11 or A118.15 ratings on your thin-set bags. Anything less is just sand and cement.
“Tile is a rigid finish on a flexible structure; without an isolation membrane, the house wins every time.” – The Installer Code
- Check subfloor moisture levels with a pin meter.
- Ensure joist spacing meets L/360 deflection standards.
- Undercut all door jambs for a clean, floating fit.
- Use 100 percent silicone in all change of plane joints.
- Apply a crack isolation membrane over the doorway area.
Moisture migration and the doorway trap
Water from the shower often travels under the tile through capillary action and settles at the lowest point, which is frequently the doorway transition. Even if you have showers with a style trendy ideas for small bathrooms, the waterproofing must extend beyond the wet area. If the threshold is not properly sealed, water gets under the tile. It saturates the thin-set and the subfloor. This constant wetting and drying cycle weakens the adhesive. Eventually, the tile pops. This is why I always recommend eco friendly tile solutions for sustainable homes in 2025 that include high quality waterproof membranes. These membranes act as a secondary barrier. They keep the water in the tile layer and away from the structural wood. If your grout is constantly damp near the door, you have a leak or a moisture migration problem. You can try tile cleaning tips for a sparkling bathroom in 2025 to clear the mildew, but you are just treating the symptom. The disease is underneath. You need to pull the transition strip and check for dampness. If the wood is black or soft, the tile cracking is just the beginning of your problems. Structural rot is much more expensive than a few cracked tiles. Do the work right the first time. Level the floor. Use the right thin-set. Leave the expansion gaps. Your knees and your wallet will thank you later. If you have questions about specific materials, you can always contact us for expert advice on your next renovation project. Stop looking for shortcuts. There are no shortcuts in flooring. There is only the right way and the way you have to do twice. Use your head and follow the standards. The TCNA handbook is not a suggestion. It is the law of the land for anyone who calls themselves a pro. If your installer does not know what an uncoupling membrane is, find a new installer. It is that simple. Protect your home and your investment by respecting the physics of the building. Your bathroom floor is a structural system. Treat it with the respect it deserves. Learn more about our policies on the privacy policy page if you want to know how we handle your data during consultations. Keep your subfloor dry and your grout lines thin. That is the secret to a floor that lasts a century. If you skip the prep, you are just building a failure. Get your level out. Check the joists. Grind the humps. Fill the dips. Only then can you start laying the tile that will stay beautiful for decades. It is hard work, but it is the only way to ensure those cracks never come back to haunt your doorway again. Stop blaming the tile and start looking at the ground beneath it. The answer is always in the subfloor. Always. This is the reality of the trade. If you want a floor that stands the test of time, you have to build it from the joists up. No amount of expensive tile can hide a cheap foundation. Build it right or do not build it at all. That is my philosophy. It has served me well for twenty five years on my knees. Follow these steps and you will never have to look at a cracked tile near your door frame again. It is about discipline and attention to detail. Every eighth of an inch matters. Every pound of thin-set matters. Do not let the small things ruin the big picture. Your home deserves better than a cracked floor. Take the time to do the prep and you will see the difference in the final product. It is the hallmark of a true master. Anything else is just a hobby. Be a professional and build a floor that lasts. That is the only way to sleep well at night knowing the job is done. Your bathroom is a high stress environment for building materials. Do not underestimate it. Use the best products and the best techniques to ensure success. It is the only way to win the war against moisture and movement in the bathroom. Good luck with your project. Built to last is the only standard that counts in my shop. Stick to the plan and you will be fine. Don’t cut corners. Just cut the tile. And do it with a wet saw. Keep the dust down and the quality up. That is how we do things in this business. Now get to work and fix that floor correctly once and for all. You have the knowledge now. Use it.